Introduction
A guide for Bitcoin home miners on setting up their BlackBox and handling their mining rewards in a privacy-preserving manner before going to cold storage. Mining Bitcoin goes hand in hand with self-custody, the miner provides a Bitcoin address in order to receive the rewards and the mining pool pays out to the provided address. This guide aims to demonstrate setting up a new BlackBox install and a few tools that can be used to handle the mining rewards in a way that helps maintain the anonymity gained from mining and sees that through to cold storage.
This guide covers:
Section 1: COLDCARD
- Checking the tamper-evident bag
- Setting up a PIN
- Generating a seed phrase with some dice rolls
- Backup recommendations
Section 2: BlackBox
- Prepare your BlackBox and suggestions for sound treatment
- Miner pressure barrier
- Connecting power and Ethernet
Section 3: Slush Pool
- Creating a mining account
- Connecting to the pool
- Configuring a payout address
Section 4: Sparrow Wallet
- Getting started
- Creating a hot wallet
- How to use Whirlpool
- Import COLDCARD Watch-Only wallet
- Configure Whirlpool to deposit directly to COLDCARD
- Air-gapped signing with the COLDCARD
Section 1: COLDCARD
This section will show you how to:
- Check the tamper-evident bag
- Setup a PIN
- Generate a seed phrase with some dice rolls
- Backup recommendations
Checking the tamper-evident bag:
Upon receiving your COLDCARD, ensure that the tamper-evident bag has not been compromised. If anything seems amiss or if you have any problems contact support@coinkite.com. Visually inspect the surfaces and edges of the bag for indications of tampering, openings, or damage.
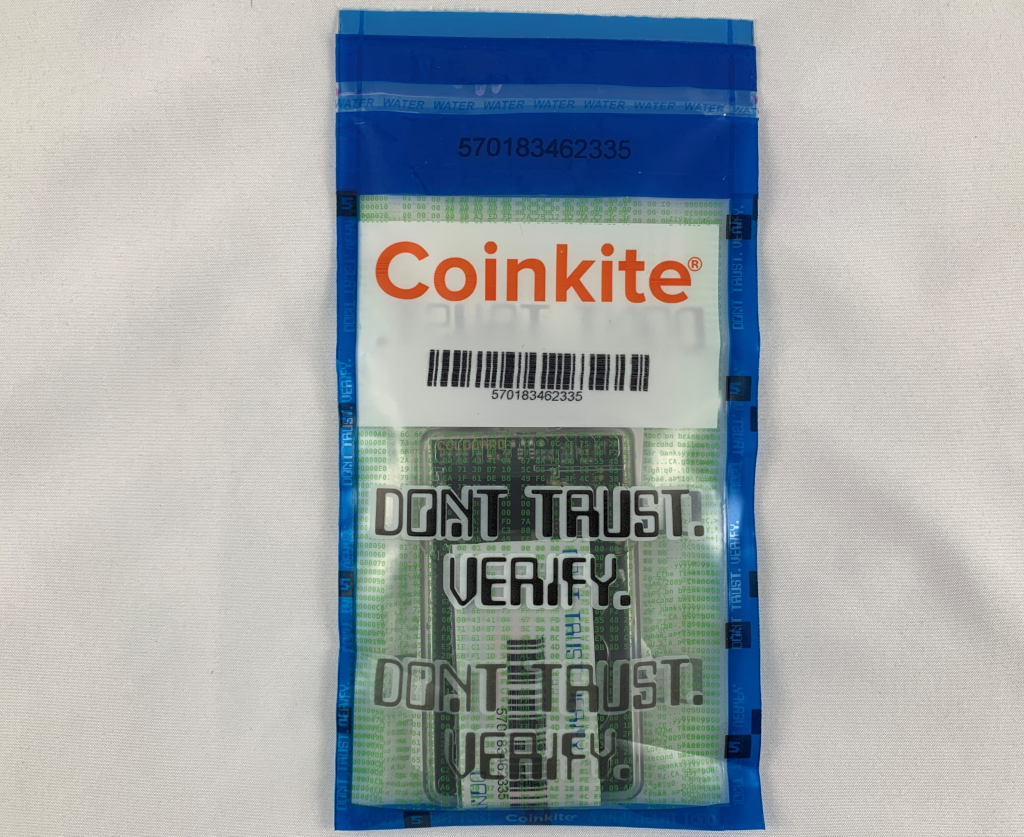
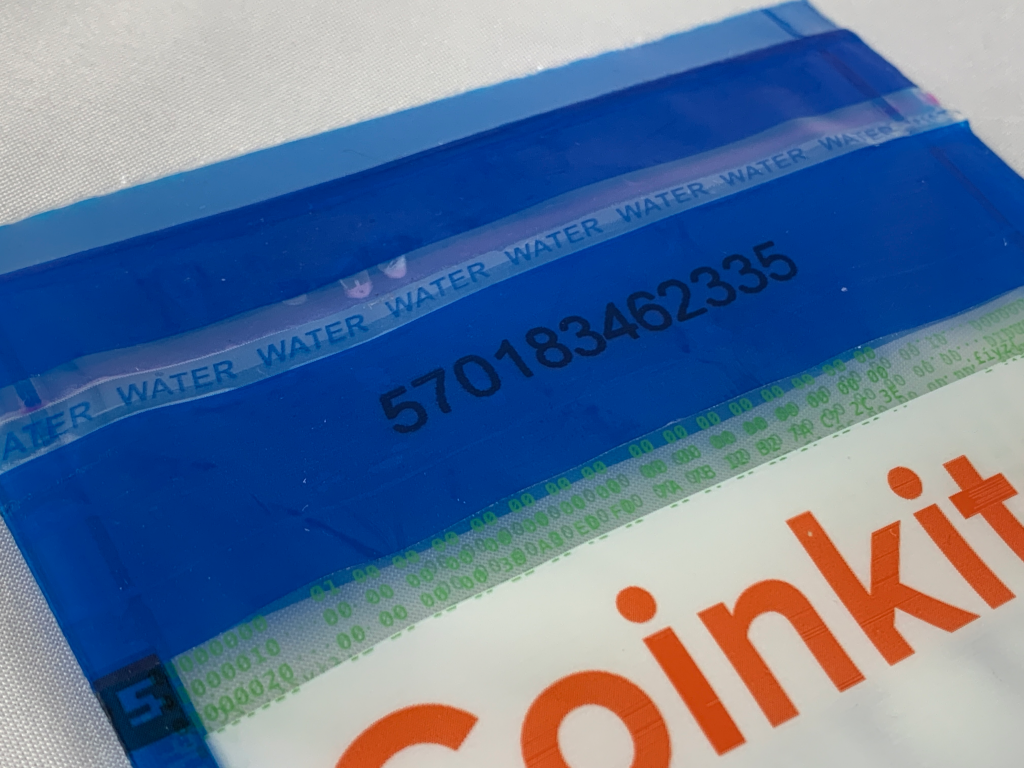
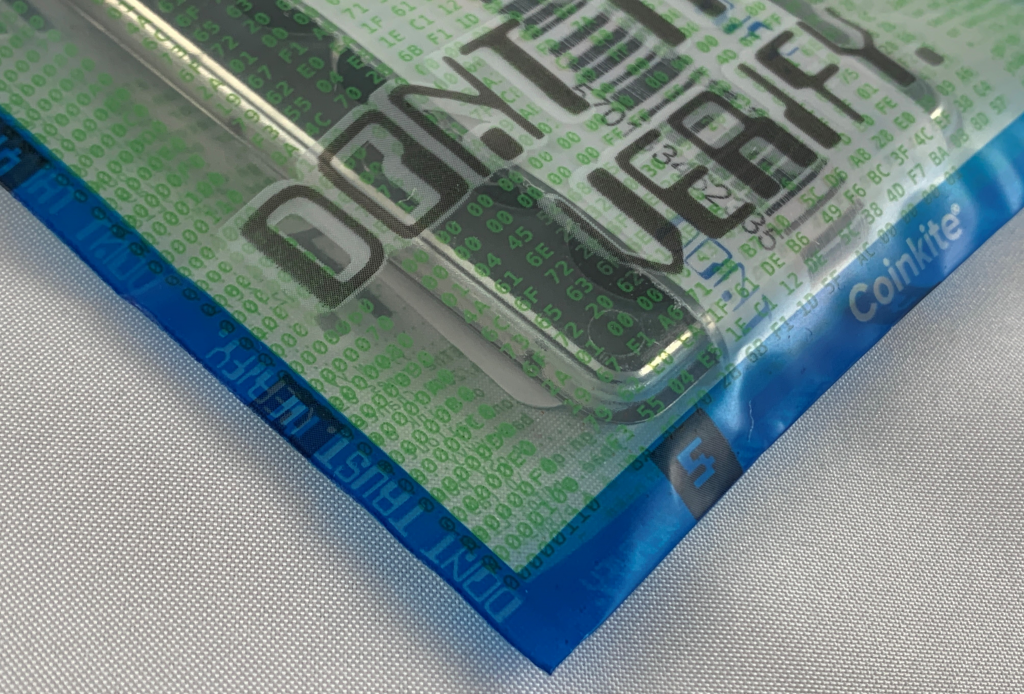
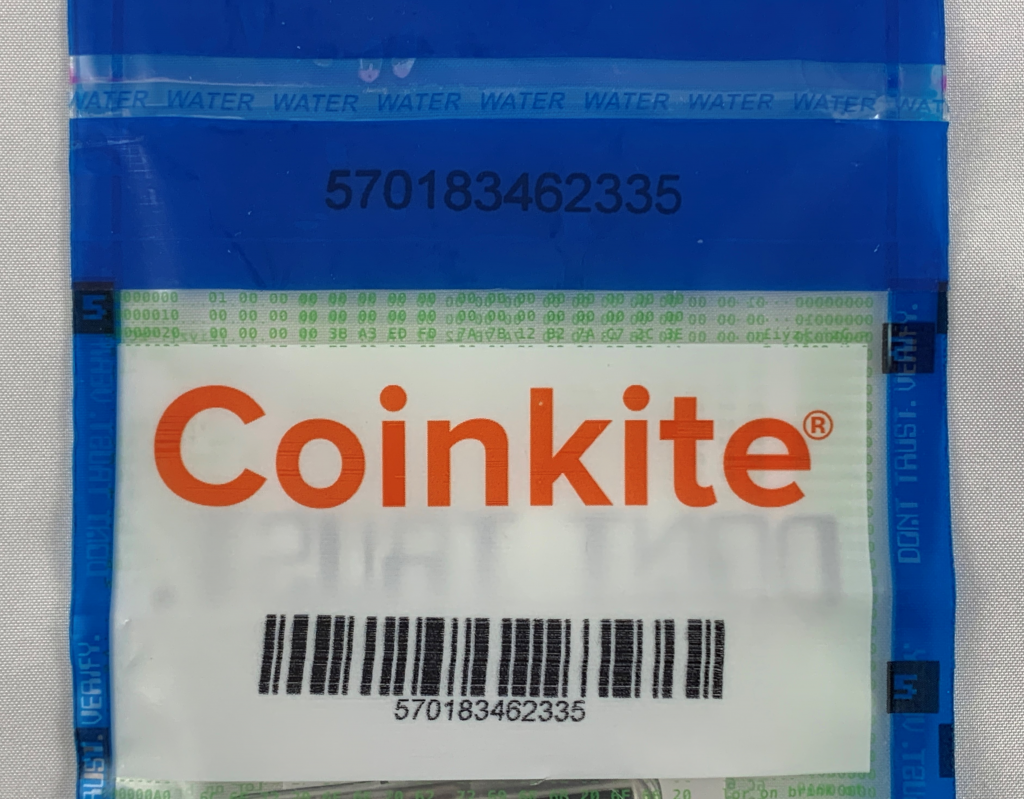
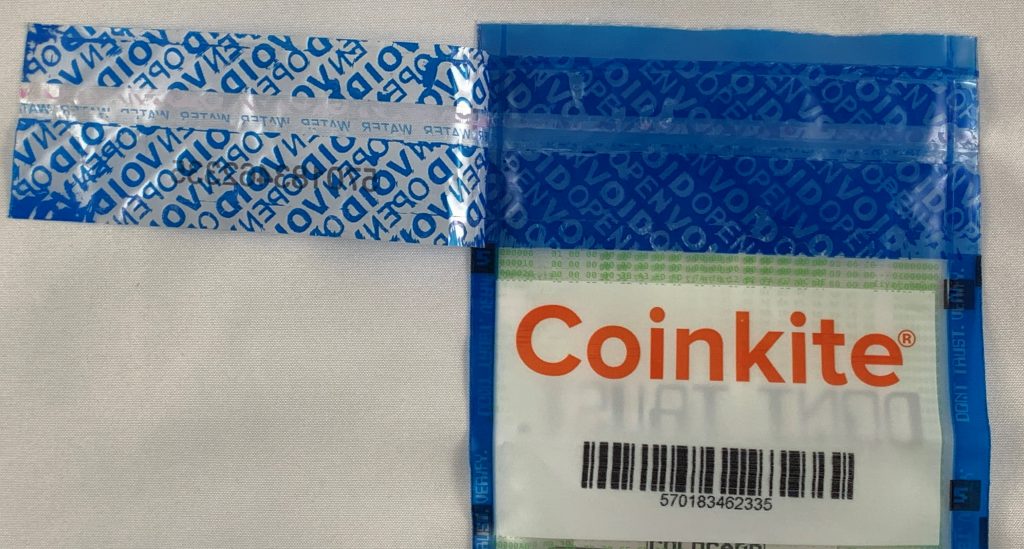
You will see the tamper-evident words “VOID” appear when the seal is opened. Inside you will find your new COLDCARD, the Wallet Recovery Backup Card, sticker(s), and an additional copy of the bag number which should match the bag number printed on the outside of the bag.
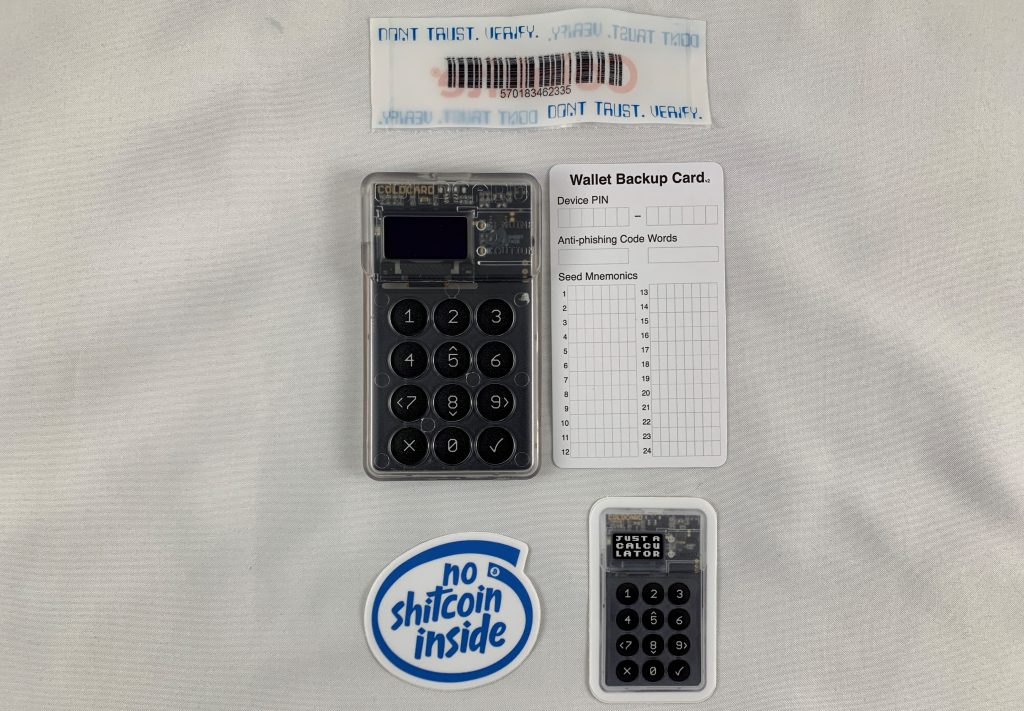
If everything looks good, then you are ready to power on your new COLDCARD and get it setup.
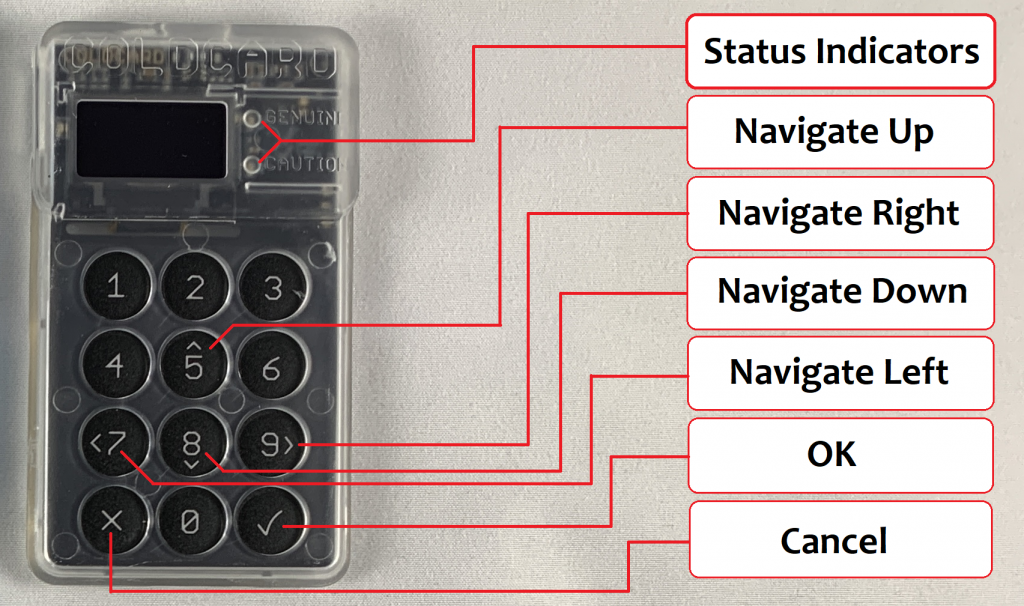
Here is a diagram you can reference to learn the COLDCARD’s navigation:
Setting up a PIN
A great security feature of the COLDCARD is that it can be used completely air-gapped. Meaning that you never have to connect it to a computer, although that option is there if you choose to use it. You can use a standard USB outlet transformer or even a 9v battery with the COLDPOWER adaptor, which Coinkite offers here. To power on the COLDCARD simply connect a USB to micro-USB cable to the port on top of the COLDCARD and the other end to the USB port on your COLDPOWER adaptor & 9v battery.
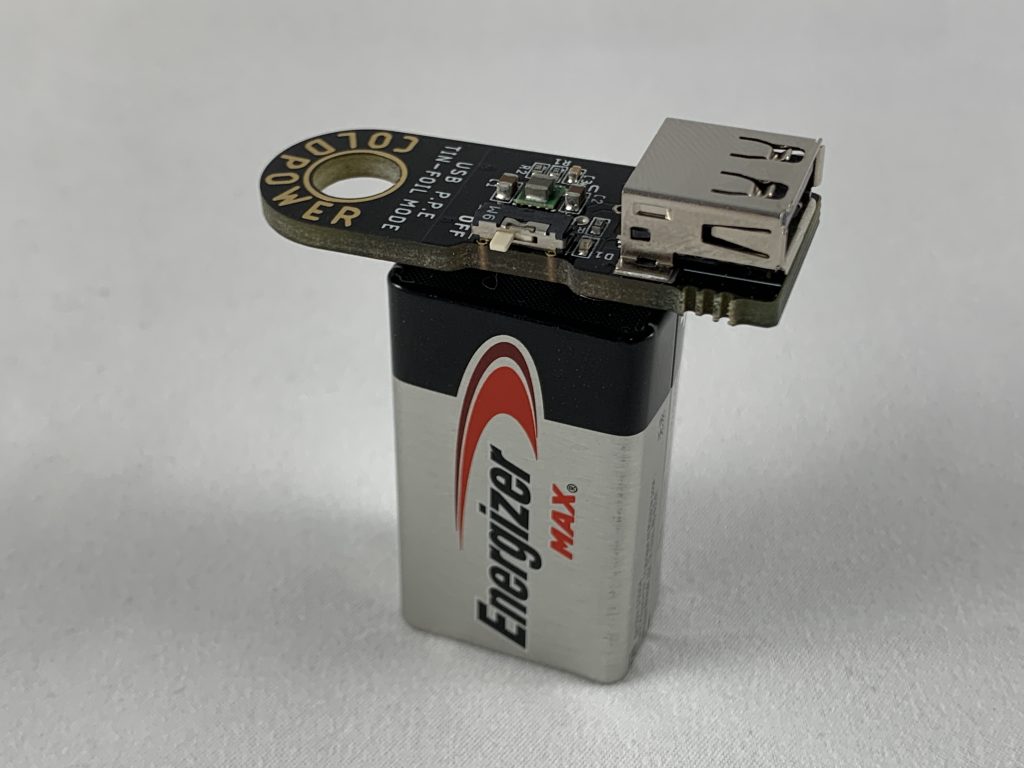
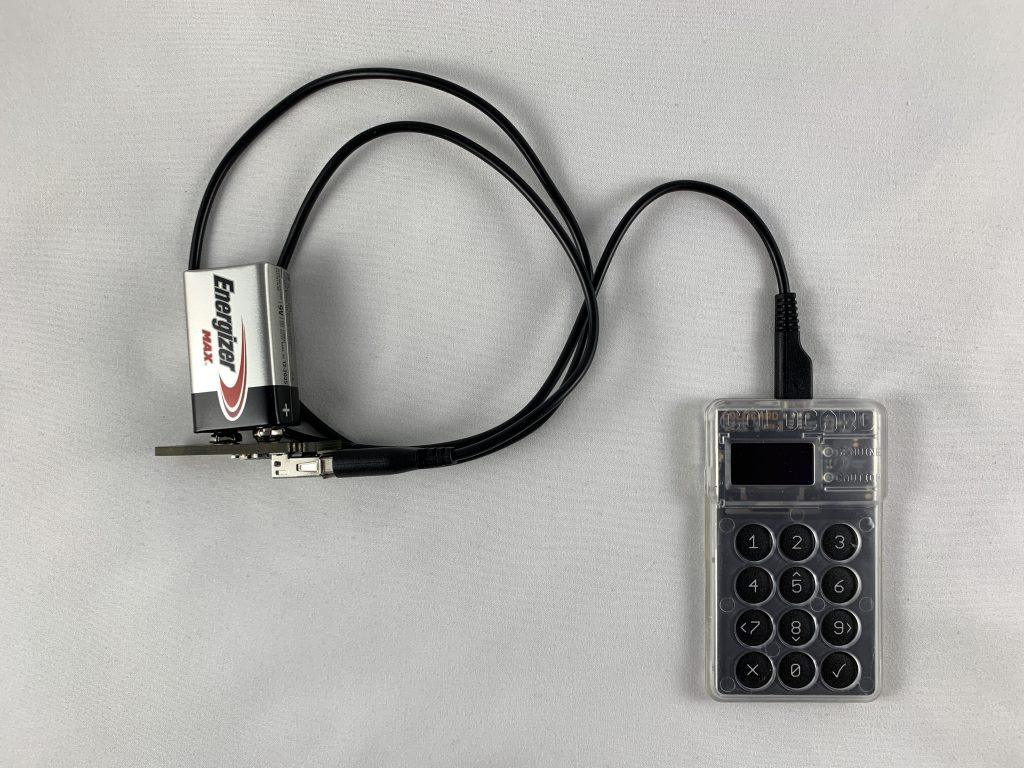
Once powered on, first read and accept the terms of sale & use. Then you will be asked to confirm the bag number. If there are any discrepancies, contact support@coinkite.com.
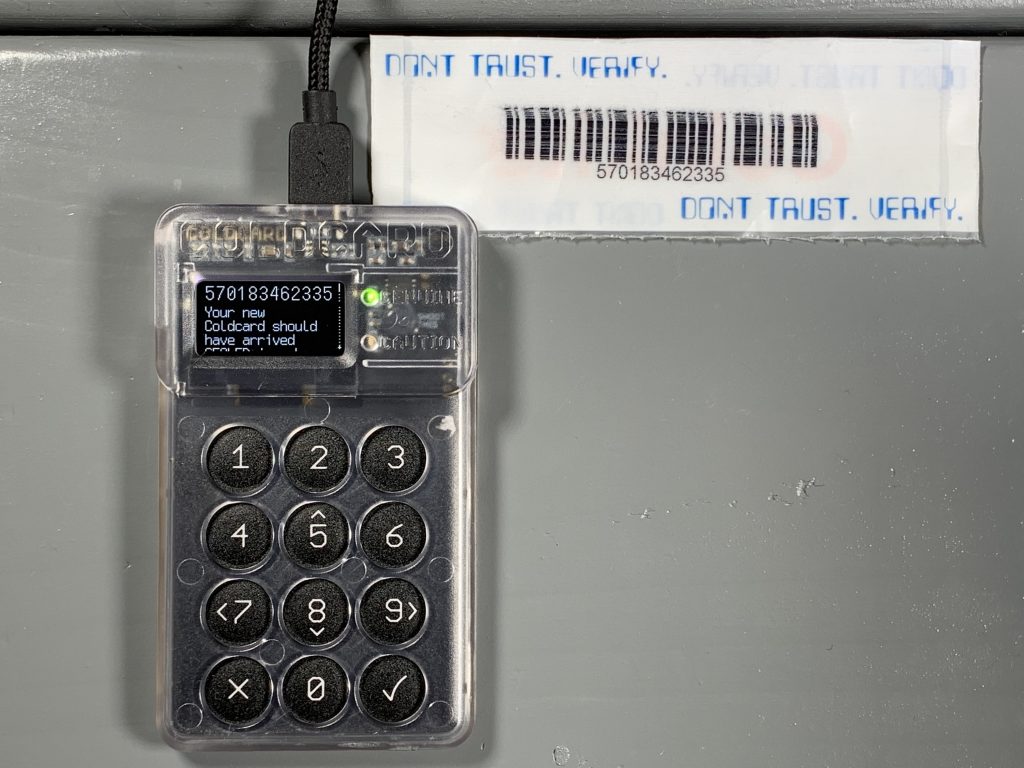
Make careful considerations with your PIN number. You don’t want to use one that is easy to guess. Your PIN will have two parts, a prefix and suffix. The way the PIN works after you set it all up is that once you enter the prefix, you will be presented with two anti-phishing words. If the words are the same as the original words presented to you at initial setup, then you know that your COLDCARD has not been tampered with since the last time you accessed it. After confirming the anti-phishing words, you then enter the PIN suffix and if all is correct you will be permitted access to the COLDCARD.
First, select Choose PIN Code, then you will see a brief description of how the PIN code works. Each part of your PIN code can be between 2 and 6 digits. There is absolutely no way to access a forgotten or lost PIN. Also, if you enter a PIN incorrectly too many times, it will brick your COLDCARD as a security feature.
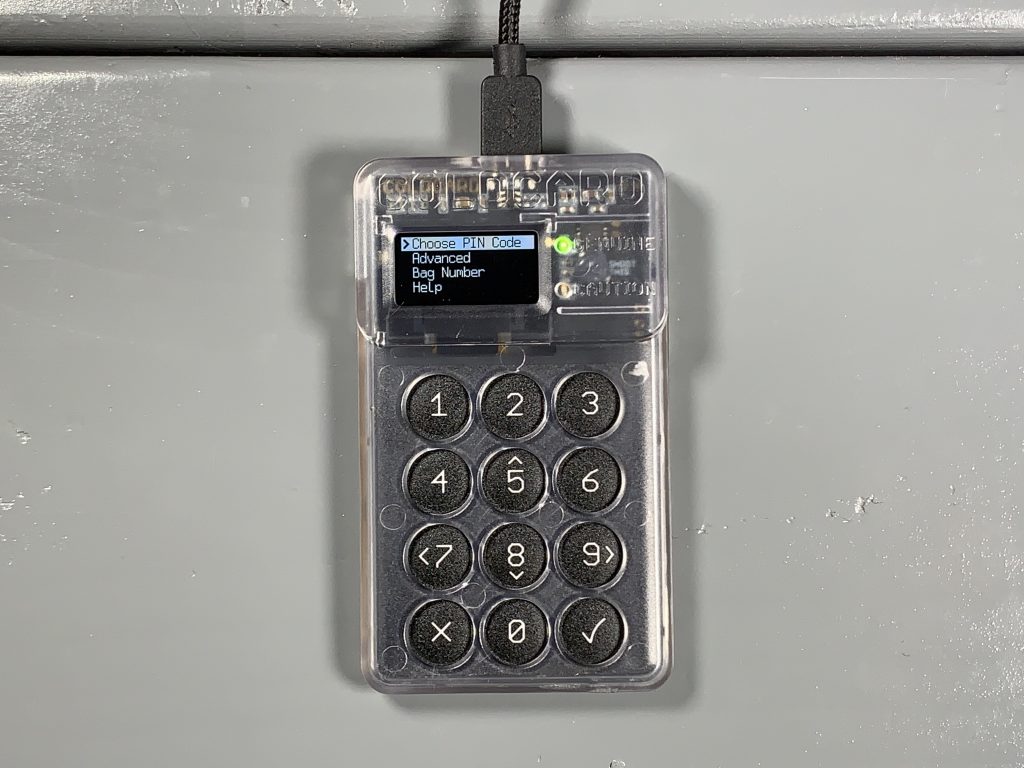
After hitting OK you will get one more warning about the risk of losing or forgetting your PIN. After reading that, you can enter your PIN prefix. Use the included note card to write down your PIN prefix then hit OK.
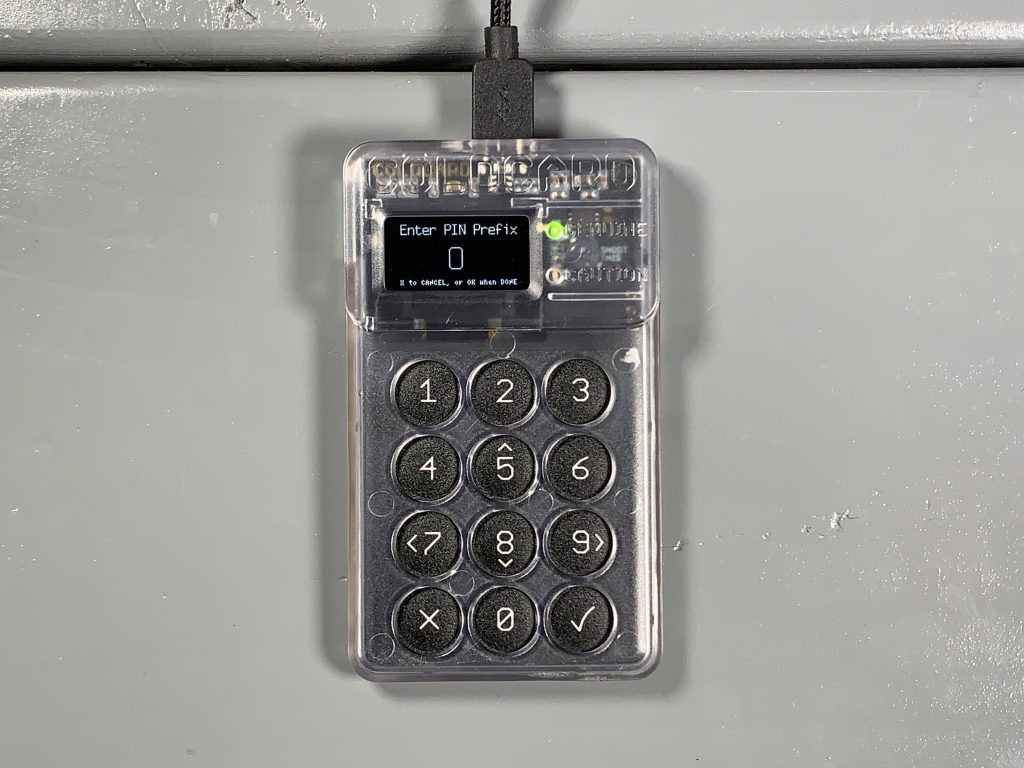
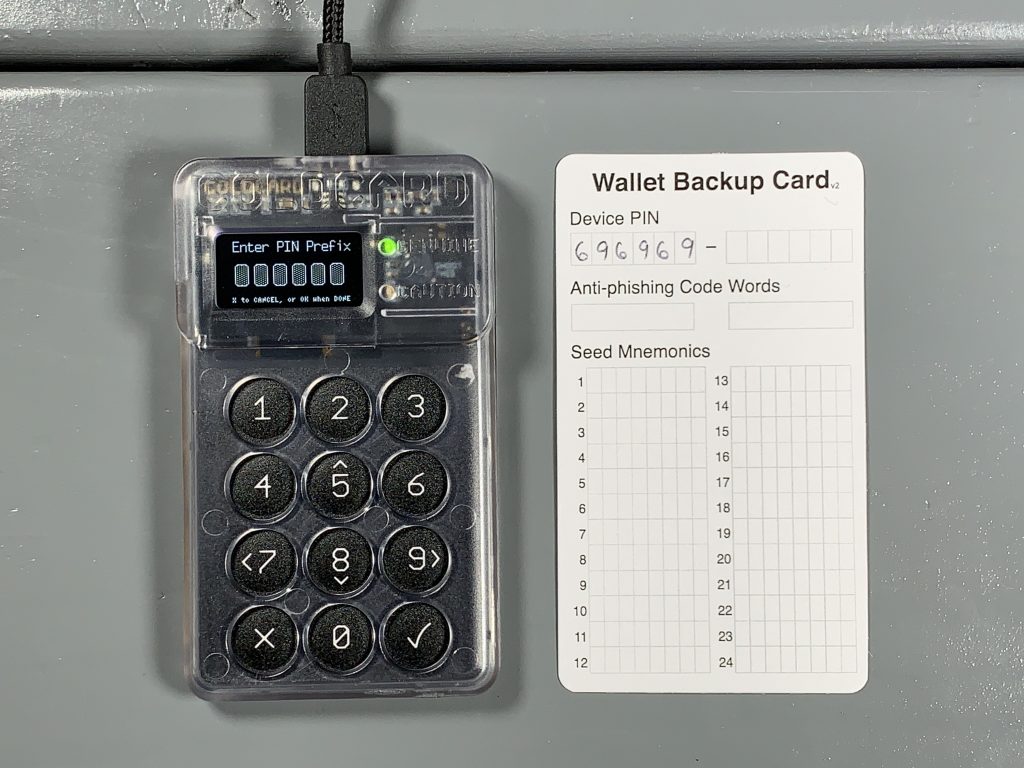
Next you will be presented with your two anti-phishing words. Write these down on your note card.
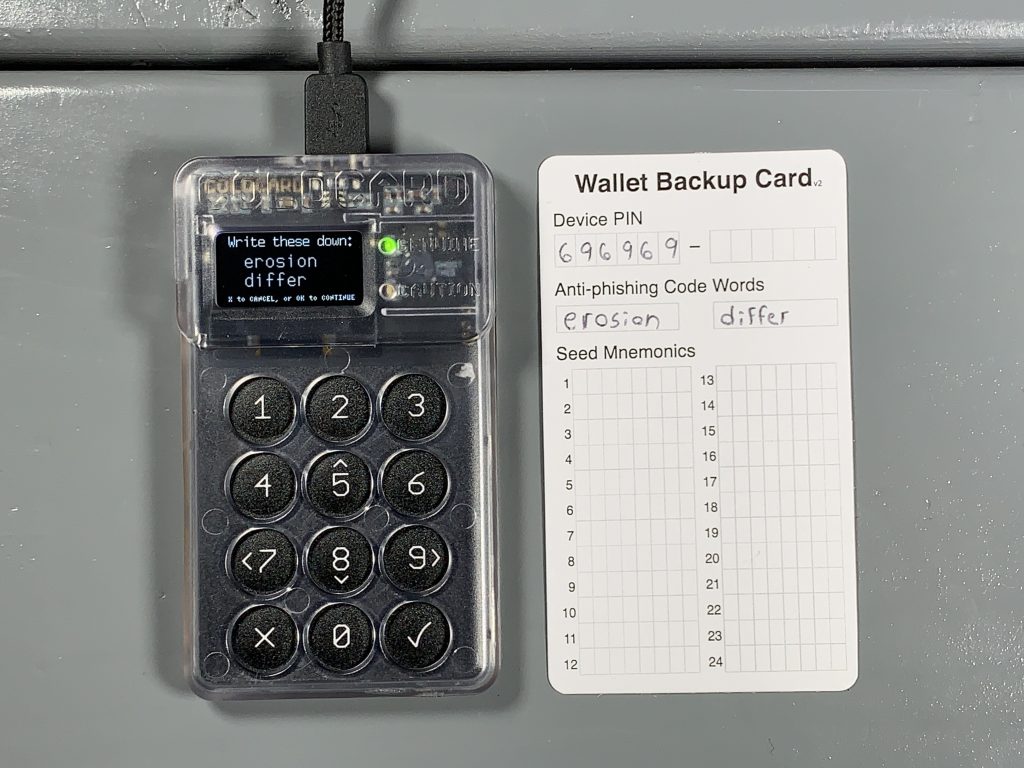
Next, enter your PIN suffix, then write it down on the note card and hit OK.
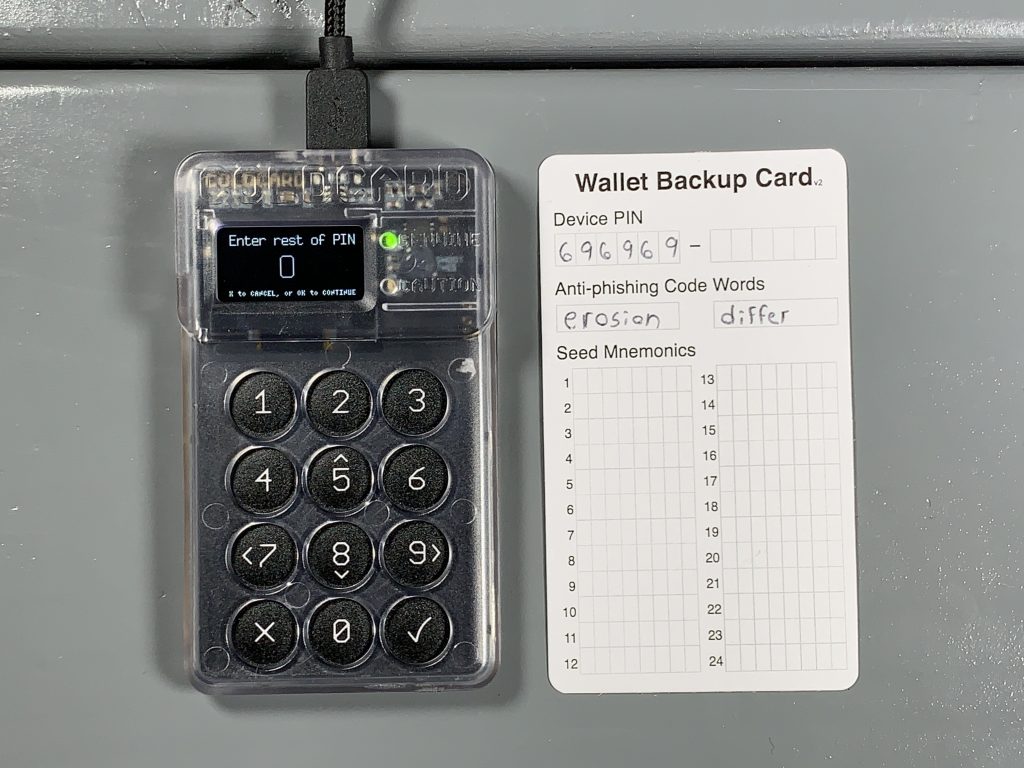
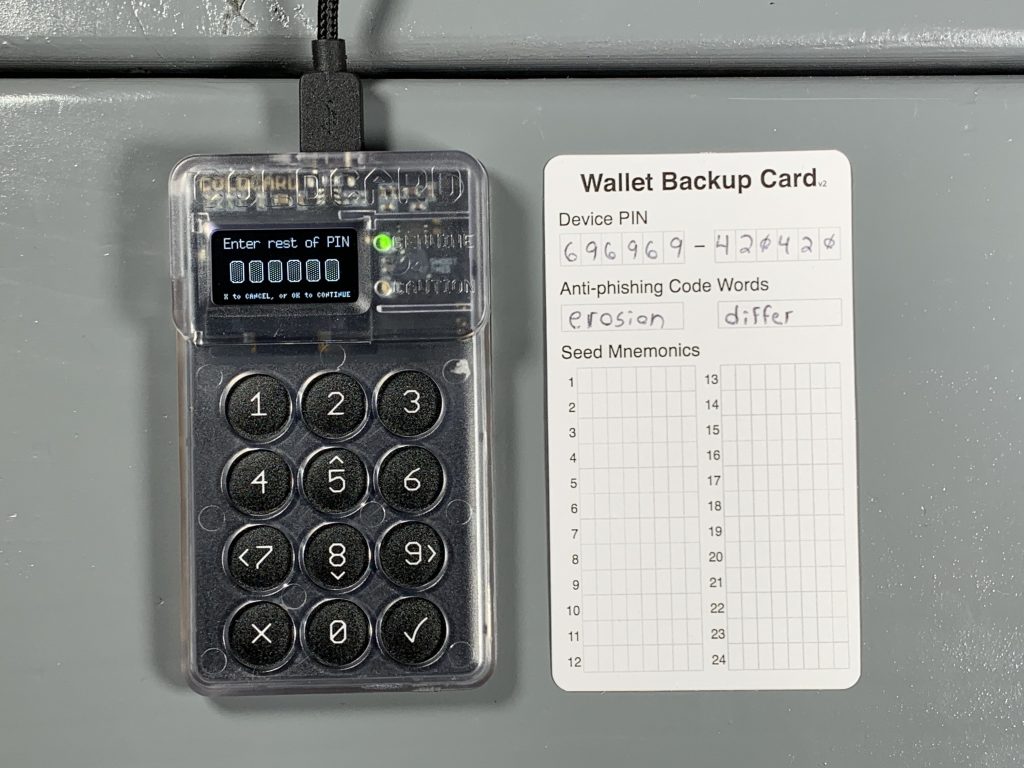
Then you will be asked to re-enter your PIN prefix, confirm the two anti-phishing words, and enter your PIN suffix. The COLDCARD will save that information and then open up the wallet where you can generate your seed phrase.
Generating a seed phrase
There are a couple considerations you may want to make when creating a seed phrase. For example, COLDCARD will generate a seed phrase for you by default, as shown in the Ultra Quick guide. However, maybe you don’t trust the True Random Number Generator (TRNG) in your COLDCARD, you can introduce some of your own randomness using a six sided dice and combine that with the COLDCARD’s TRNG entropy. If you still don’t trust the COLDCARD is doing what it purports to be doing then you can generate additional entropy with dice rolls and even verify the dice roll math as shown in the Paranoid guide.
In the steps below you will see how to introduce your own entropy using a six sided dice combined with the TRNG entropy from the COLDCARD to generate your seed phrase. After setting up the PIN, you should be at the COLDCARD main menu. Select New Wallet and after a moment you will be presented with 24 words. However, to introduce your own dice roll randomness, scroll down to the bottom of the word list and select 4 to add some dice rolls.
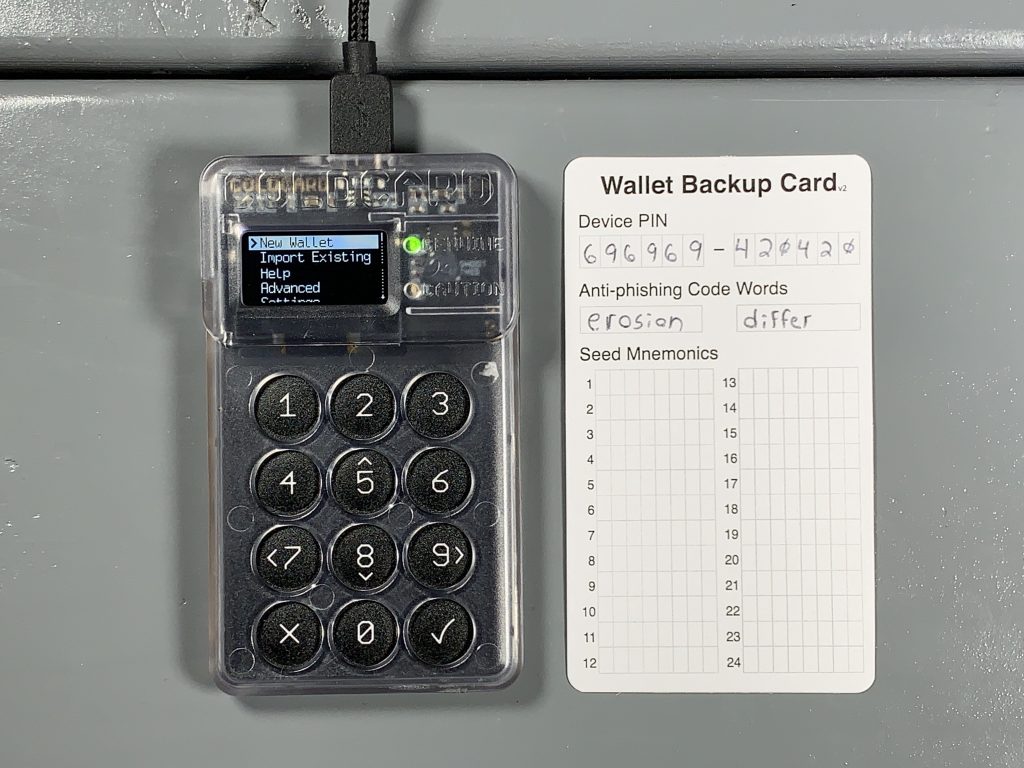
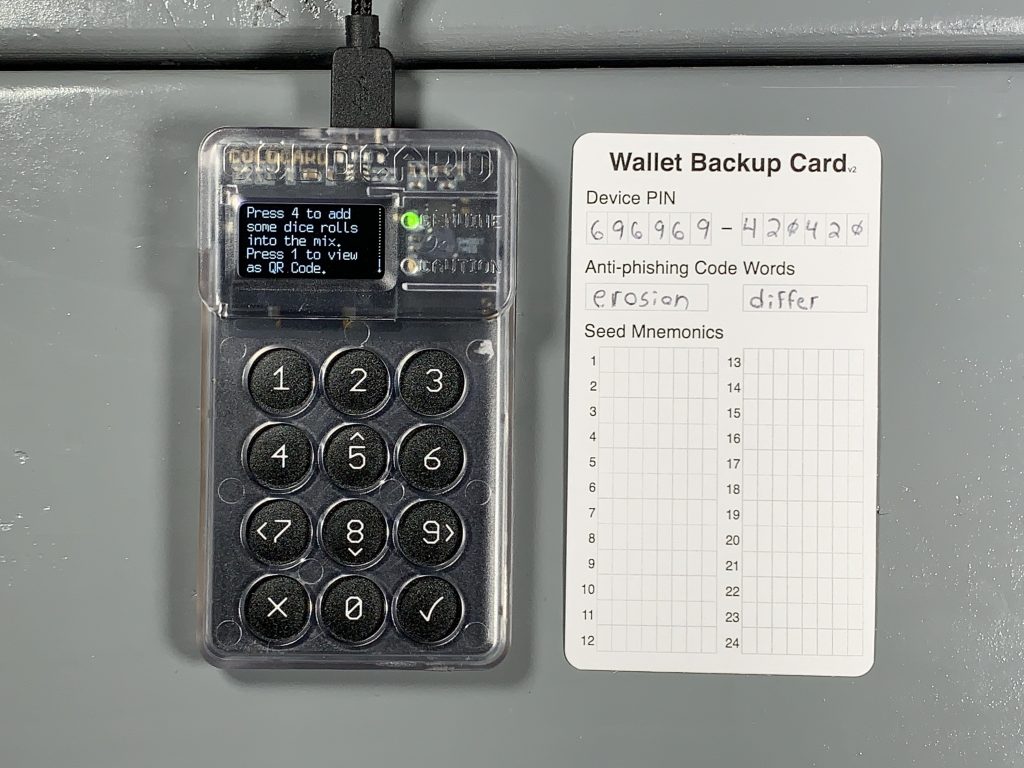
Each 6-sided dice roll is equivalent to 2.58 bits of entropy (log2(6)). For reference, it would take the world’s most powerful supercomputer trillions of years to brute force a 256 bit key. The COLDCARD’s TRNG has already picked 256 random bits at this point, but each time you roll, you are adding 2.58 bits of entropy over those bits. So roll the dice and enter the corresponding number for each roll. Repeat this process as much as you want. Then hit OK.
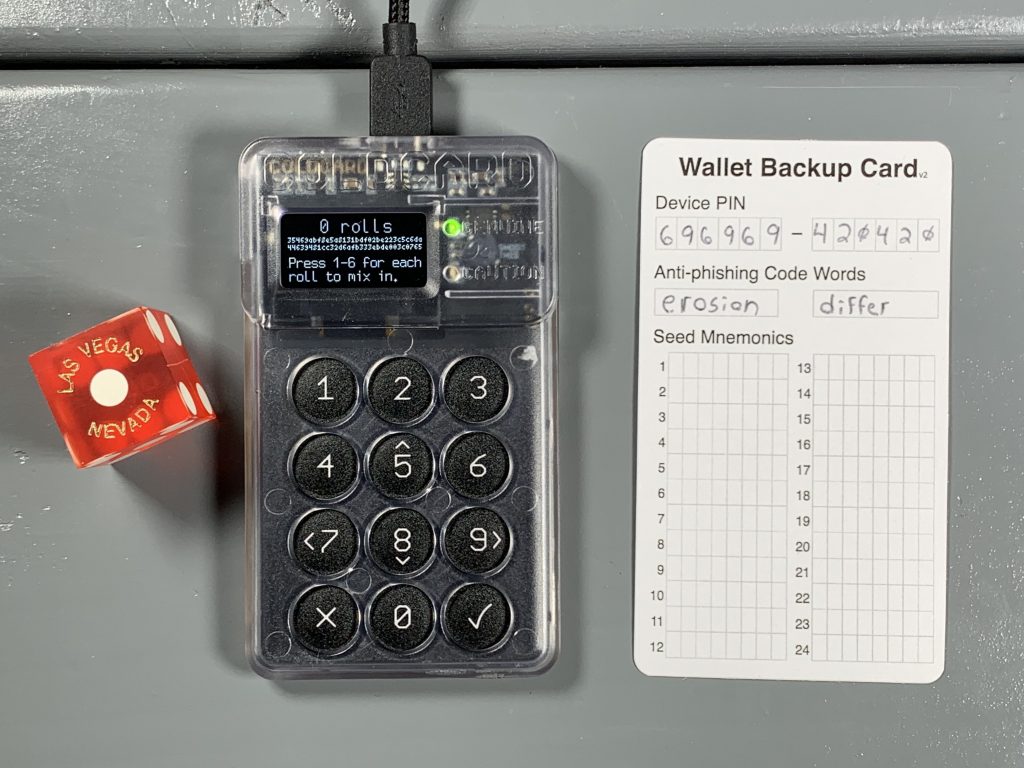
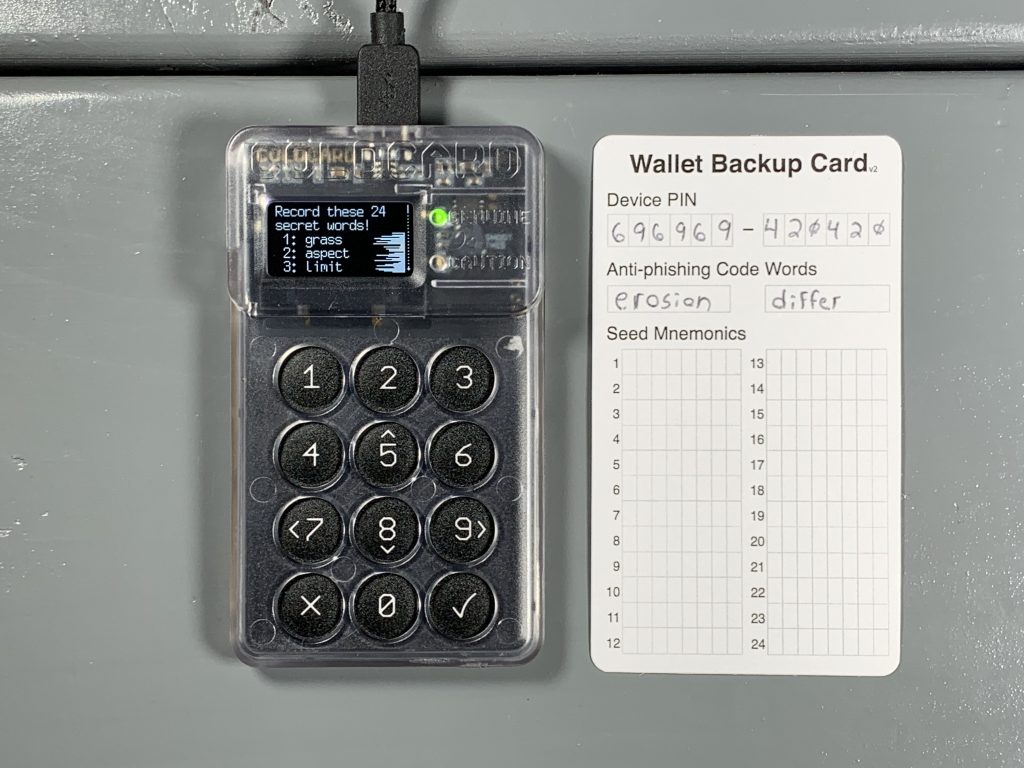
Now you will be presented with a new list of 24-words. Write these words down in order on your note card. Then double check your work.
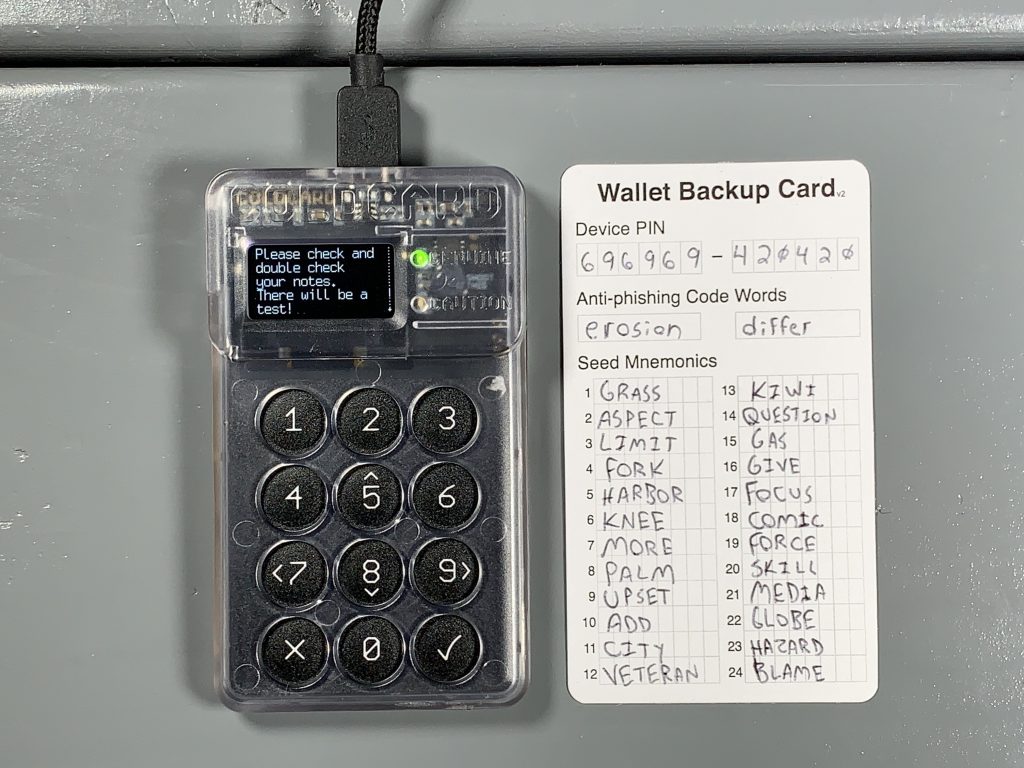
Next, you will be asked to take a test to prove you wrote the words down correctly.
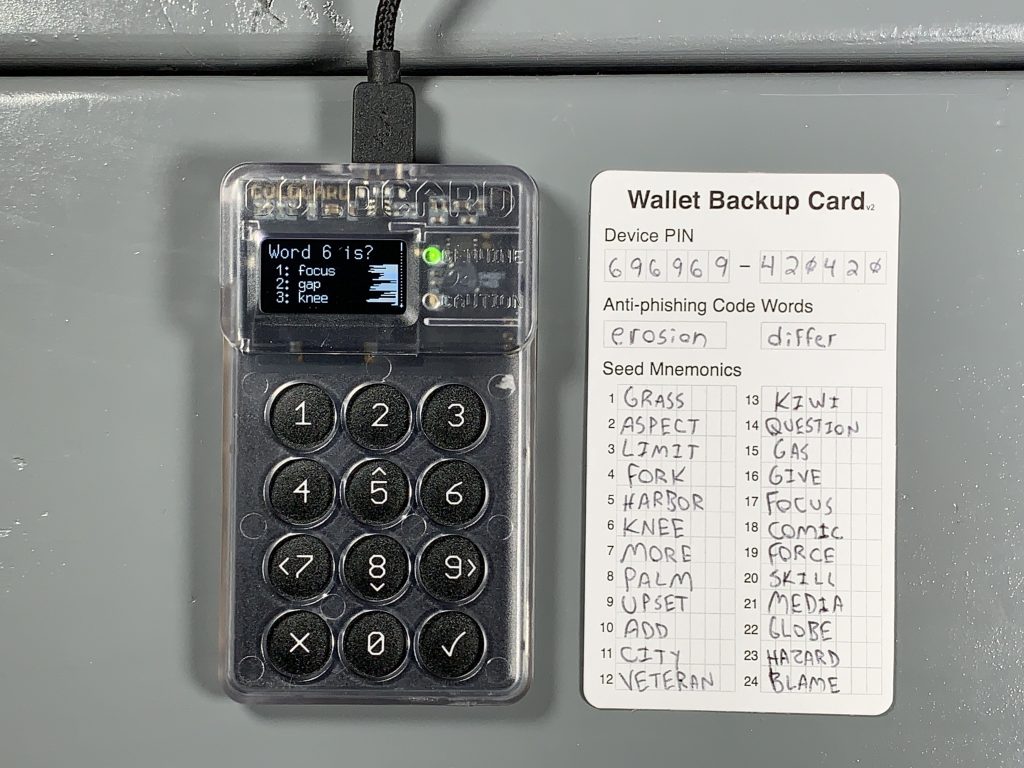
After passing the test, you will be at the COLDCARD’s main menu. Best practice is to test your backup information before depositing any bitcoin. The basic idea is to use only your written backup information in an attempt to restore your wallet. If all of your backup information is correct and you successfully restore your wallet then you know that you can recover any bitcoin deposited to that wallet with that backup information. First you need a way to identify your wallet. Your newly generated wallet has a unique fingerprint which you can find from the main menu by navigating to Advanced > View Identity. You will find a unique 8-character fingerprint such as 99E870EF. Write that fingerprint down. Now you can destroy the seed on your COLDCARD by again navigating to Advanced then Danger Zone > Seed Functions > Destroy Seed. Then you will be presented with a couple of warnings, after confirming, your seed will be destroyed and you will be brought back to the login page where you enter your PIN. Log back into your COLDCARD and from the main menu navigate to Import Existing > 24 words and then start entering your seed words in order from your backup card. Start by scrolling down until you see the first letter of your word, then scroll down to the next nearest part of the word, and keep narrowing down the search until you arrive at the word you need. For example, t > th > thr > throw then hit OK and repeat the process for the next word. If you make a mistake, you can hit Cancel to go back and re-select a word. After you enter the 23rd word, COLDCARD will compute a list of 8 possible options for your 24th word. Select your 24th word from that list. If you do not see your 24th word on that list then you either made a mistake entering the first 23-words or you wrote down your backup information incorrectly. After selecting the 24th word and hitting OK the seed will be applied and then you can navigate back to Advanced > View Identity and confirm the fingerprint is correct.
Your COLDCARD is ready to start receiving deposits, set it aside for now and after Sparrow Wallet is all setup then you can import the XPUB to deposit straight to the ColdCard from Whirlpool. If you are interested in adding the additional security of a passphrase to your COLDCARD wallet, then check out the Paranoid guide. A passphrase will add an additional layer of security to your seed phrase, it is like adding a 25th word that is only known to you.
Backup recommendations
Careful considerations should be made in regards to how the wallet backup information will be stored. The information required for a proper backup varies depending on how the wallet was setup. These requirements may be only 24-words for a simple wallet or the requirements can include 24-words, a passphrase, master fingerprint, derivation path, and more. There are several options when it comes to picking a storage medium, each has its own set of trade offs. Writing the 24-words on paper is a good start and helps mitigate the risks associated with having a digital copy of the backup information. With the backup information written down on paper, an adversary would need physical access to the paper in order to retrieve the information. Where as a photo, text file, or other digital medium can be copied and replicated and shared quickly.
The trade off with paper backups is that they do not withstand fire or flooding very well. This is where steel backups come into play. Robust backups made from stainless steel can withstand fire temperatures beyond the range of a typical house fire, up to 1,500°C. Also stainless steel backups can withstand being submerged in water for extended periods of time. There is a wide range of steel backups available. Coinkite offers the SEEDPLATE which gives users a robust backup option that is resistant to fire and flooding as well as easy to conceal.
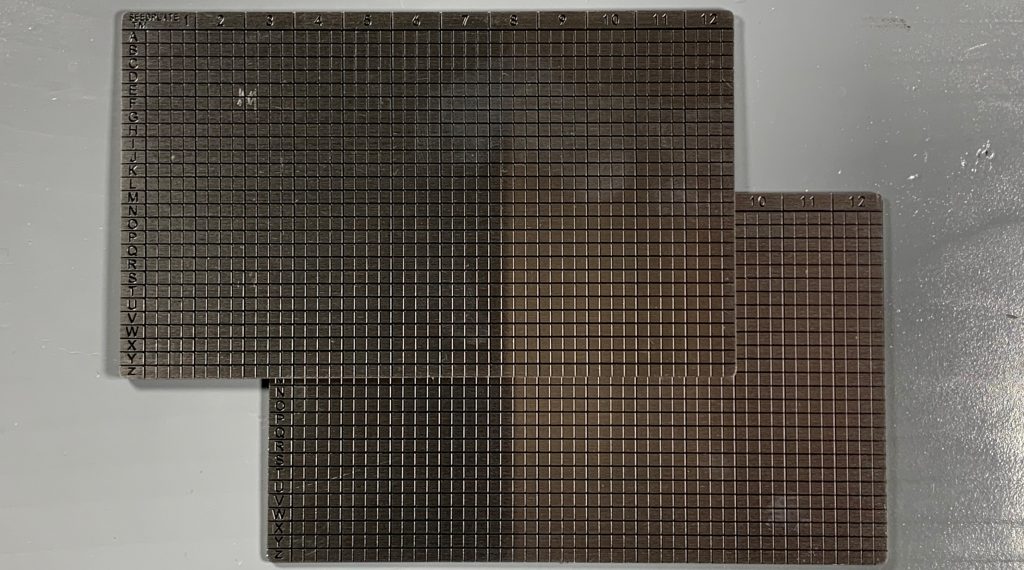
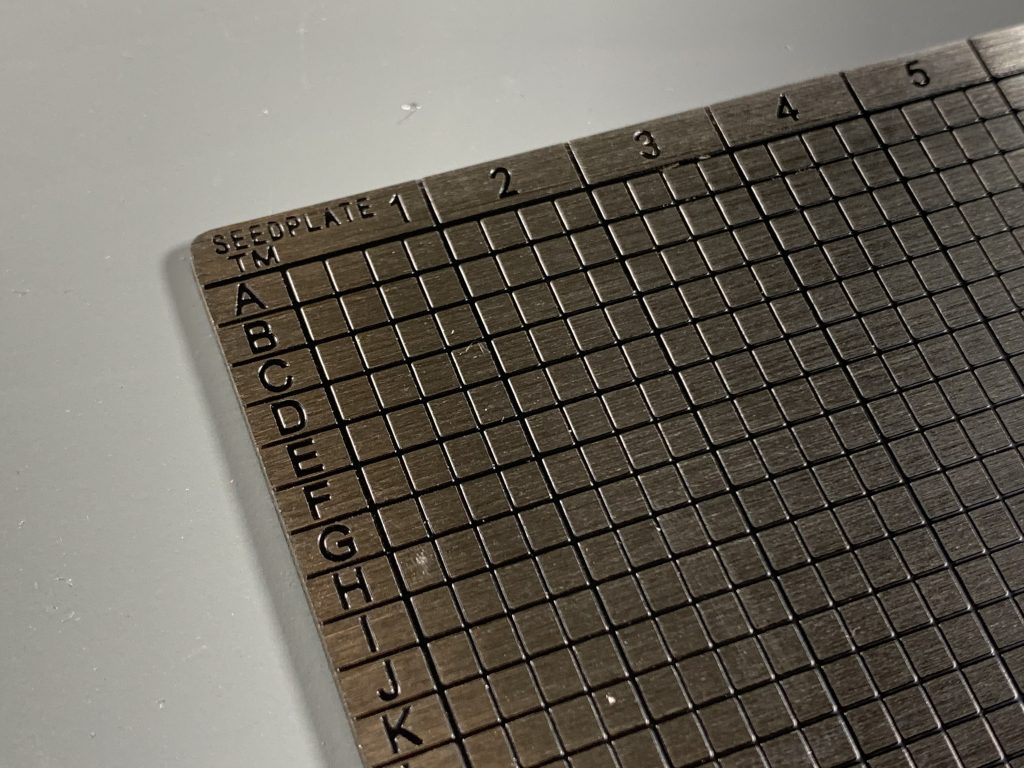
These stainless steel plates are etched with a grid on both sides. The grid contains the alphabet along the Y-axis and 48-columns along the X-axis. The 48-columns are split into 12 groups of 4-columns. Each of the 12-groups has enough room for 4-letters. Only the first 4-letters of each BIP39 seed word is required in order to restore the wallet as no two words on the BIP39 word list share the same sequence of the first 4-letters.
Use a marker to indicate the first 4-letters of the first 12-words on one side of the plate and then flip the plate over and repeat the process for the 13th through 24th words. Double check your work then use a spring-loaded punch to stamp the plate on each mark.
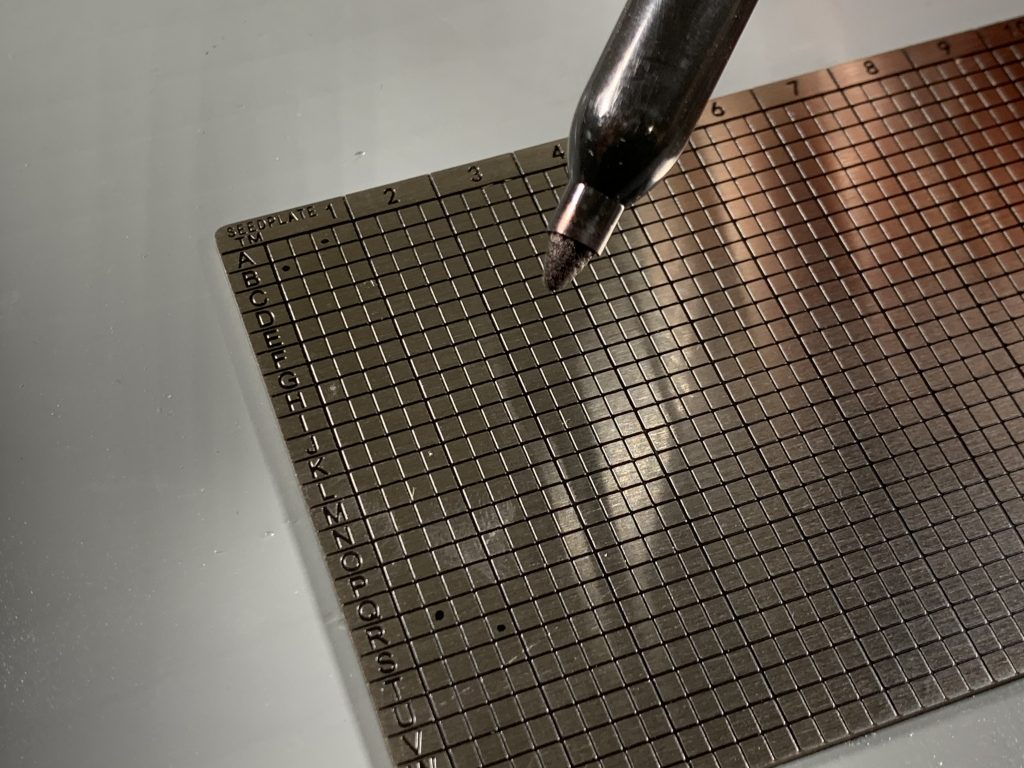
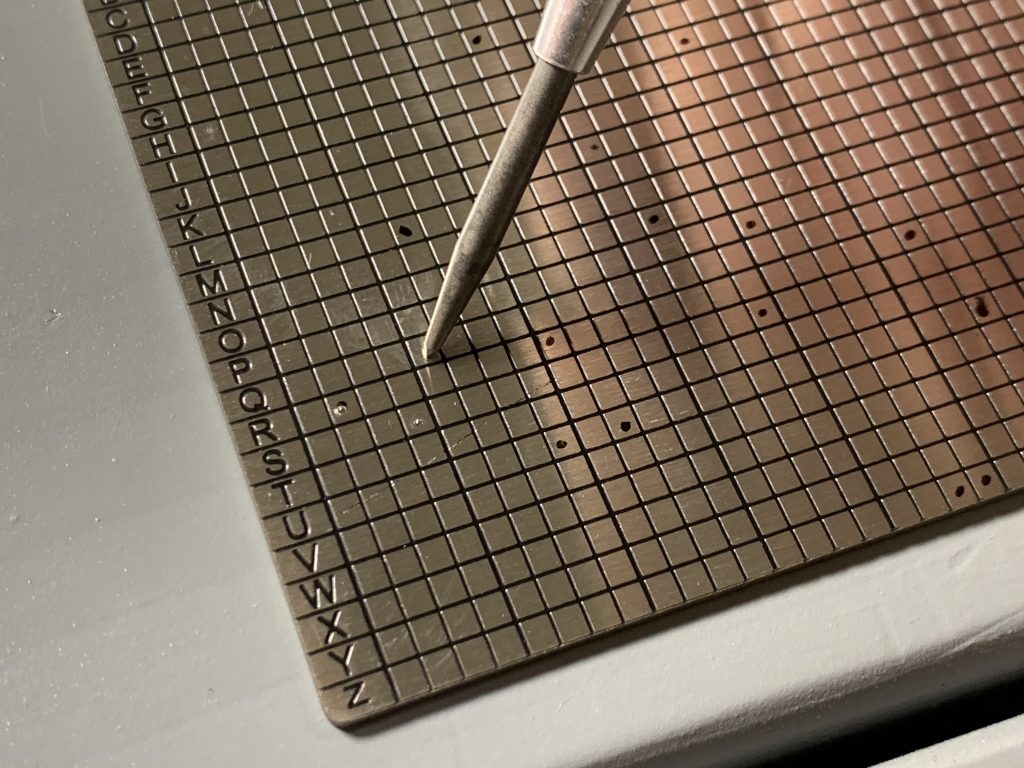
Now you have a robust stainless steel backup that can withstand fire and flood. This backup plate is easy to conceal measuring in at 127mm X 76mm x 1.5mm so that it can be hidden in a variety of places and environments.
Section 2: Installing the BlackBox
This section will show you how to:
- Prepare your BlackBox and suggestions for sound treatment
- Miner pressure barrier
- Connecting power and Ethernet
Introduction
The intent of the BlackBox enclosure is to allow the user to run their mining ASIC hardware outdoors where the heat and noise can be more easily controlled or dissipated. Excessive heat and noise are common problems users experience when mining bitcoin in the home or working space. In this demonstration, the final BlackBox installation was outdoors. Give some forethought as to where you will be installing your BlackBox:
- How far is going to be from a suitable power source?
- How far is going to be from an Ethernet port?
- How will sun exposure be throughout the year?
- Is there adequate room for air flow?
- How close are any neighbors?
- Is it in a flood plane?
- Will it be secure?
- Is it out of plain view from the street?
Everyone will have a unique install situation. In this demonstration, the BlackBox was installed on the North side of a garage so that the majority of the year and for most hours of the day, the box will be in the shade to help reduce heat exposure. A dedicated 240v, 20 amp circuit was ran from a sub panel through the wall of the garage and tied into the BlackBox with water-tight conduit, consult a licensed electrician to help with your installation.
The enclosure is designed with the ASIC raised on a platform above the air intake/discharge with a symmetrical ‘S’ shaped air flow path connecting each. This flow path allows snow, rain or dirt to fall out before it enters the ASIC, potentially causing damage. The ASIC itself is the prime mover of the heated air with an added barrier creating a pressure seal between the low pressure intake side and the high pressure discharge. The “tortuous” shape of the air flow path also helps deaden the sound waves as it reflects and is absorbed within the enclosure, reducing overall noise. The supporting column holding up the ASIC separates the ‘hot’/’cold’ aisles and includes an air recirculating valve (air register) which gives the user the ability to recirculate heat when needed, for example in cold or humid climates. Finally, the design also allows for power scalability by elongating the dimension of the box perpendicular to the air flow path, enabling room for more mining ASICs up to 12 in a row in an 8′ long enclosure.
The BlackBox weighs approximately 110 lbs, be sure to have another person help you move it. The exterior dimensions are 36″H x 32″W x 28″D.
Double check that everything looks good once you unpack your BlackBox, checking for dents or scratches, making sure the latches and hinges work, and the filters are in good shape and the bolt-action locks don’t bind up.
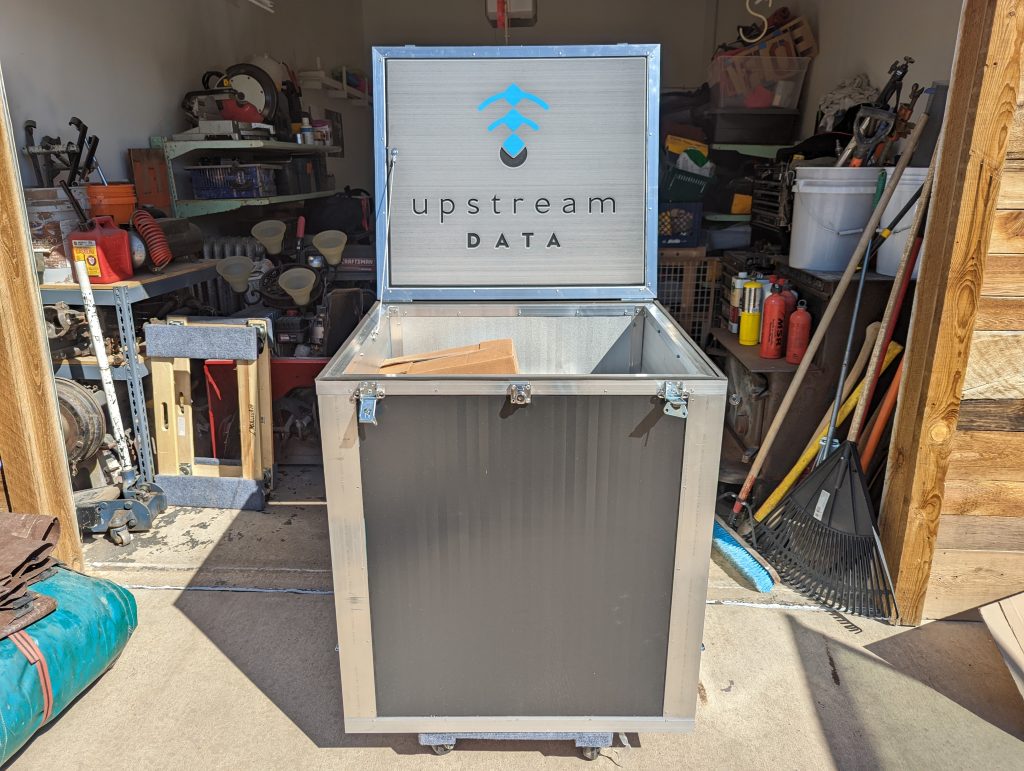
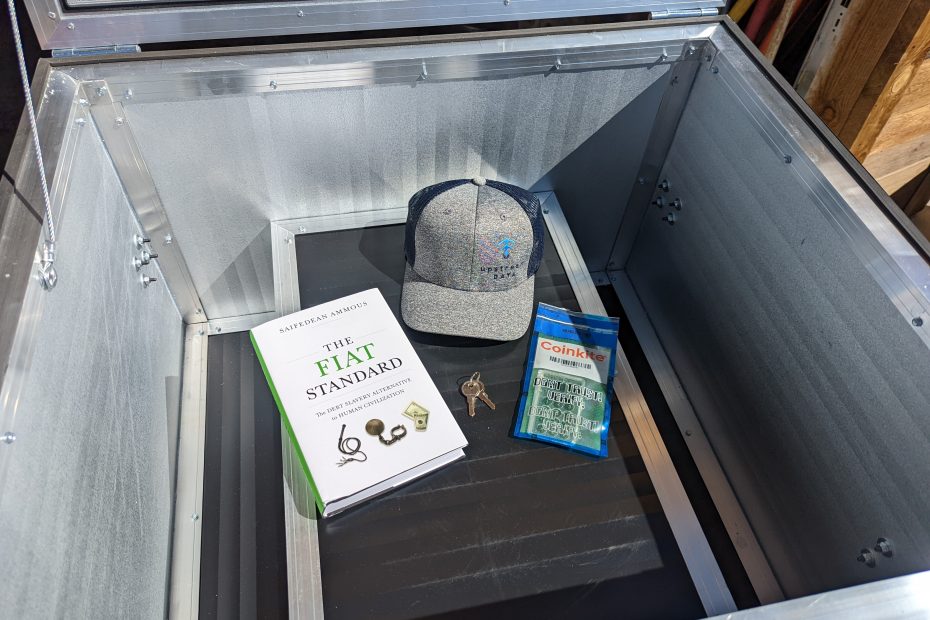
Inside the BlackBox, you’ll find a few included “thank you” items from Upstream Data.
Sound Treatment
In this demonstration there was not any sound-treatment material included. The final production BlackBoxes will have a sound-treatment liner included. The process of adding sound-treatment material will be covered just in case you are interested in adding additional material above and beyond what is included from the manufacturer.
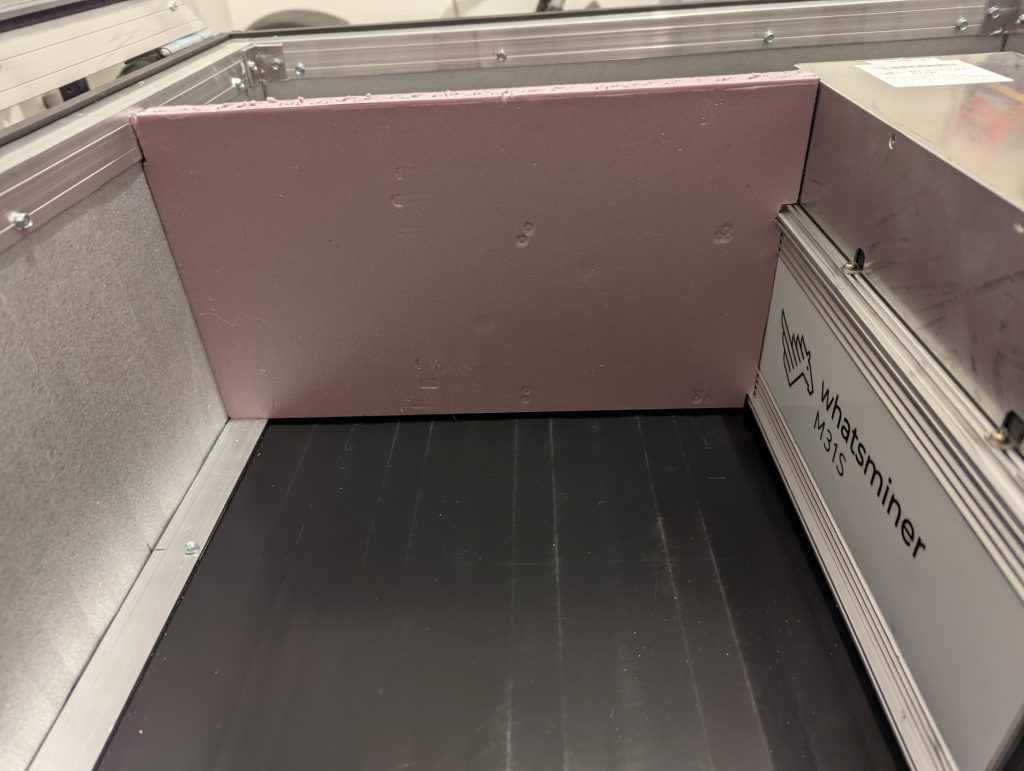
One important piece that you will need to manage making on your own is the pressure-barrier. The pressure-barrier will separate the cool side from the hot side, with only the ASIC passing through the barrier. This is how the hot air is forced out through the path of least resistance which is the exhaust port. Without a tight fitting pressure-barrier, then the hot exhaust air from the miner will be circulated back to the intake side of the ASIC where it needs to have cool air coming in. This will cause the miner to over-heat and have problems running smoothly. In this example, a 1″ think foam insulation board was used. The advantages of this material are that it creates a good heat transfer barrier, it is cheap, and it is easy to work with as it can be cut to any shape with a razor blade.
For this demonstration some testing was carried out to check the sound levels with a Whatsminer M31s 78Th miner. You’ll notice that the pressure barrier in these photos is cut to the profile of the miner to fit tight against it.
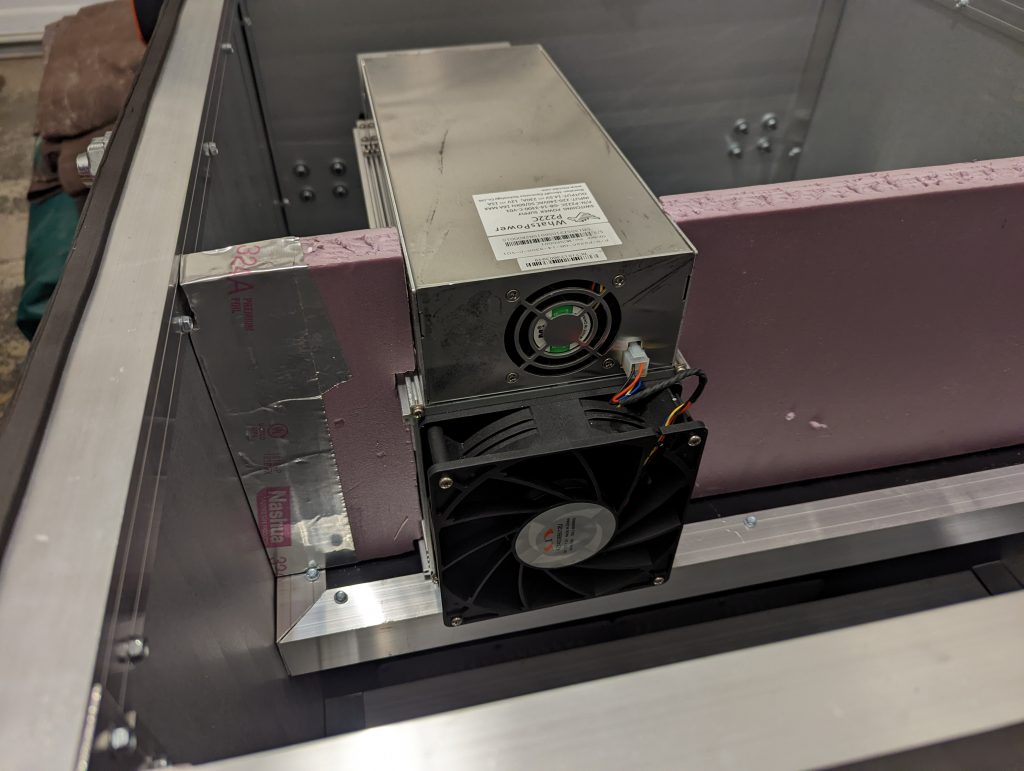
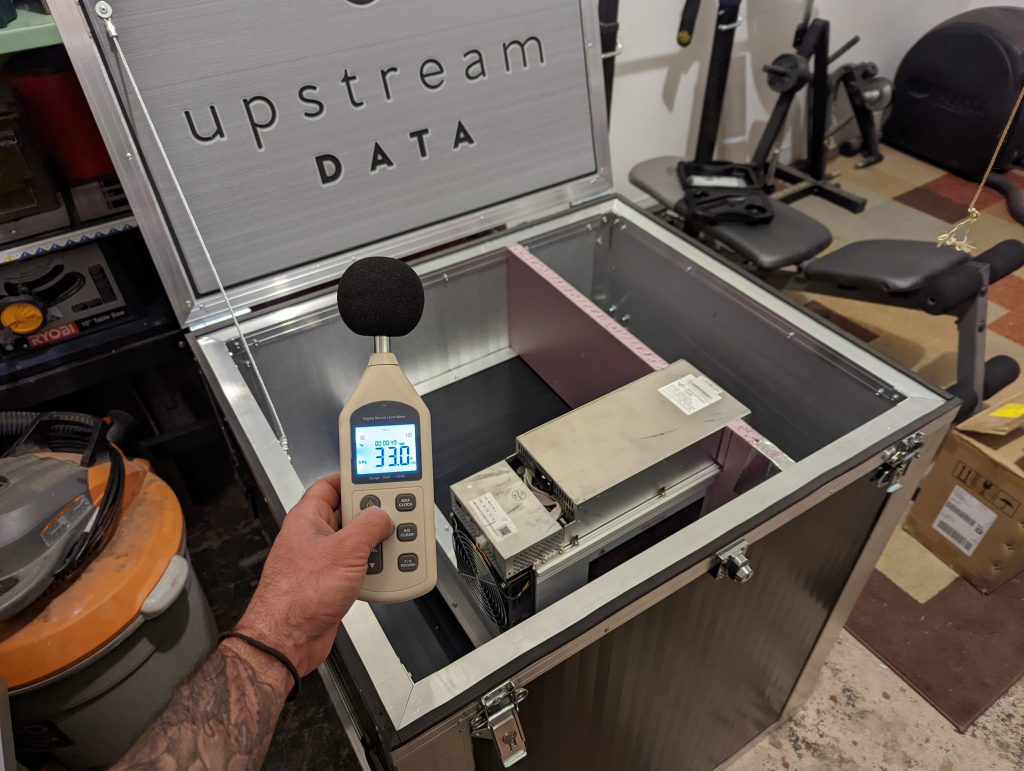
Just checking the ambient noise floor of the garage without the miner running, was ~33dB. With the miner running and the lid open, the noise level was ~82dB. With the miner running and the lid closed, the noise level was ~60dB. ~22dB reduction with no sound treatment is very good in terms of noise attenuation, humans perceive a 10dB attenuation in a noise source as being half as loud, a 20dB attenuation is perceived as a quarter as loud.
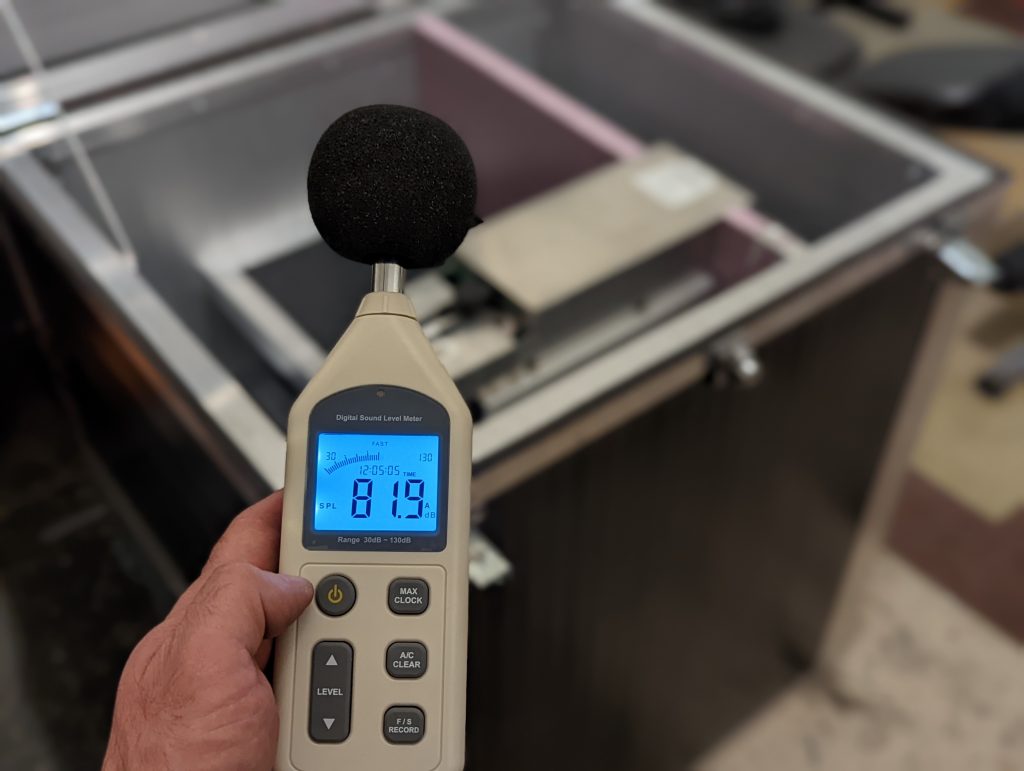
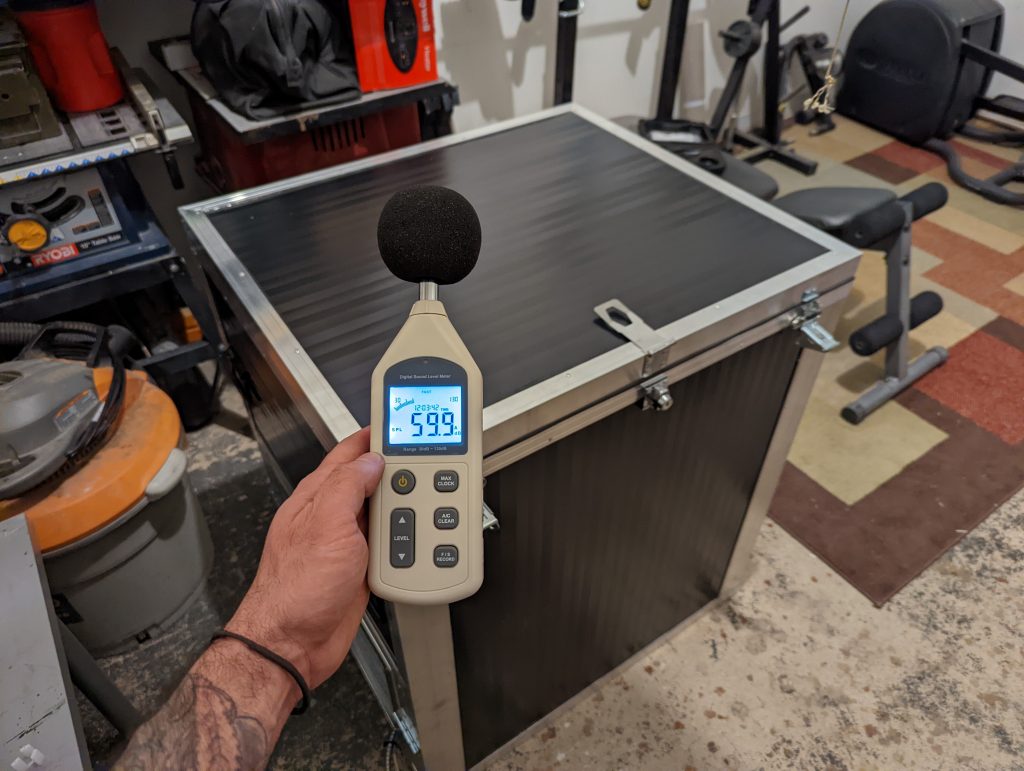
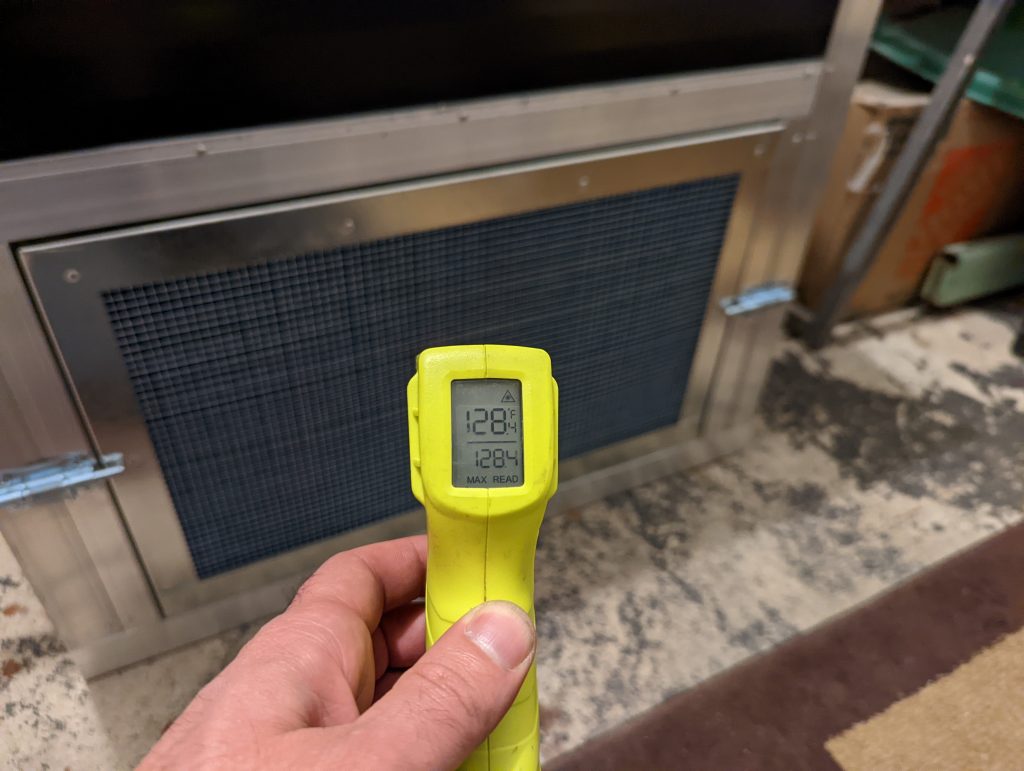
The heat coming from the exhaust port was ~130° F.
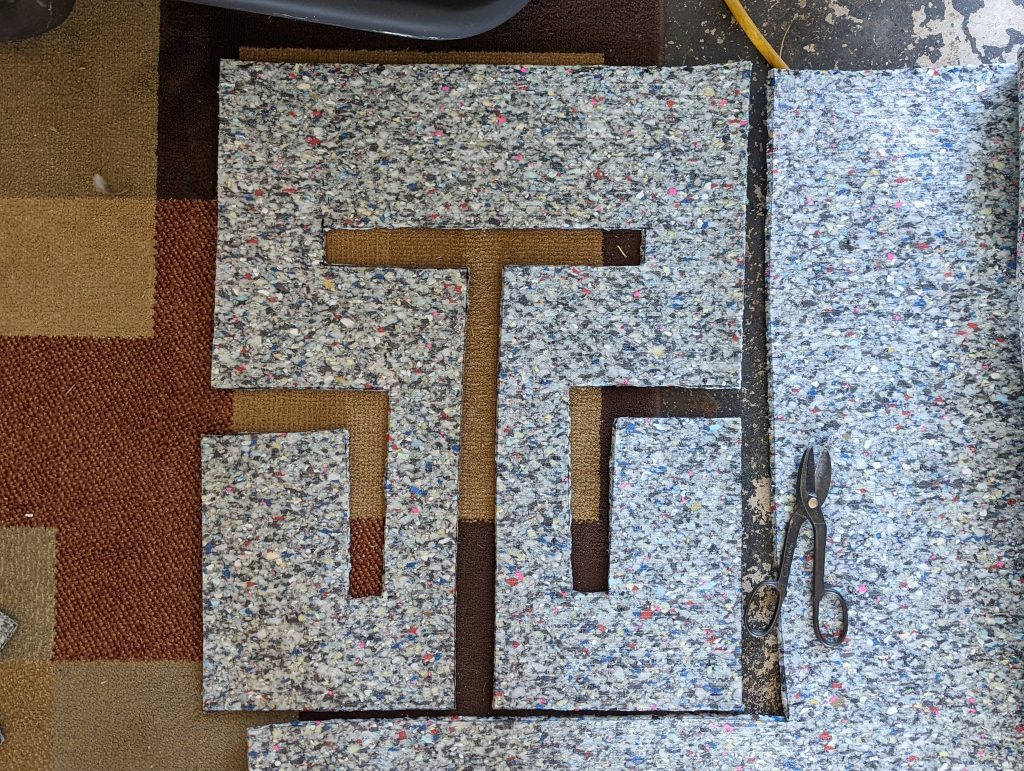
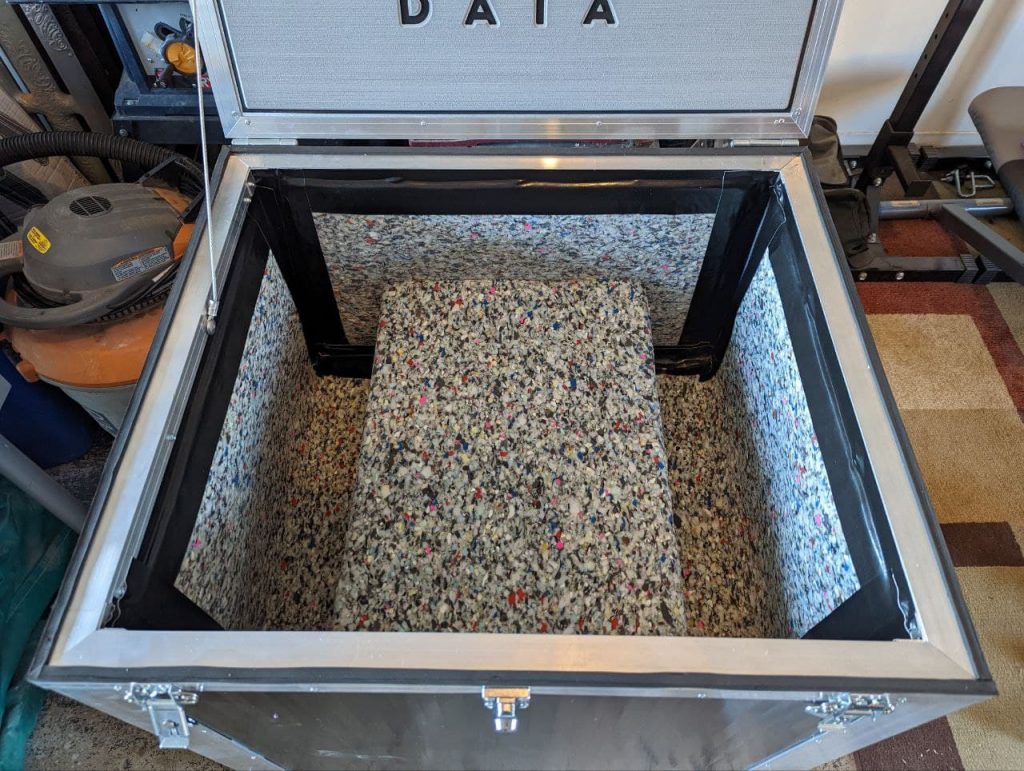
The first material used in this demonstration was carpet padding. Something similar to this product. The profile of the air path way inside the BlackBox was cut out from a piece of the carpet padding so that it could fit on two of the inside walls.
Then additional pieces were cut out and wrapped around the “T” section in the middle and also applied to the other two remaining walls. Carpet padding was also added to the lower sections. You’ll notice in this photo that there is a vent register in the “T” section in the middle. This is how you can choose to allow hot air to circulate back to the intake side to help with intake air that is too humid and/or too cold.
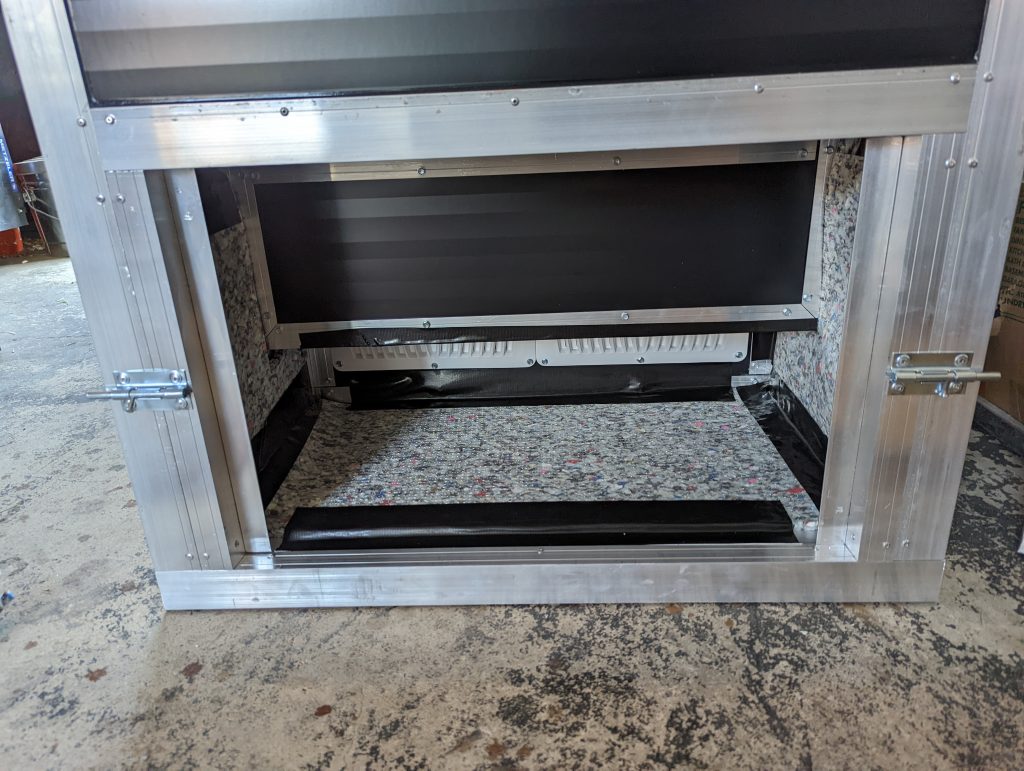
Then the miner and pressure barrier were put back in place. The carpet padding got the noise level down an additional ~5dB.
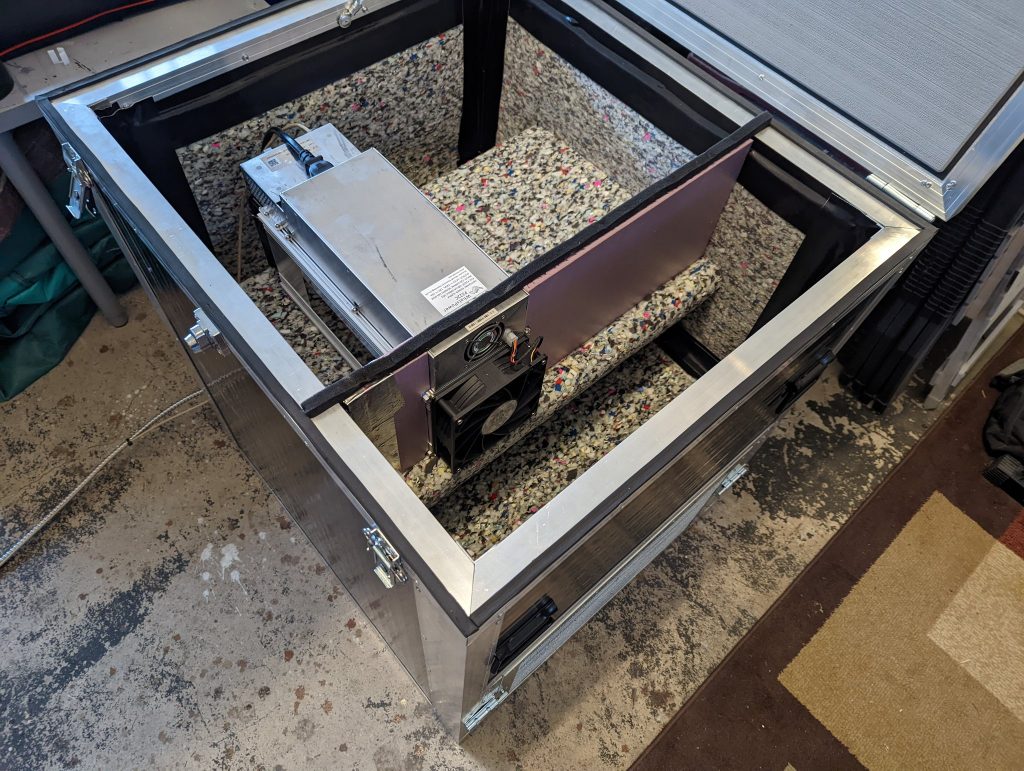
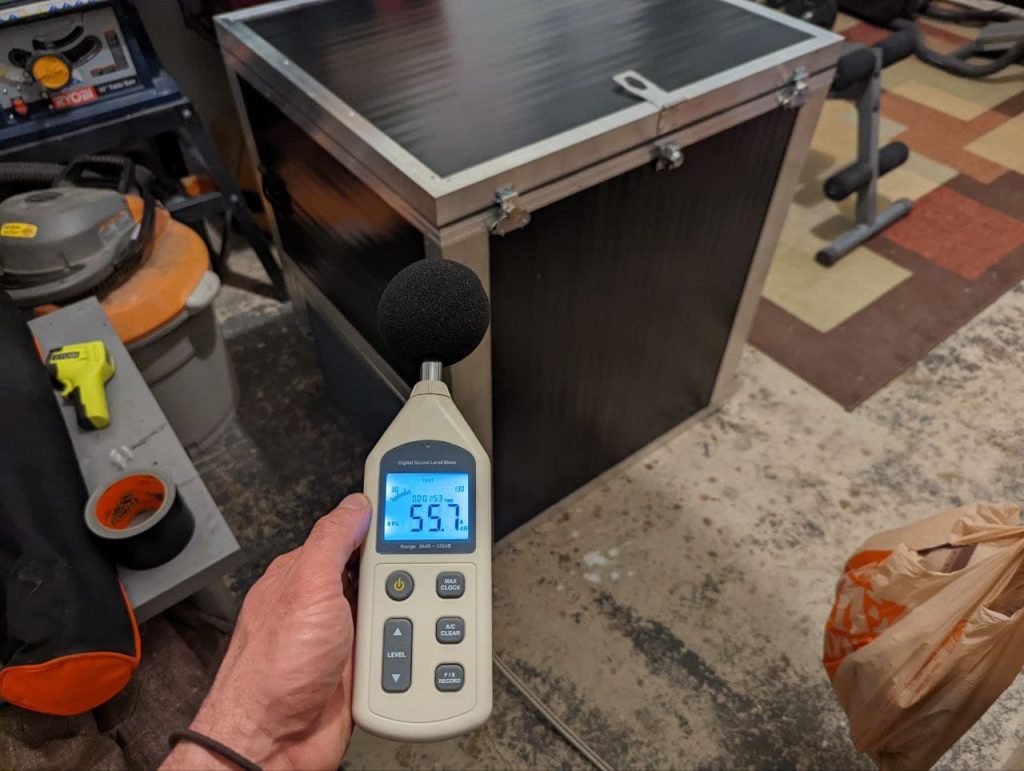
In an effort to get the noise level down even further, a sound board material was used to add an additional layer on top of the carpet padding. After some time, the duct tape was no longer doing a good job holding down the carpet padding on the exhaust side.
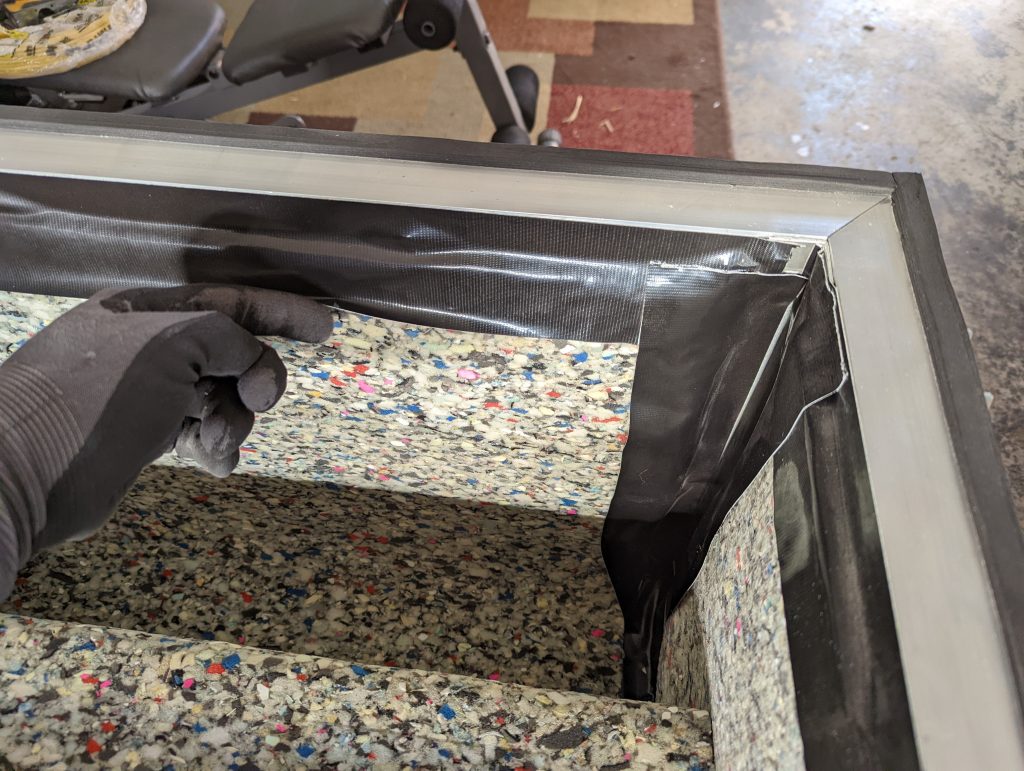
The basic idea was to just cover the surfaces on the four walls in the upper section of the BlackBox. Two pieces were cut out to fit over the top of the “T” section.
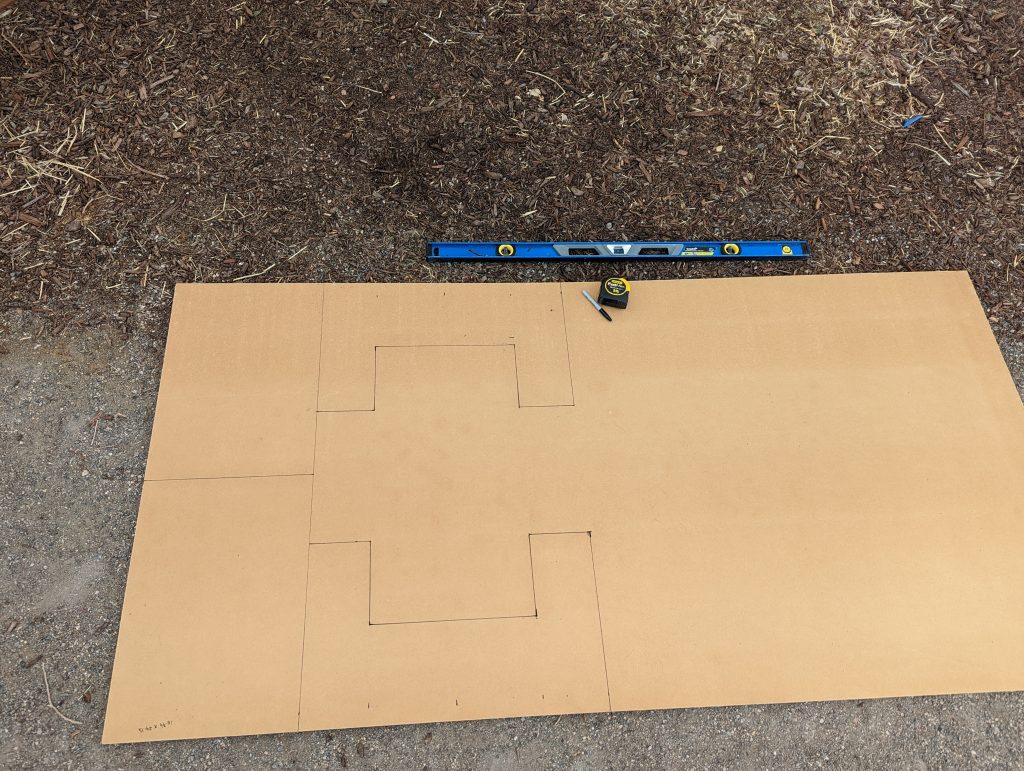
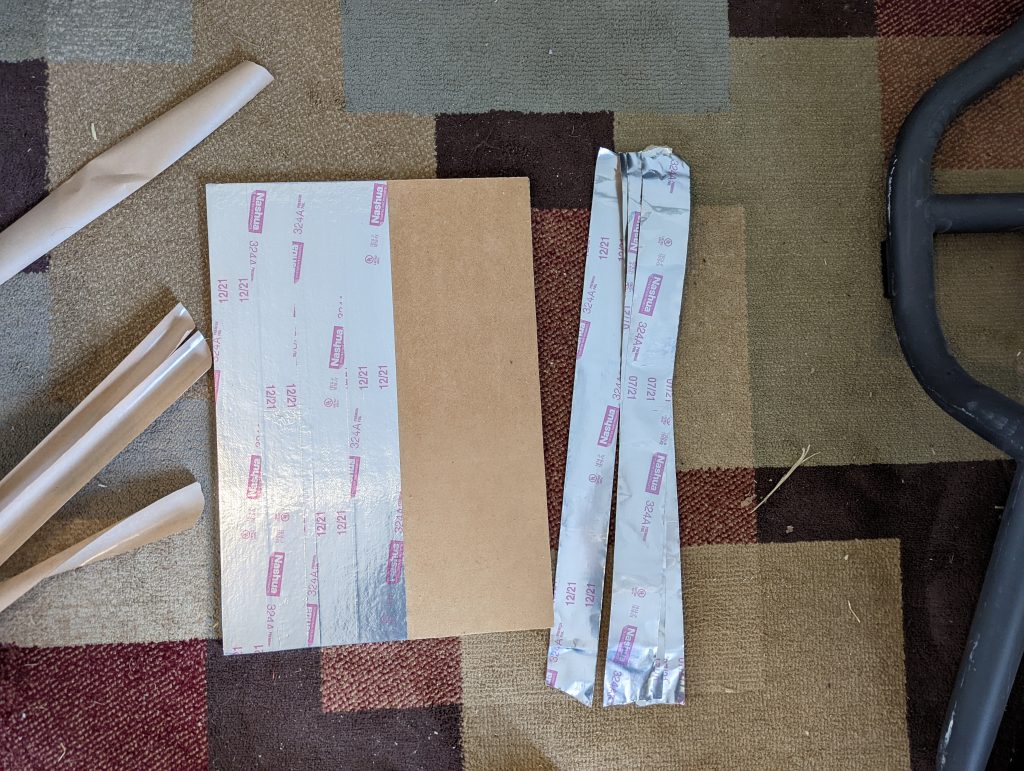
This particular sound board material is flammable. Just for good measure, a layer of foil tape was applied to the sections of board that would be in the hot exhaust path. The foil tape was also used to help secure the four panels against the wall.
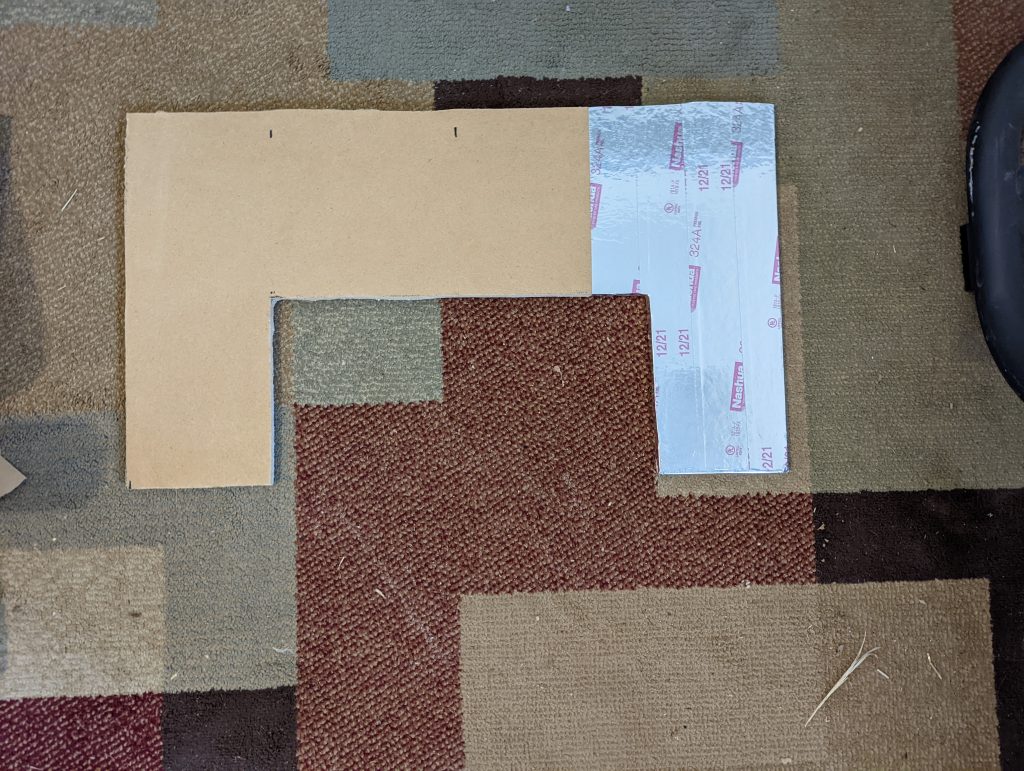
Then the miner was placed back in the box, the pressure barrier was trimmed down to account for the added material on the sides of the box, and the sound levels were measured again, there was another ~5dB attenuation.
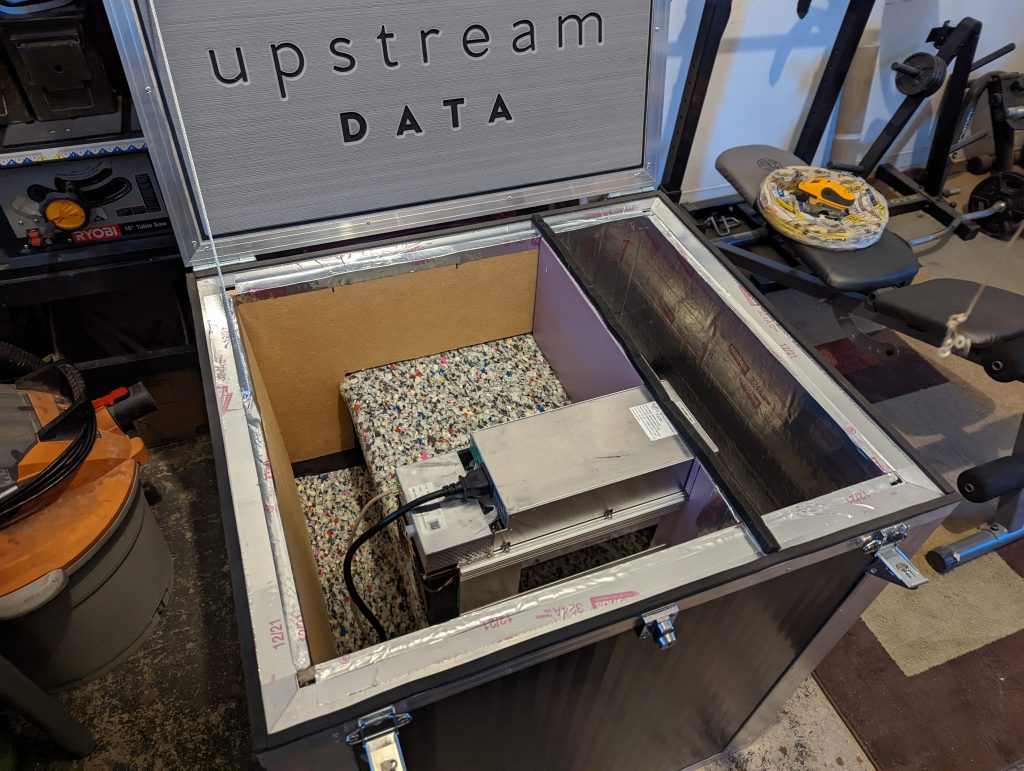
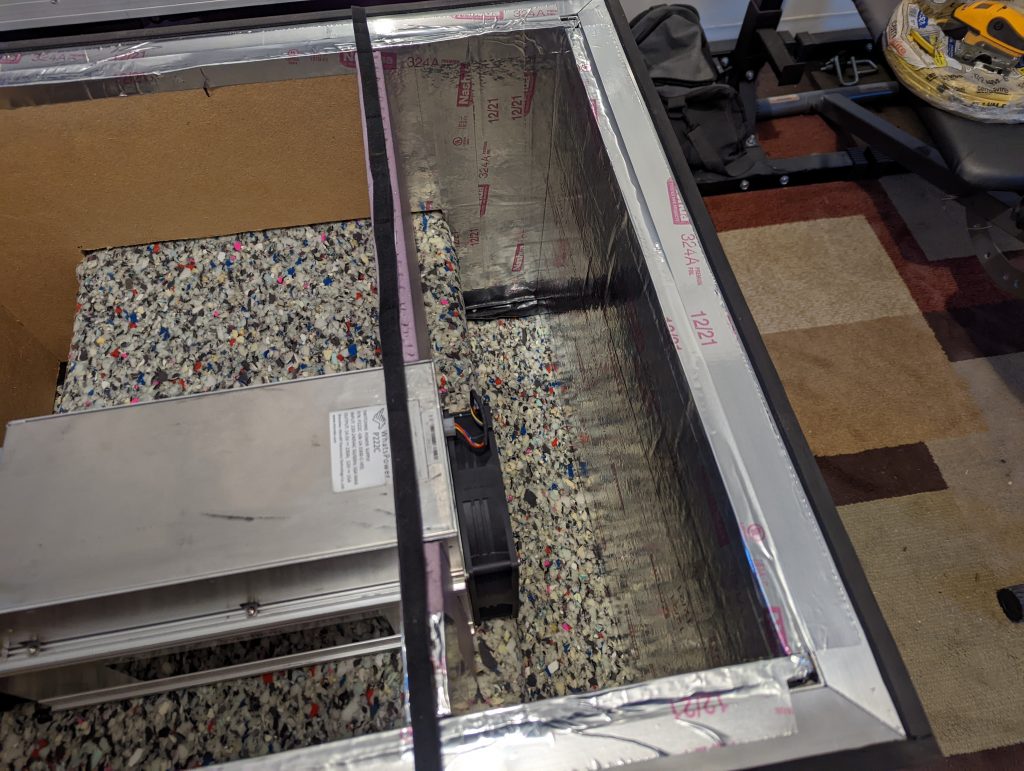
Now that the sound treatment is satisfactory, the BlackBox is ready to be installed in its permanent location. But first there needs to be a way to connect it to power and Ethernet.
Electrical and Ethernet
Each BlackBox ships with a coupling to run the cables through for the customer to install themselves. There is no way to know which side of the BlackBox the customer is going to need the cables to pass through, so it is better if the customer just drills the hole in the side of the BlackBox with a hole saw where they need it. A hole saw should work just fine for this purpose.
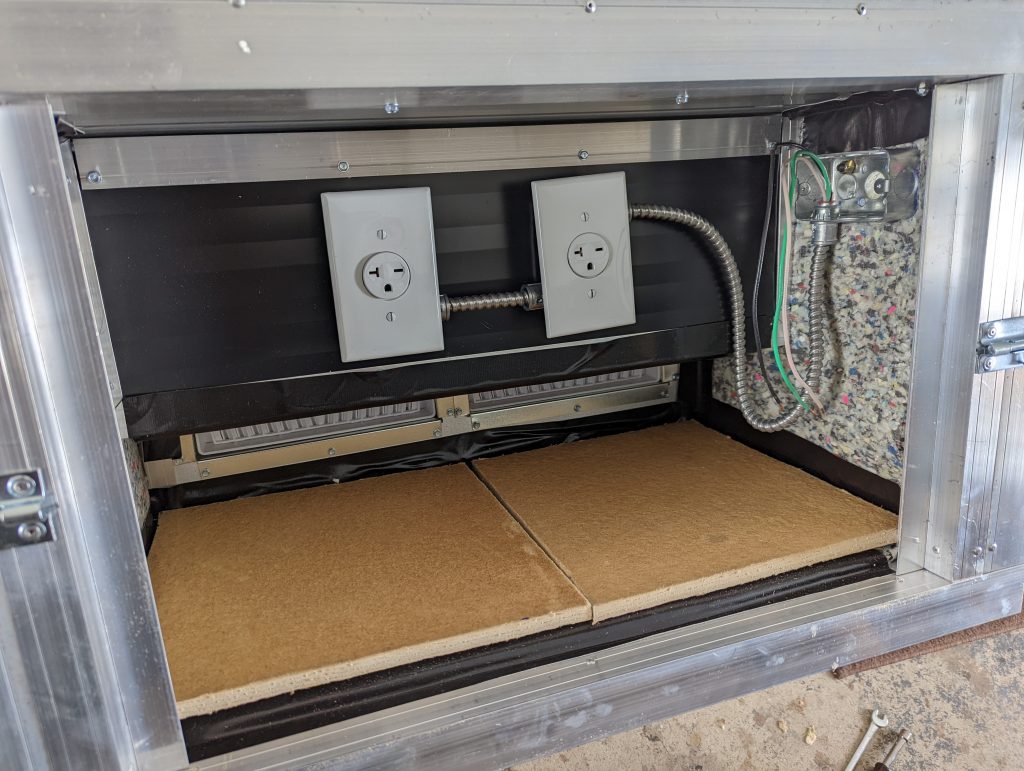
There are many different ways this can be configured. In this demonstration, an Antminer S19j Pro 110Th miner was used for the final install. These miners require two outlets. The outlets were installed inside the BlackBox in this case. Then the power was ran to the box using water-tight conduit. You may not want to install your outlets inside the BlackBox and may prefer to have them installed on a wall near by so that the wiring doesn’t have to be un-done in order to move the BlackBox.
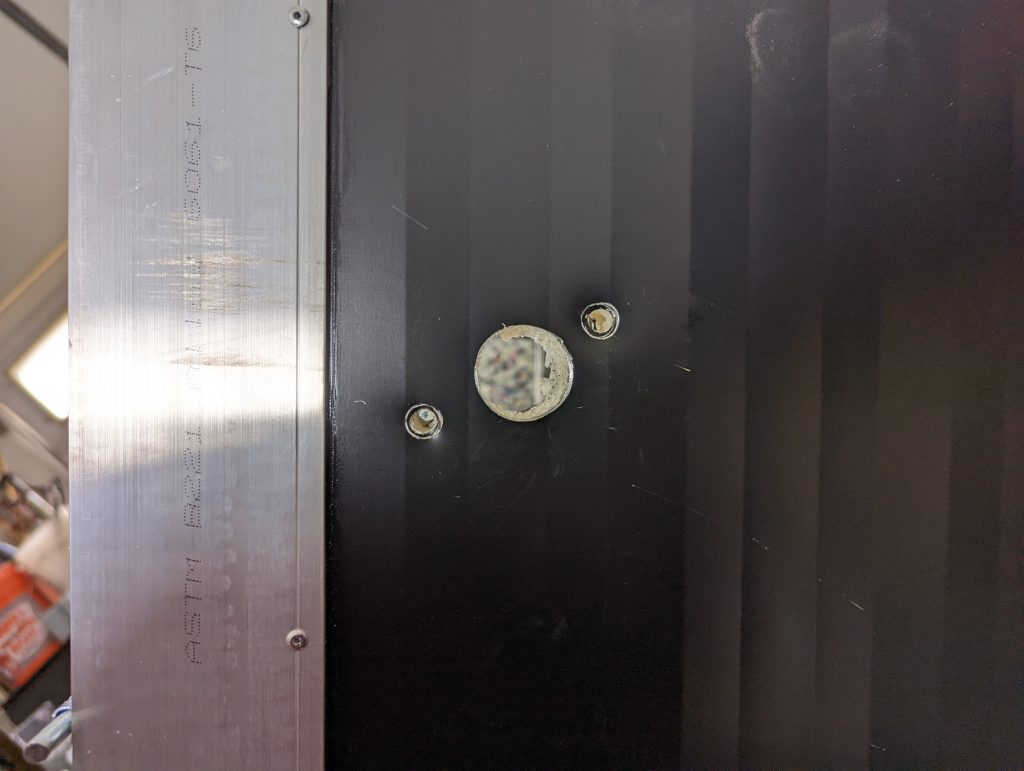
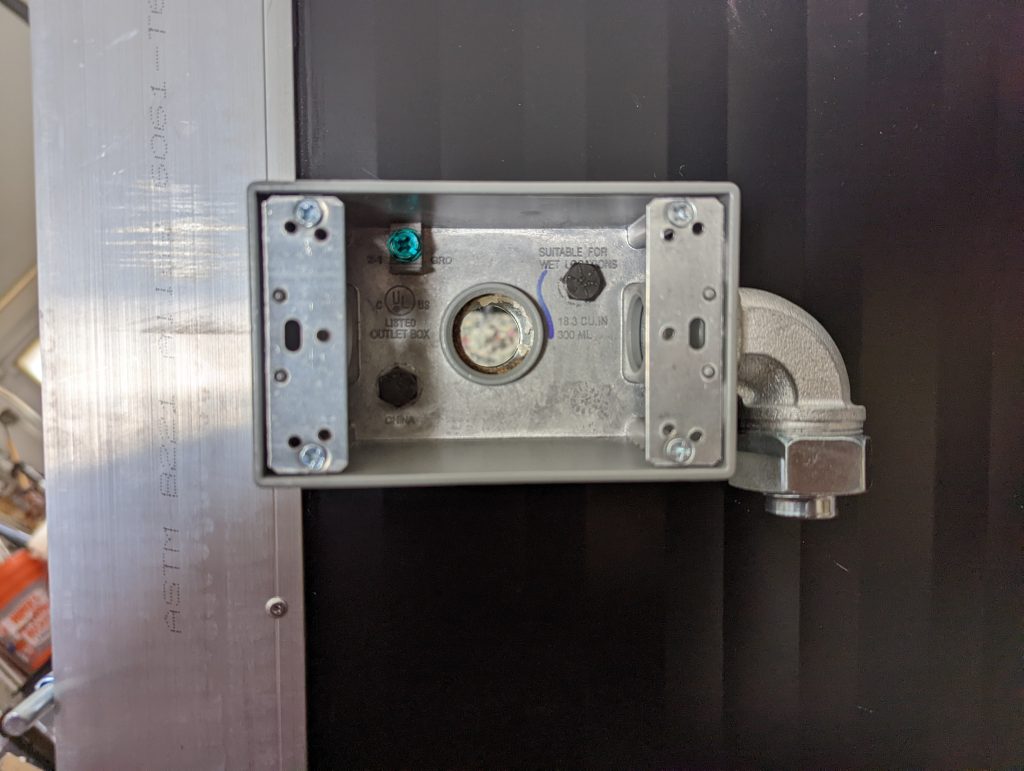
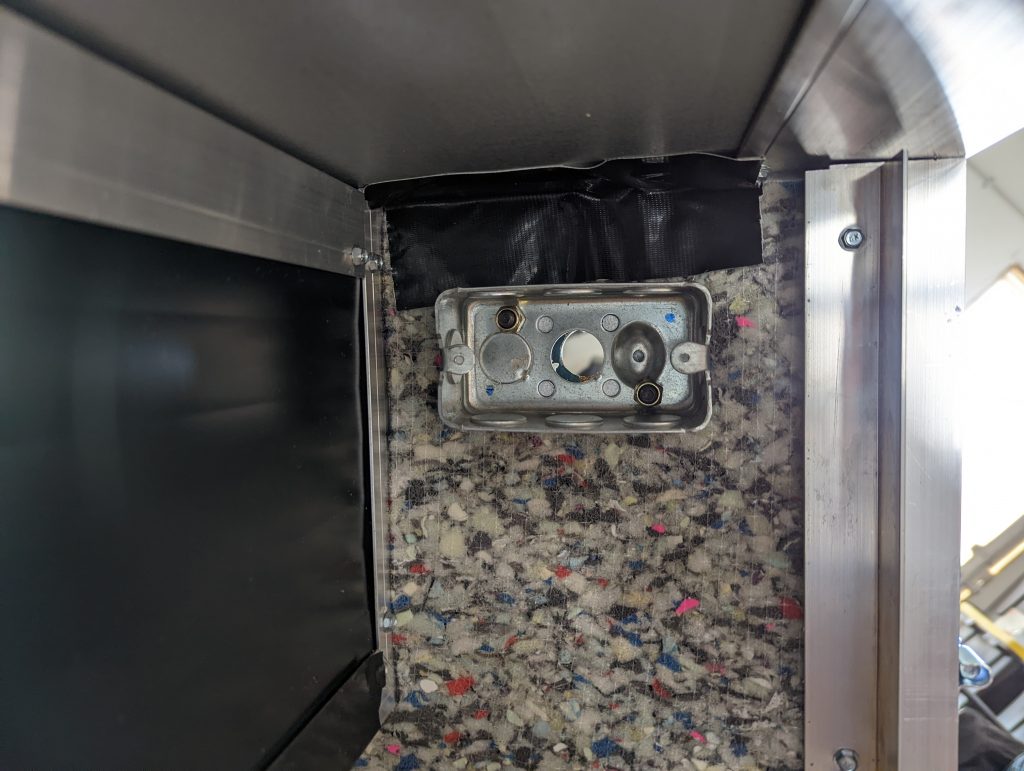
In this demonstration, two additional holes for 1/4″ bolts were drilled into a water-tight conduit box. These holes lined up with an in-door conduit box which was mounted on the inside of the BlackBox, directly opposite from the water-tight conduit box. Then a gasket was made using some cork material to go behind the water-tight junction box, on the outside of the BlackBox.
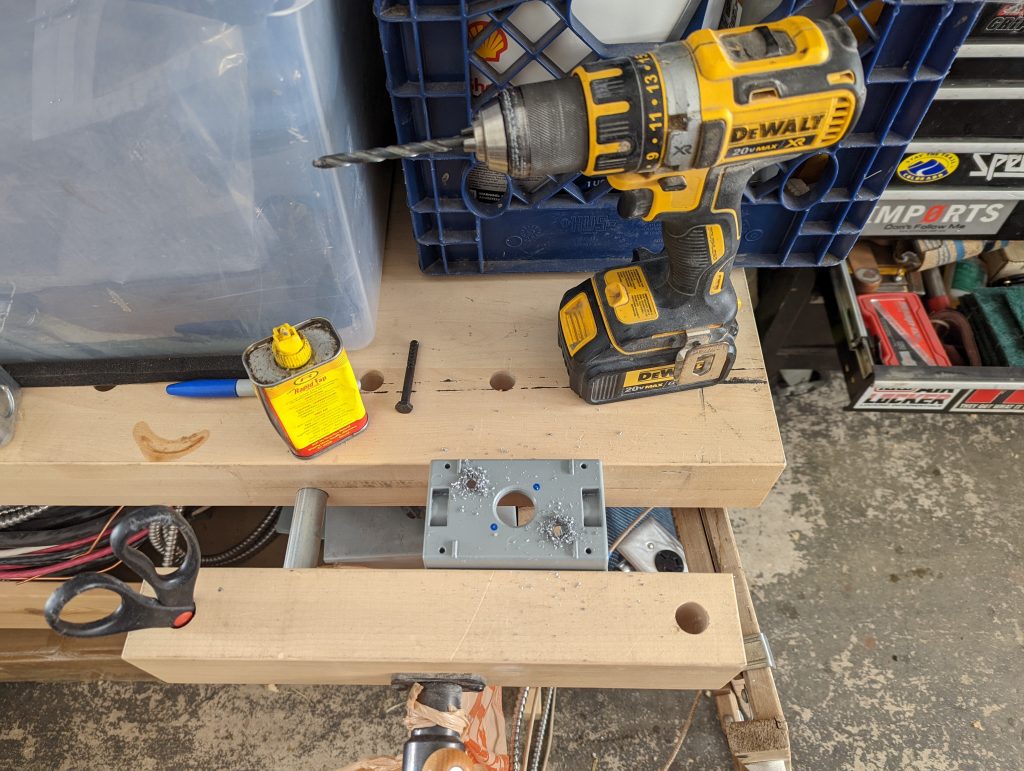
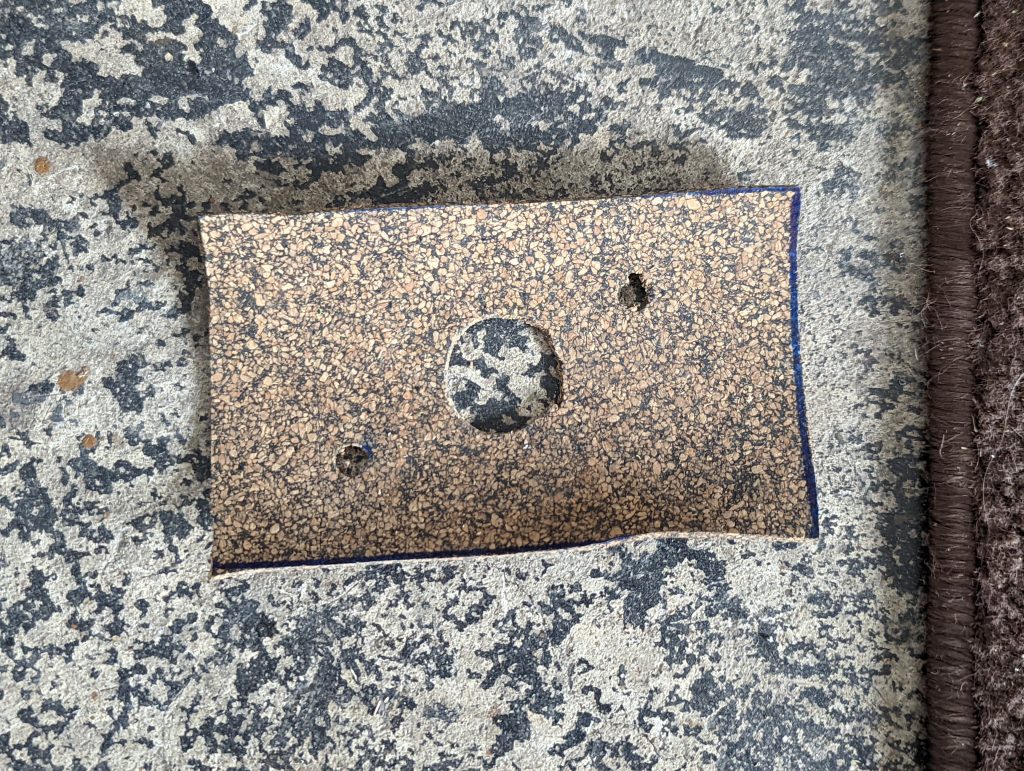
Using a hole saw, a 3/4″ hole was drilled into the side of the BlackBox, then the 1/4″ hole locations were marked on either side of it and then drilled out as well. Then using the 1/4″ bolts to hold the water-tight conduit box in place, the in-door conduit box was lined up on the inside of the BlackBox and then the nuts were tightened down to secure both junction boxes, pinning the wall of the BlackBox in between.
Then the outlet boxes were mounted to the wing wall inside the BlackBox on the intake side. These were mounted using 1/4″ bolts again that passed through the entire wall of the wing.
Now the site for the BlackBox could be prepared. In this demonstration, a pallet was used to keep the BlackBox up off the ground. The dirt/wood-chip was shuffled around to make sure the area was level first.
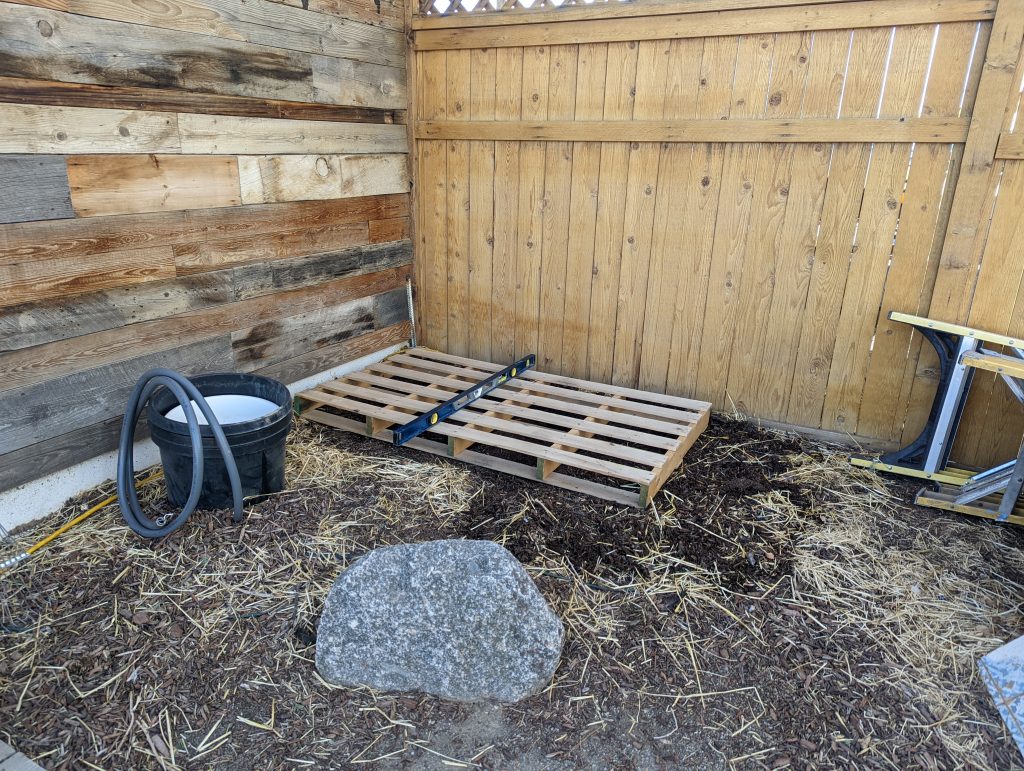
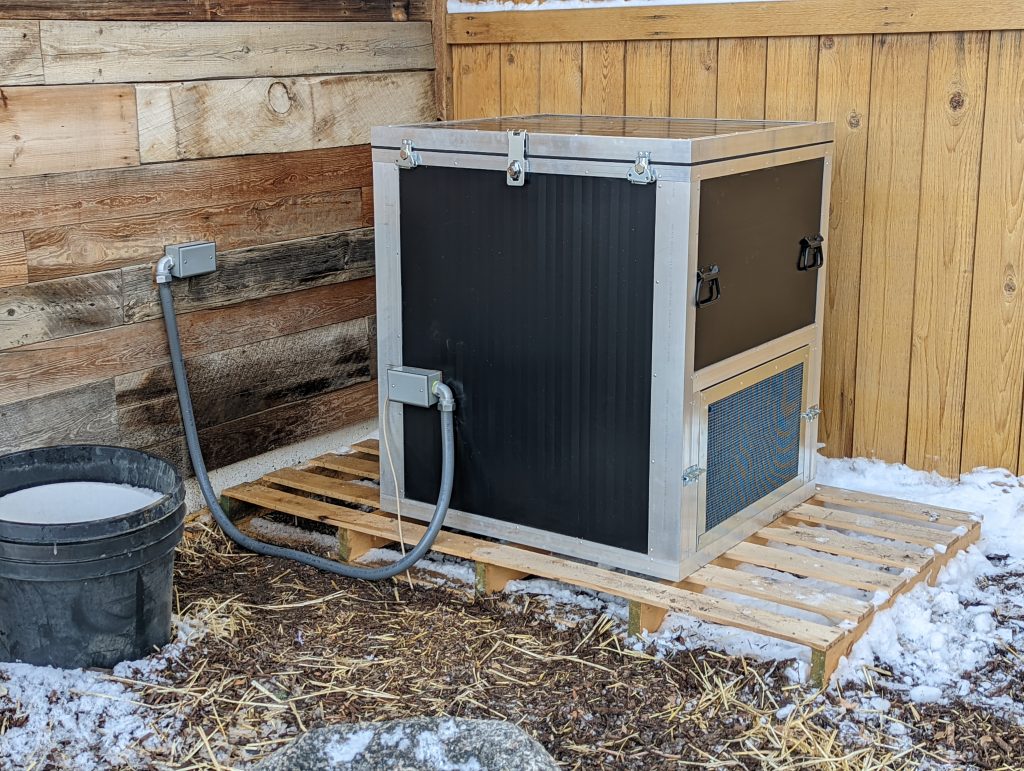
Inside the garage, there was a 100 amp sub panel. A 20 amp dedicated breaker was installed. Then using 12/2 MC, a line was ran on the inside of the garage, along the wall from the sub-panel to the opposite side of the wall where the BlackBox was going to be installed. Then a hole was drilled through the wall. An in-door junction box was mounted on the inside wall where the cable would pass through. On the exterior, another water-tight conduit junction box was mounted on the outside wall. Then using water-tight conduit, 12GA wire was ran through the conduit and then it was connected to the water-tight conduit elbows on the junction boxes. With the cable ran into the BlackBox, the connections were tied together with the MC cable from the outlets inside the in-door junction box mounted inside the BlackBox.

You will also need an Ethernet connection for your BlackBox. There are several different solutions for making the required network connection such as power line adaptors or mesh WiFi satellites. In this demonstration, the Ethernet cable was ran from a switch inside the home, buried in the ground along the run through the yard over to the garage, and through the water-tight junction box. If you are not comfortable installing your own cable then call a licensed professional. Depending on your installation you may need to terminate your own cables, drill holes in your walls, and enter your attic or crawlspace. You can buy 100 feet of outdoor rated CAT5e Ethernet cable, a box of RJ45 connectors, and the crimping tool from your local hardware store.
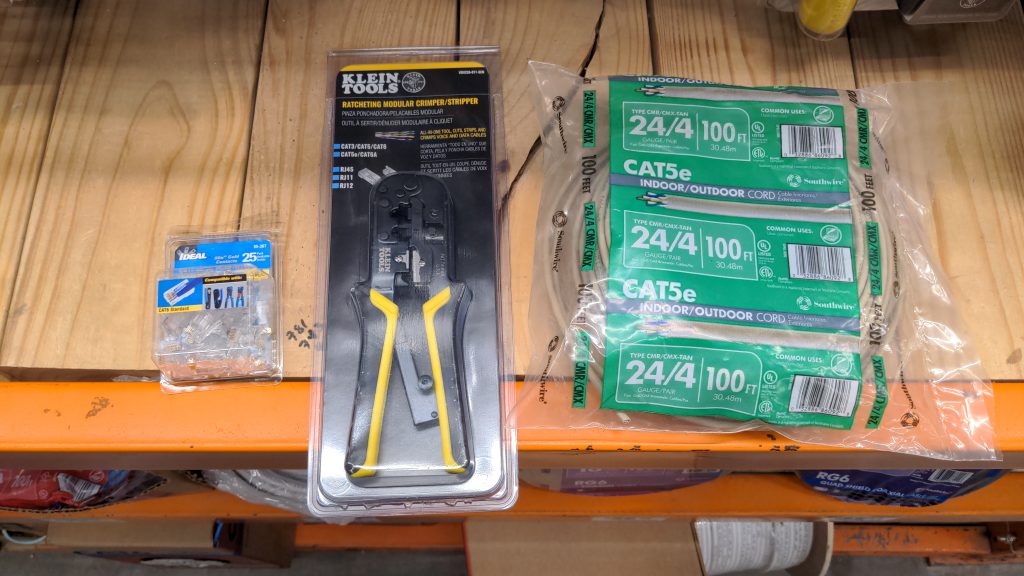
Then you need to decide which standard you want to use for your Ethernet cable, either T568A or T568B. So long as you terminate both ends of the cable with the same configuration, it really shouldn’t matter which one you choose. All the wires are the same color on the inside after all.
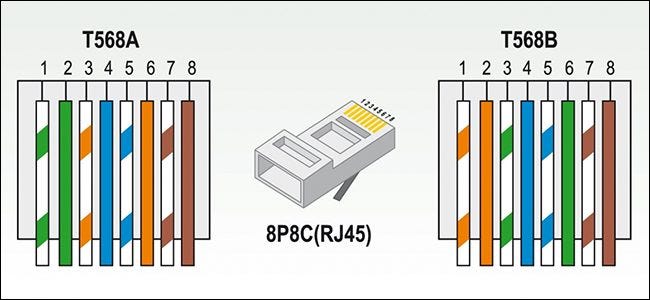
There are some good guides online for making your own Ethernet cables, such as this one. The full details here on how to terminate your Ethernet cables won’t be covered here since there are so many good videos and guides online. But just a few things to point out; make sure your wire color order is the same on both ends, make sure the wires go all the way to the end of the RJ45 connector, and make sure there is some of the insulated outer jacket where the pinch point clamps down on the cable in the RJ45 connector.
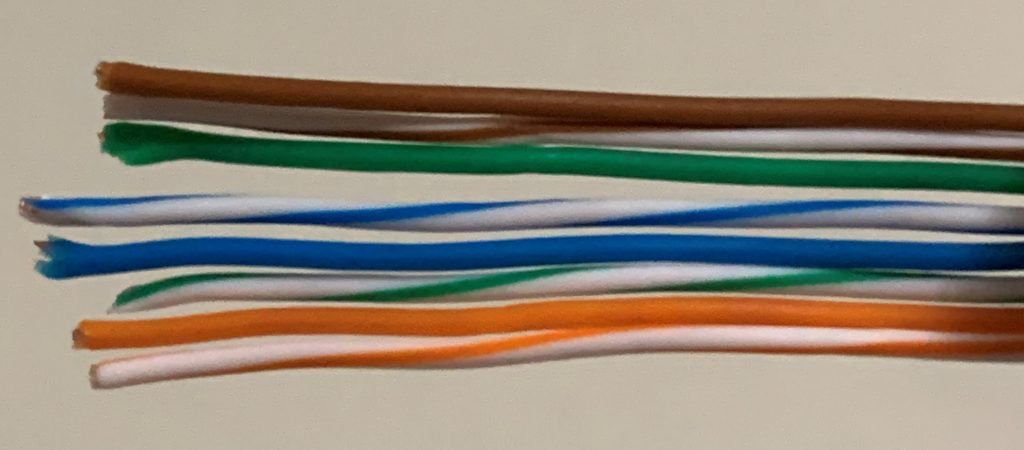
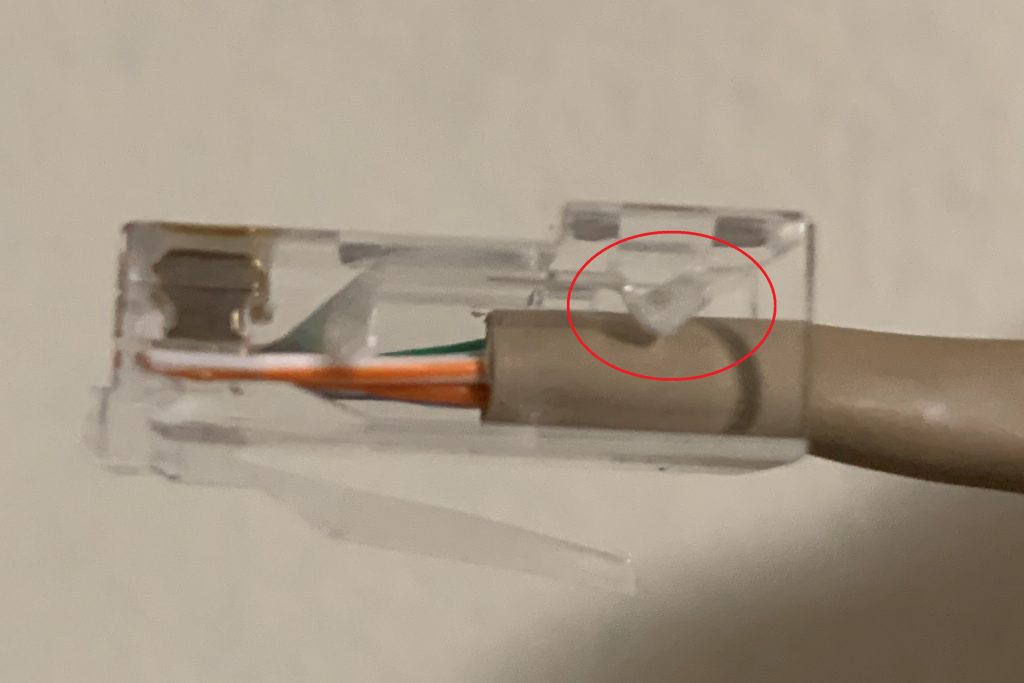
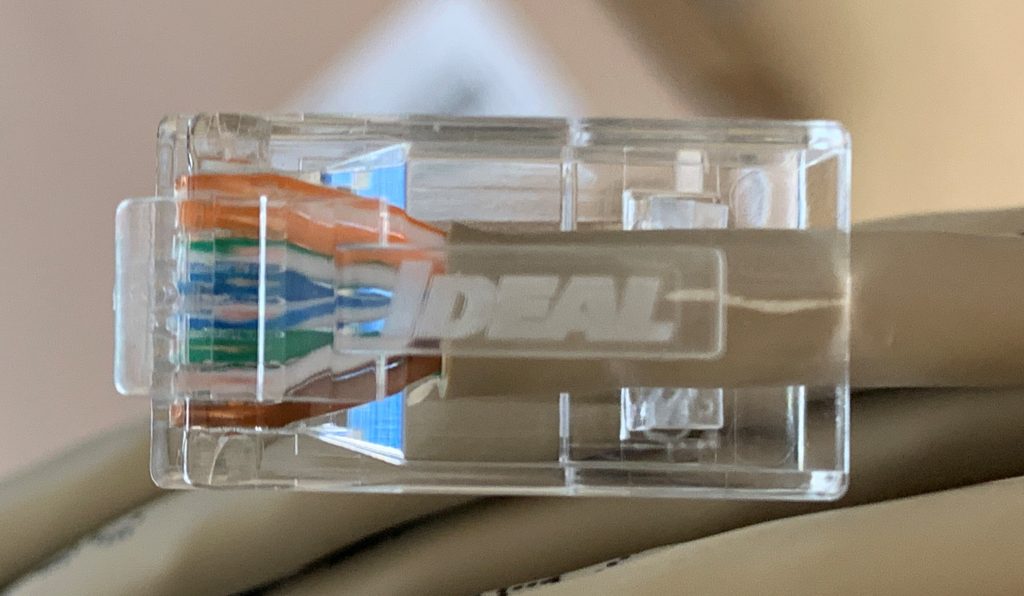
The Ethernet cable was routed through an extra port on the water-tight conduit junction box. These junction boxes come with little plastic threaded caps, you can simply drill a hole through them and feed the un-terminated Ethernet cable through to the inside of the BlackBox.
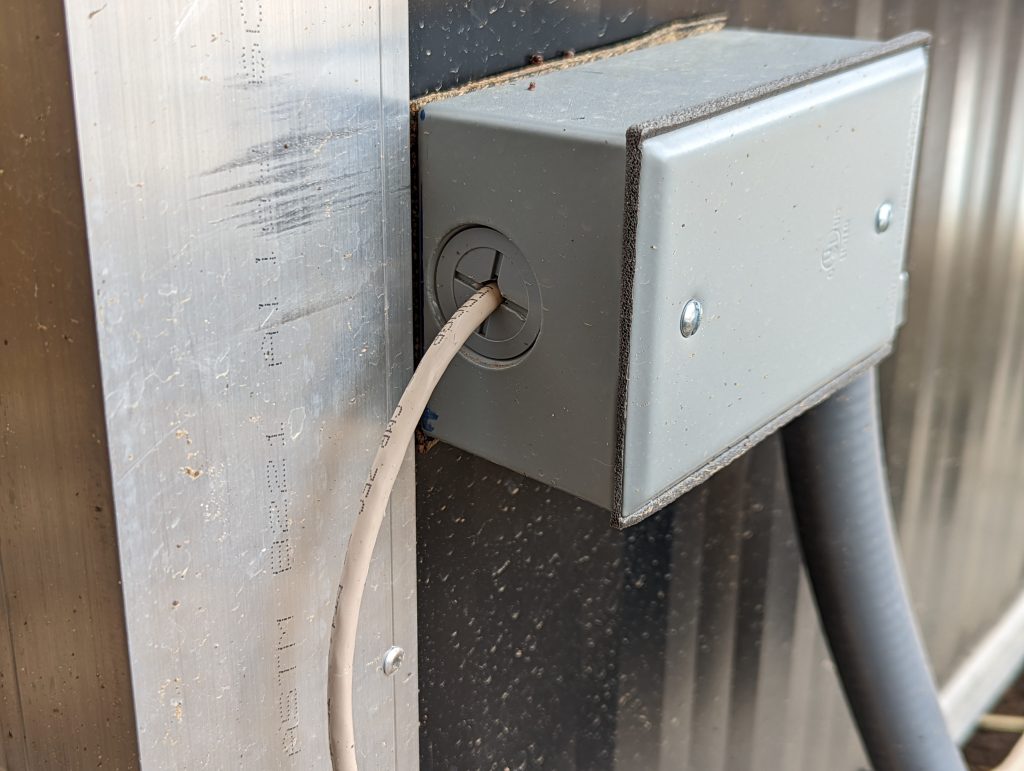
Then the Ethernet cable can be routed through the in-door junction box using a cord-grip protector in one of the 1/2″ knock-outs. The power cables and the Ethernet cable can just be routed up along the intake air pathway to the miner on top of the “T” platform.
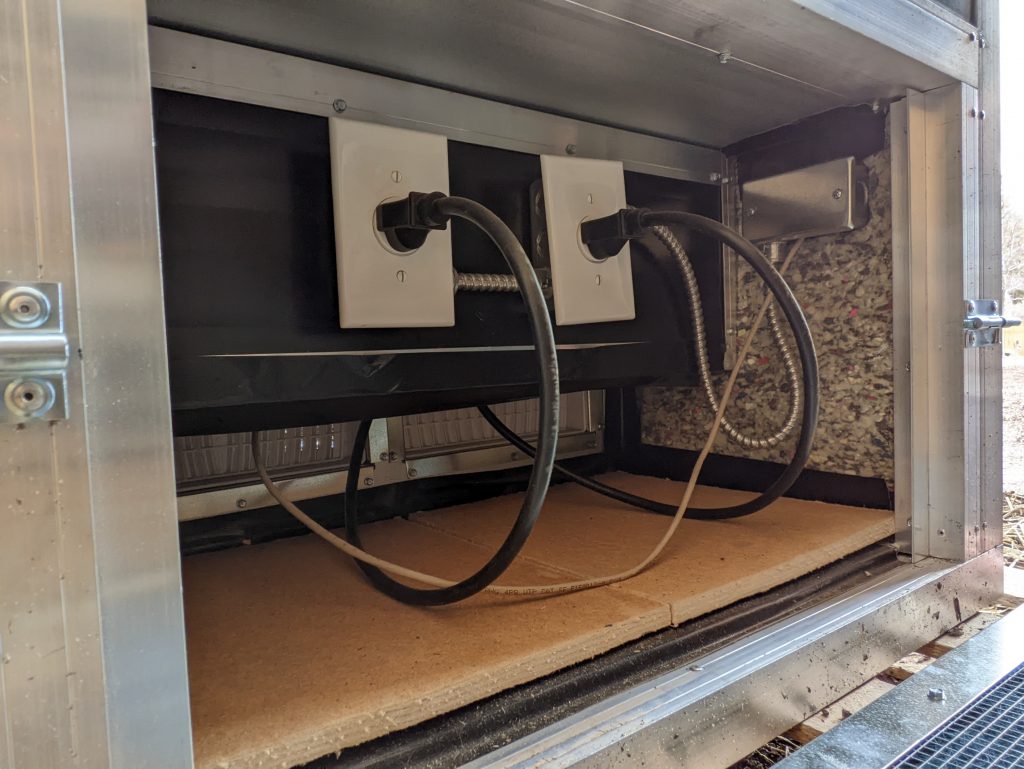
With that, everything is ready to be connected and powered on. If you are looking for additional information on the startup procedure best practices, check the Upstream Data Startup Guide.
Section 3: Slush Pool
The first thing to do is configure your miner. This section covers both Antminer and Whatsminer. If this is the first time you are running an ASIC, please check this guide first for some tips and tricks on startup best practices.
Miner configuration
In order to configure your ASIC you will need to be able to communicate with it. The easiest way to do this is to use a web browser to log into your ASIC from a computer connected to the same local network. Once connected and logged into the ASIC you can make the necessary changes to connect to the mining pool.
First you will need the local IP address for your ASIC. This can be found by logging into your router and checking the list of devices under the DHCP leases section. Your router should have the local IP address needed to login, along with the password on a label somewhere on the device. If not, the directions are usually pretty easy to find with an online search for your manufacturer’s router. Typically, you can just type 192.168.0.1 or 192.168.1.1 or 10.0.0.1 into your web browser and that will bring you to your router login page.
Alternatively, one sure way to identify your router IP address is to open your command line terminal and run one of the following commands, looking for default gateway in the printed results:
ipconfigcommand for Windowsnetstats nr|grep defaultcommand for MacOSroute -ncommand for Linux distros
With the IP address identified, the username/password can vary depending on manufacturer but they are usually something like admin/admin or admin/1234 or admin/password. Alternatively, ASIC device specific programs like BTCTools, which can be downloaded here or general device detection tools like AngryIP may be used.
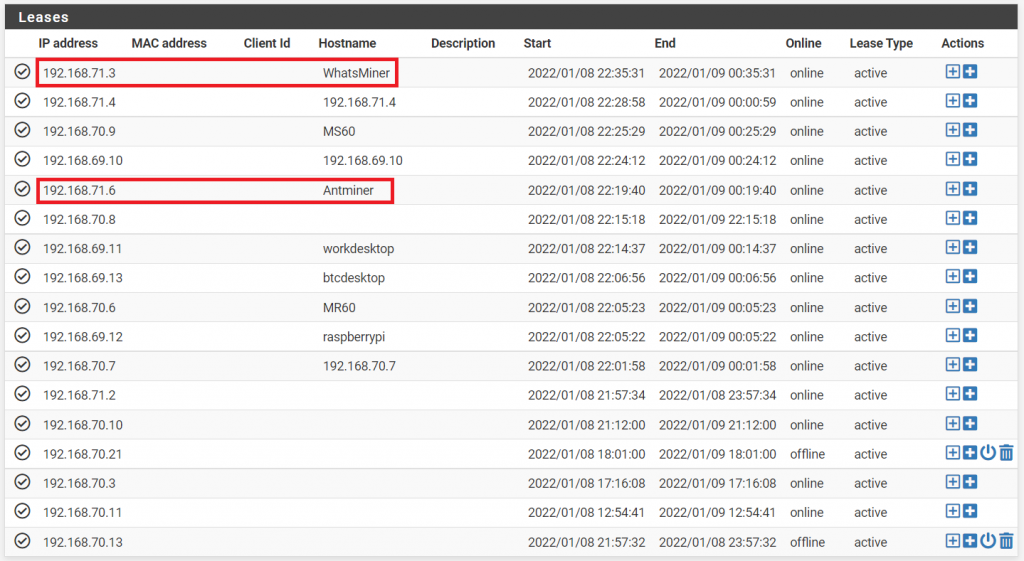
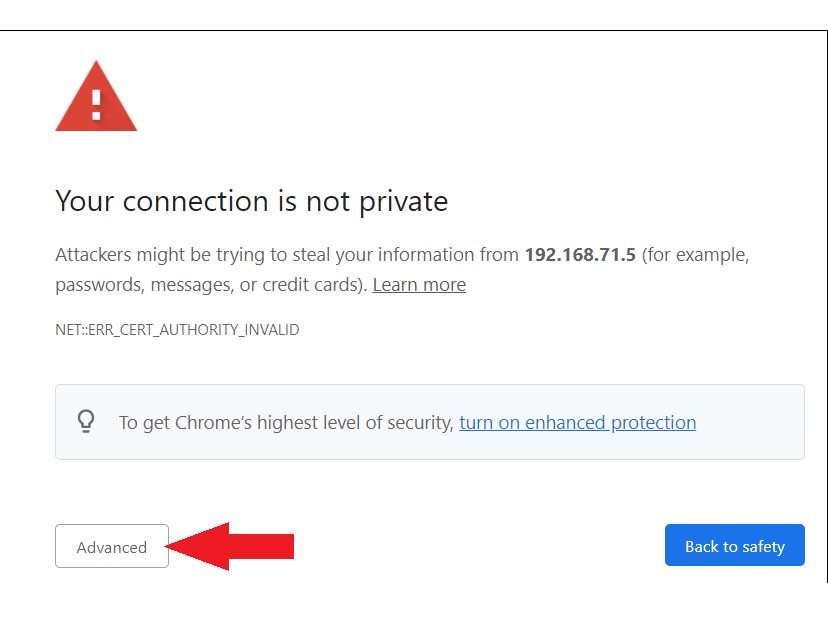
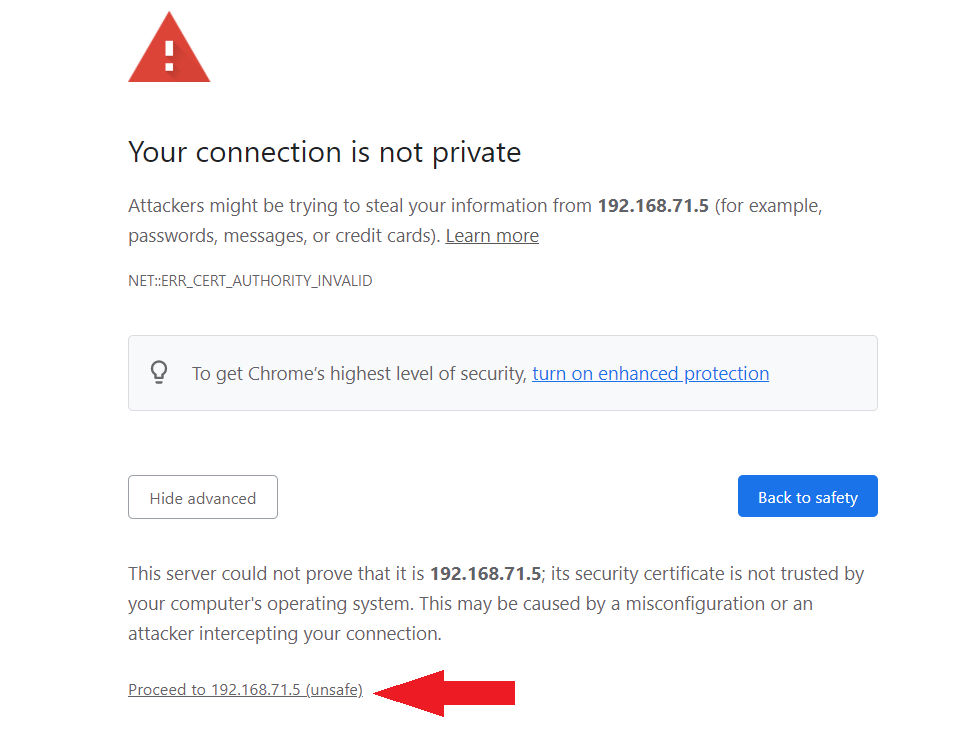
Once you have your ASIC’s local IP address then you can just type that into your web browser URL bar and then you may be warned about how this is not a trusted connection. This is a self signed certificate so just accept the risk and continue.
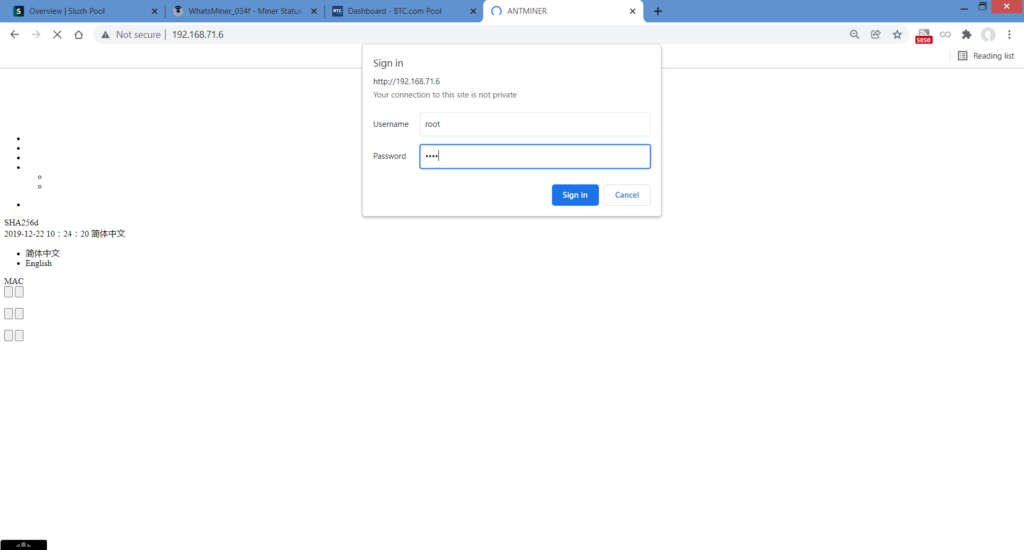
Antminer
Once you are at the Antminer login page the username/password should be root/root.
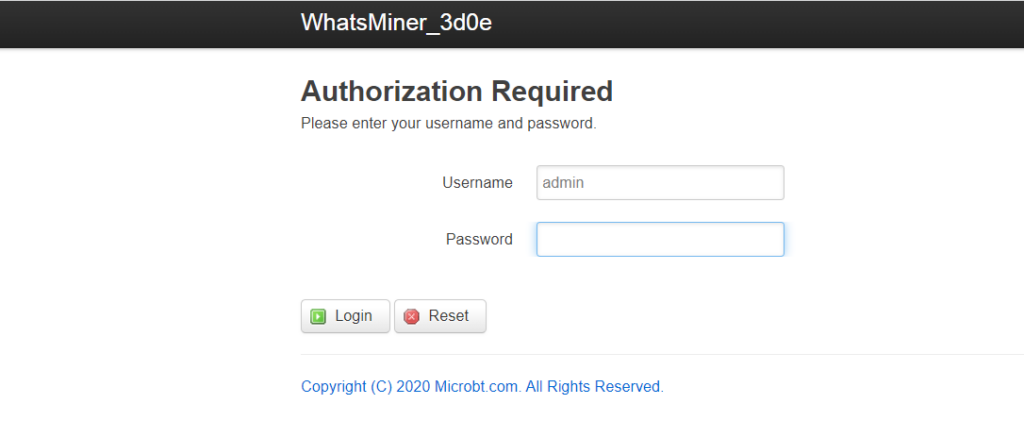
Whatsminer
From the Whatsminer login page the username/password should be admin/admin.
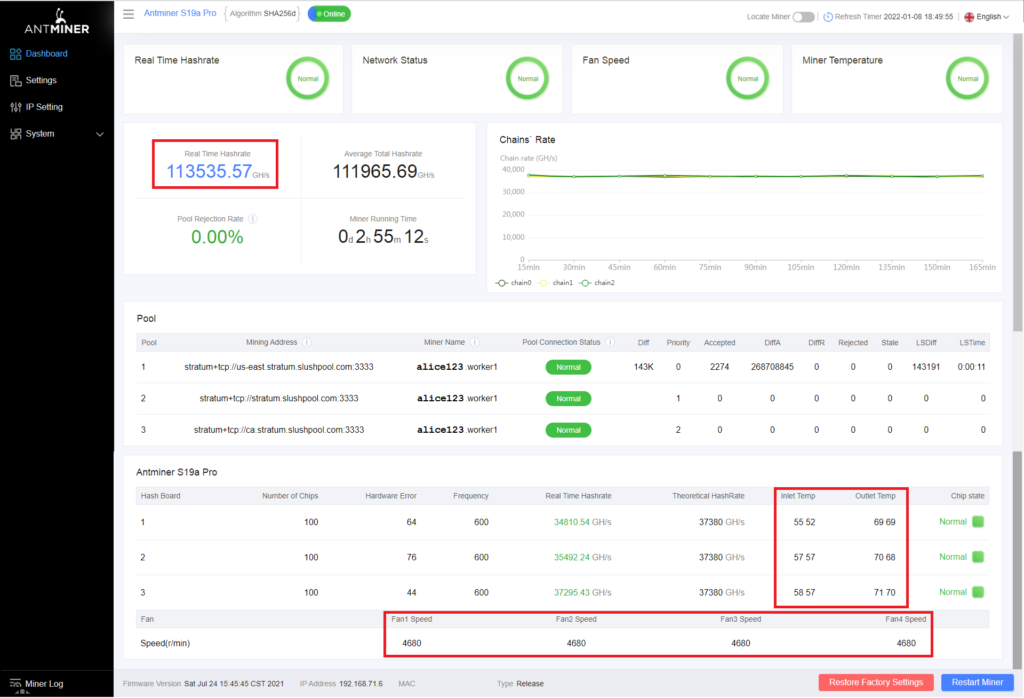
Antminer
Once logged in to the Antminer web interface, a few important statistics to note are the Tera Hash, displayed as a Giga Hash Average: GH/s. The Fan Speed: Fan1 Speed, Fan2 Speed, Fan3 Speed, Fan4 Speed. And the Hash Board Temperatures: Inlet Temp & Outlet Temp.
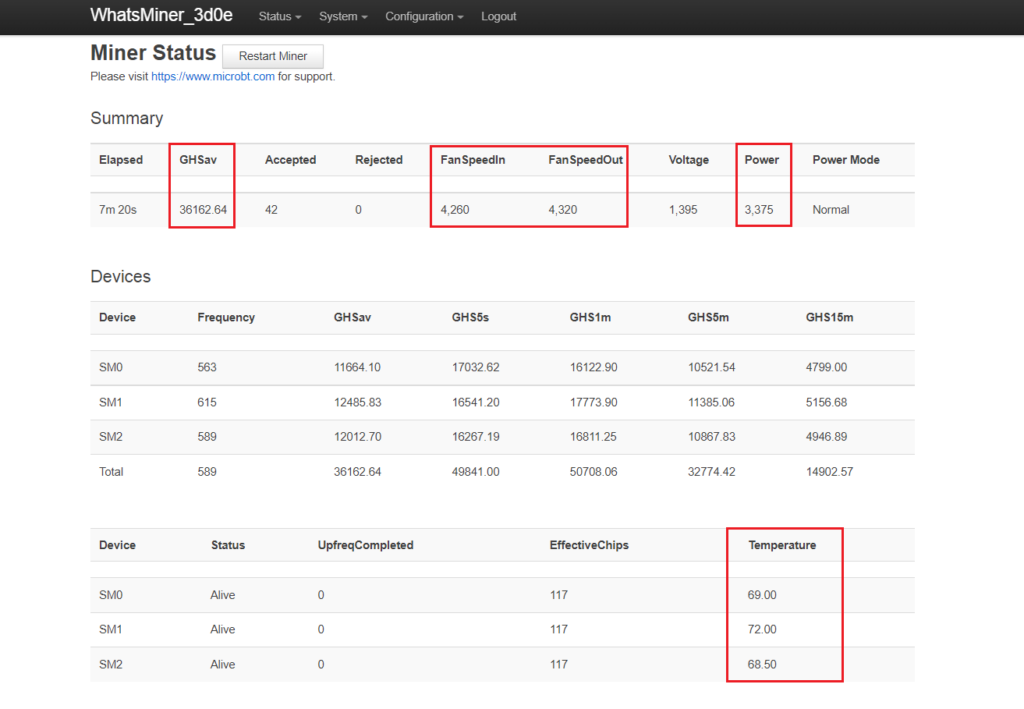
Whatsminer
Once logged in to the Whatsminer web interface, a few important statistics to note are the Tera Hash, displayed as a Giga Hash Average: GHSav. The Fan Speed: FanSpeedIn & FanSpeedOut. The Power Consumption in Watts: Power. And the Hash Board Temperatures: Temperature.
It can take several minutes to an hour for the ASIC to get up to speed and fully hashing, in the mean-time you can get started on connecting your ASIC to SlushPool.
Connecting to SlushPool
In this section you will see how to connect to SlushPool. There are many mining pools to choose from and the basic concepts covered here should be roughly the same for any pool you choose.
Antminer
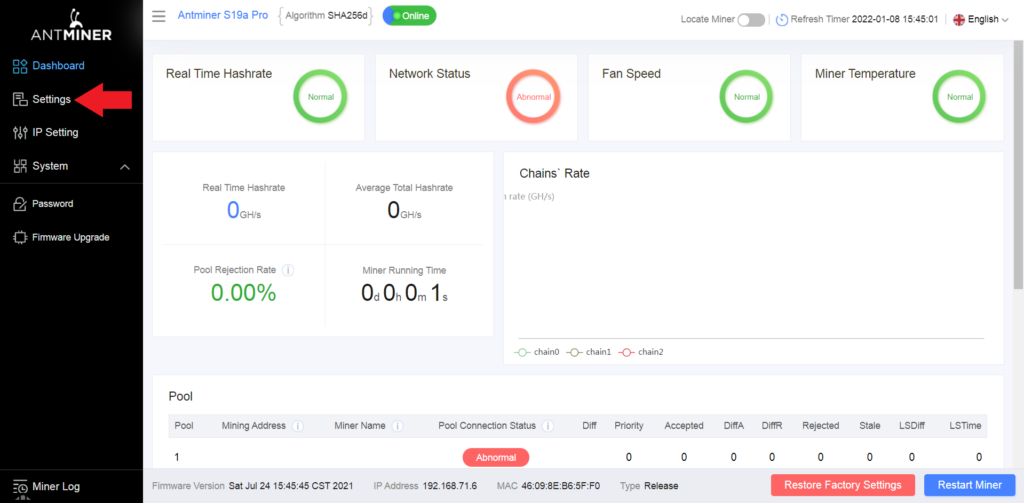
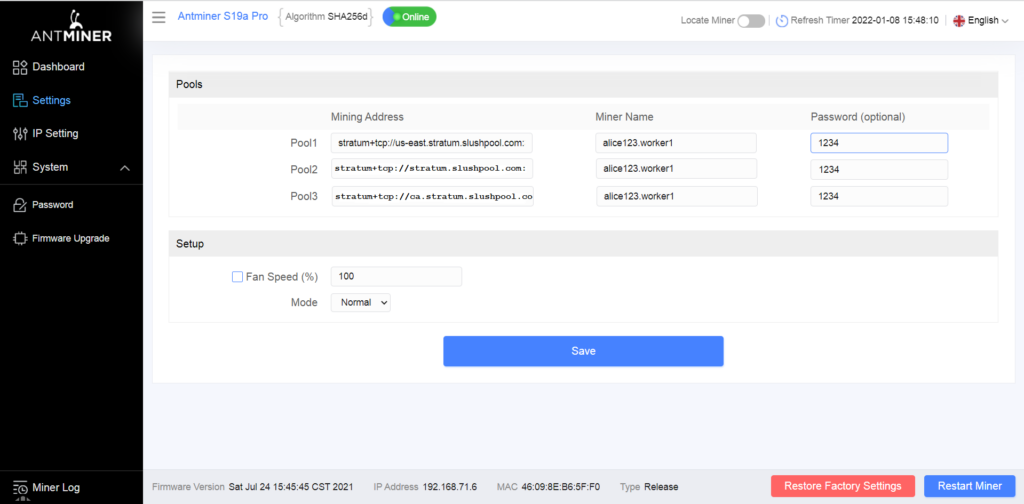
In the Antminer web interface, navigate to Settings in the left-hand menu, this will bring you to the configuration page where you can add the pool URLs.
Whatsminer
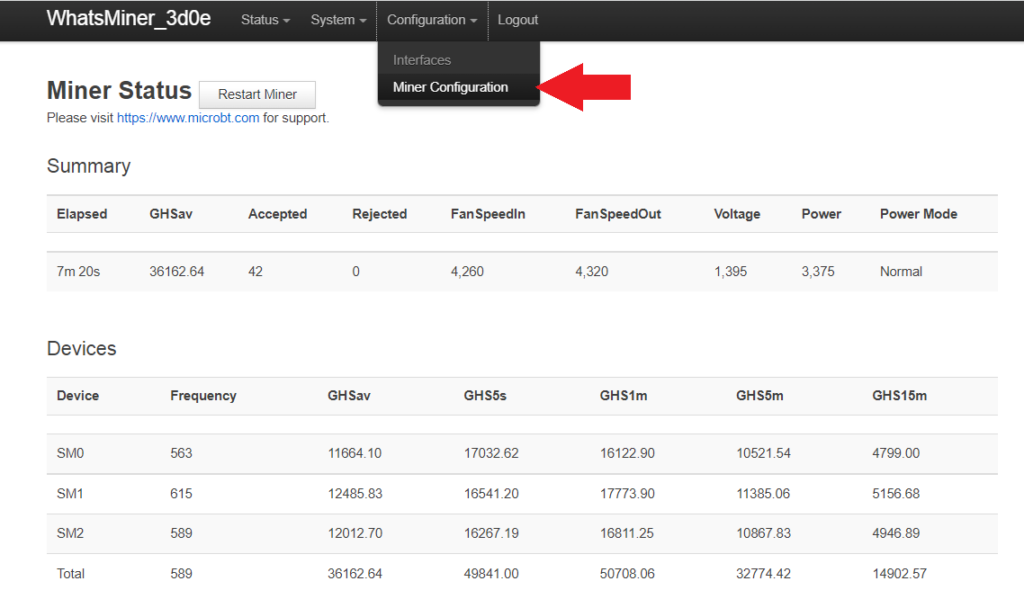
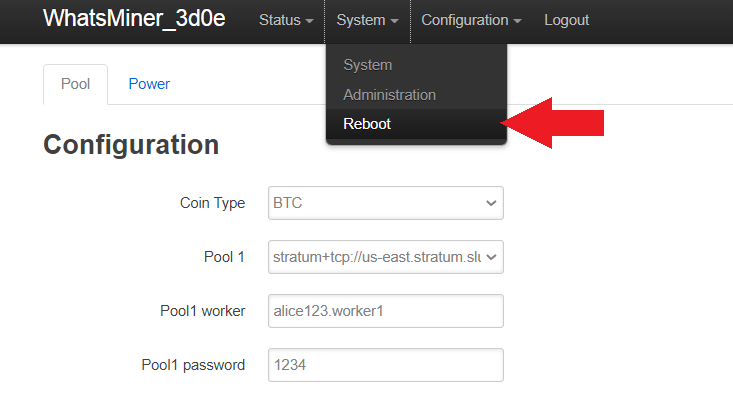
In the Whatsminer web interface, from the top bar menu, select Configuration > Miner Configuration. This will bring you to the configuration page where the pool URLs can be added.
Antminer
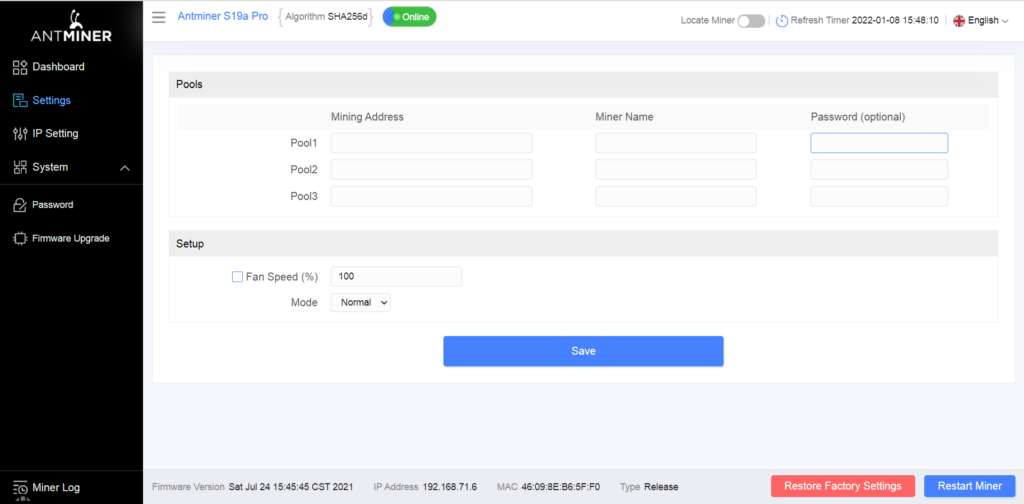
In the Antminer configuration page, you can change all the variables and then click on Save at the end prior to reboot.
Whatsminer
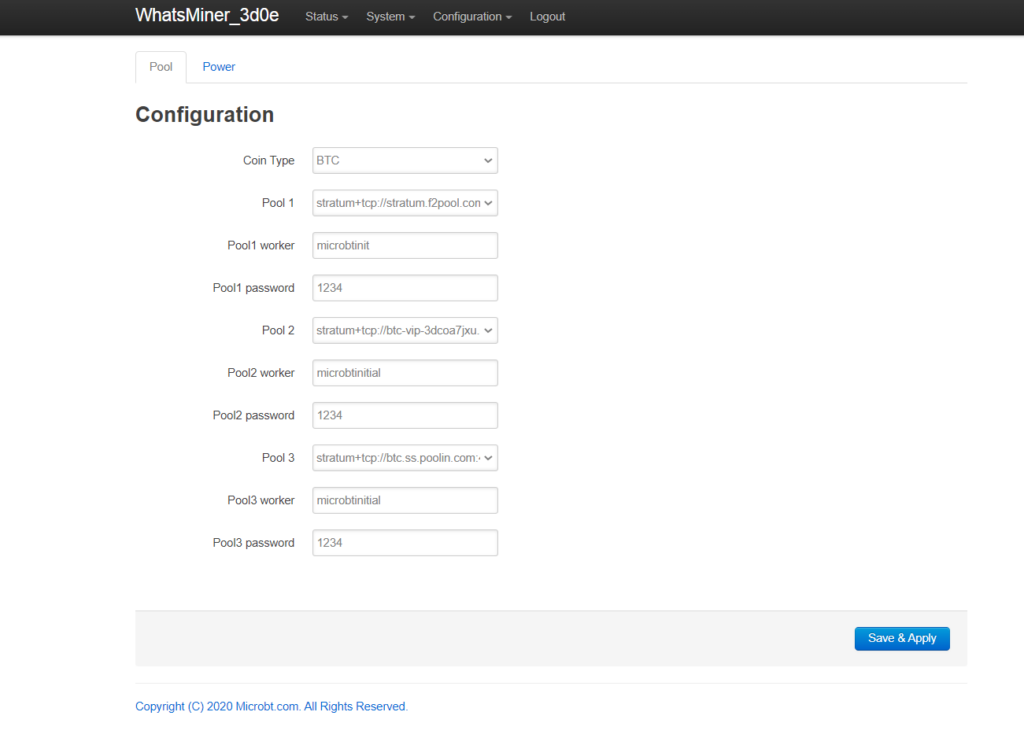
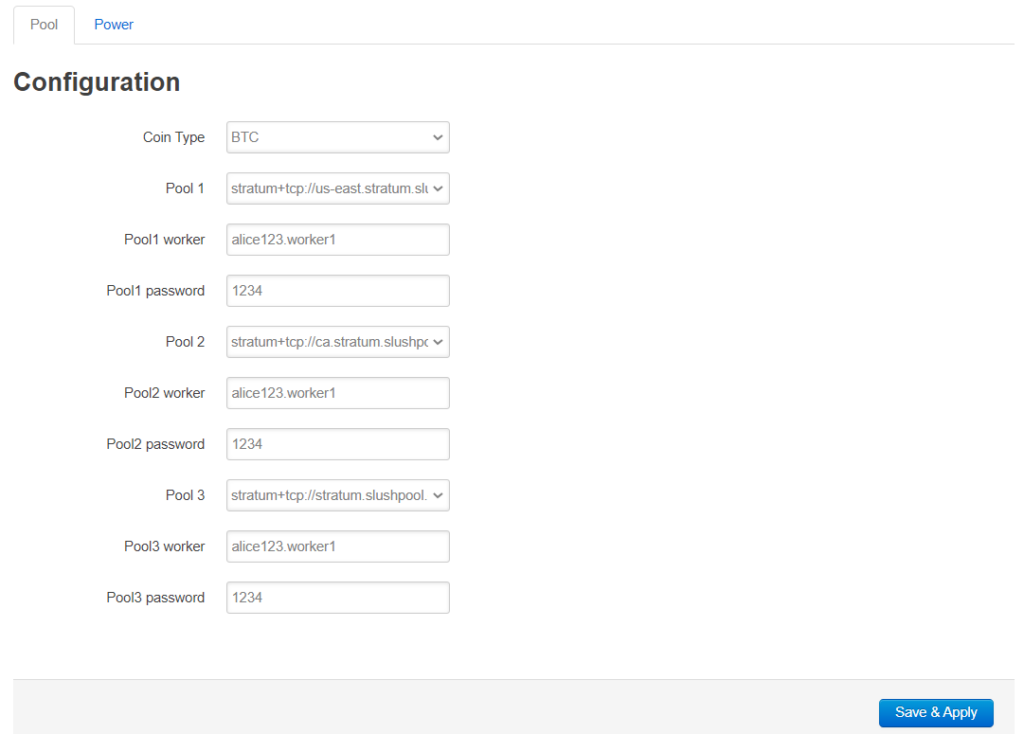
In the Whatsminer configuration page it is important to click on Save & Apply in between each change you make. Then at the end, after all the changes have been made, the ASIC gets a reboot and the changes are applied. If you don’t click Save & Apply between each change then those changes will be lost prior to the reboot.
Antminer & Whatsminer
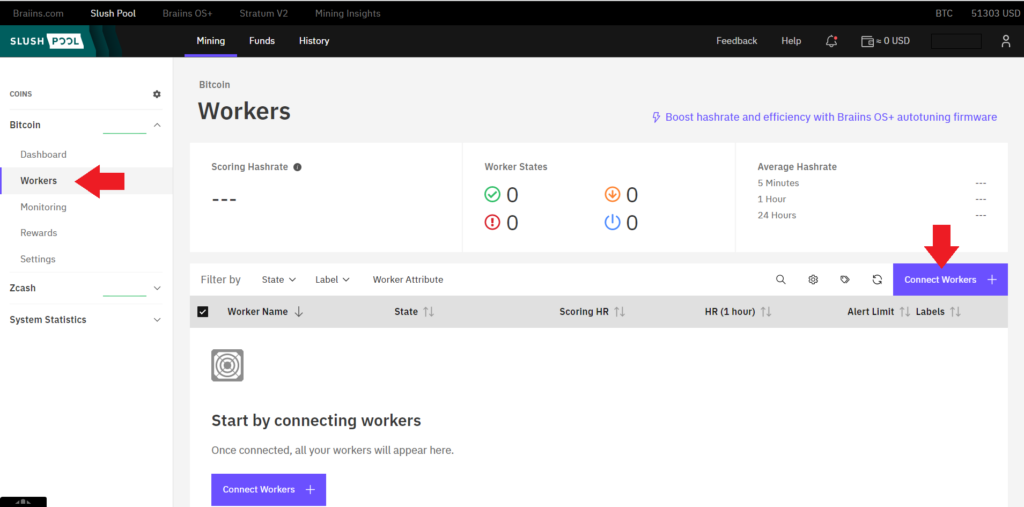
In another tab on your web browser, log into your SlushPool account if you haven’t already. Then navigate to the Workers tab in the left-hand side menu and click on Connect Workers +.
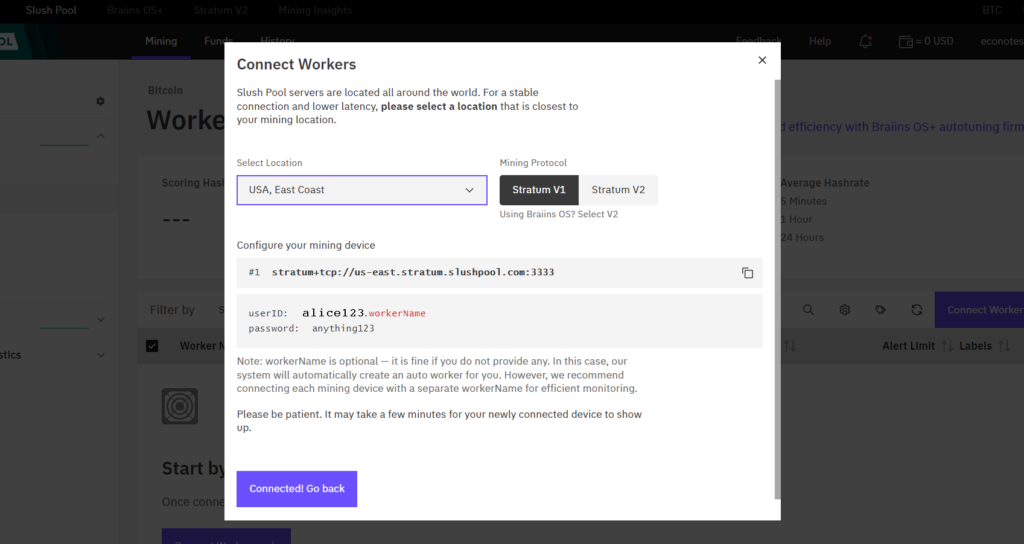
This will bring up a page where you can choose the SlushPool server that is closest to your geographic location. Choosing a server that is far from you can introduce latency which reduces mining rewards. For the Whatsminers, make sure you have Stratum V1 selected. Only use Stratum V2 if you have done the BraiinsOS firmware upgrade on your Antminer. You will also notice that SlushPool suggests that you name your ASIC username.worker1 in your ASIC configuration page. So in this example, the SlushPool username is alice123 therefore the ASIC configuration will be setup so that the ASIC is named alice123.worker1. If you are running multiple ASICs then just keep appending the “worker” flag sequentially. For example, alice123.worker1 for the first ASIC. Then alice123.worker2 in the second ASIC’s configuration page, and so on.
Also of note is that the password in the configuration page can be anything such as 1234, there is no security precaution with this password, it is used as a way to prevent the mining pool servers from getting spammed.
Antminer
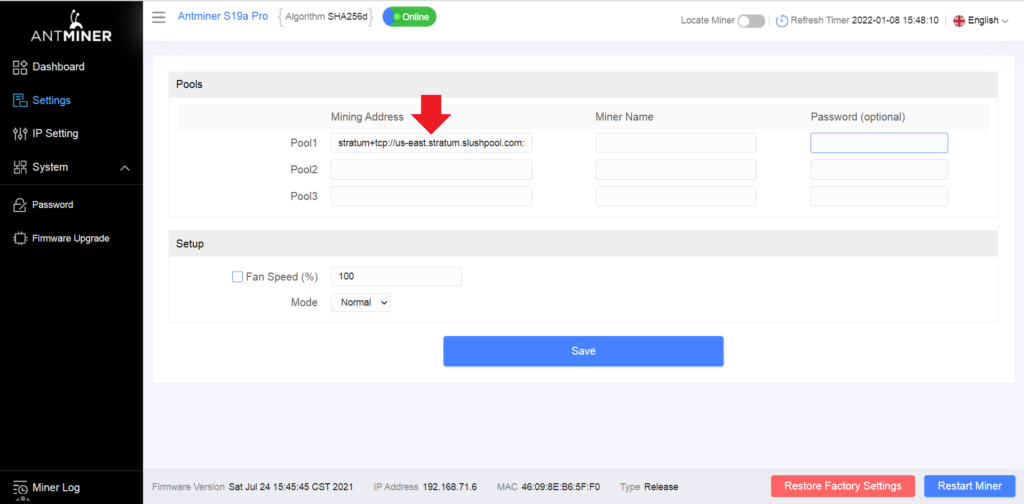
Copy/paste the first nearest SlushPool server into your ASIC configuration page by navigating to the Pool 1 dialog box and placing the SlushPool URL there.
Whatsminer
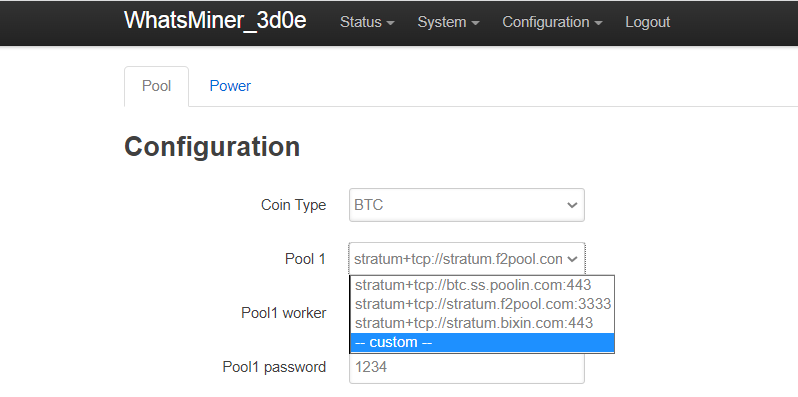
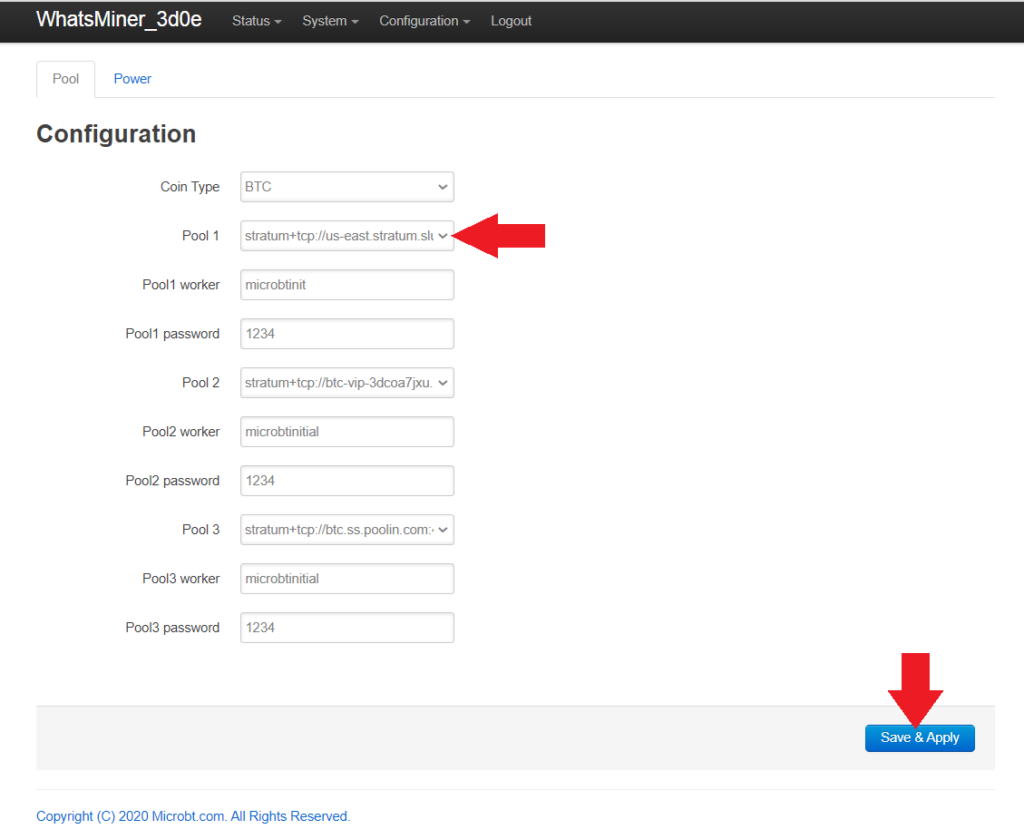
Copy/paste the first nearest SlushPool server into your ASIC configuration file by navigating to the Pool 1 drop down menu and selecting -- Custom -- and then pasting the SlushPool URL there. Then click on Save & Apply before making any other changes.
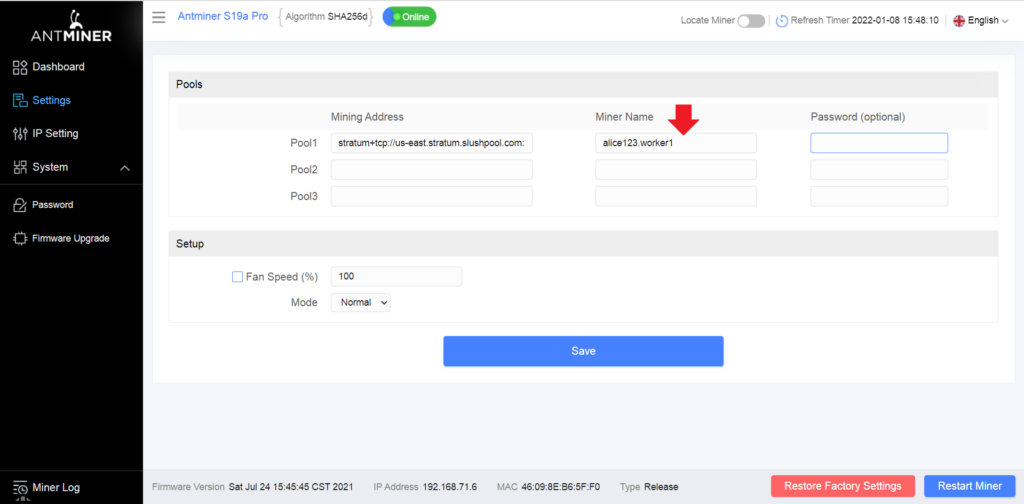
Antminer
Name your ASIC using your SlushPool username followed by .worker1 for example, alice123.worker1.
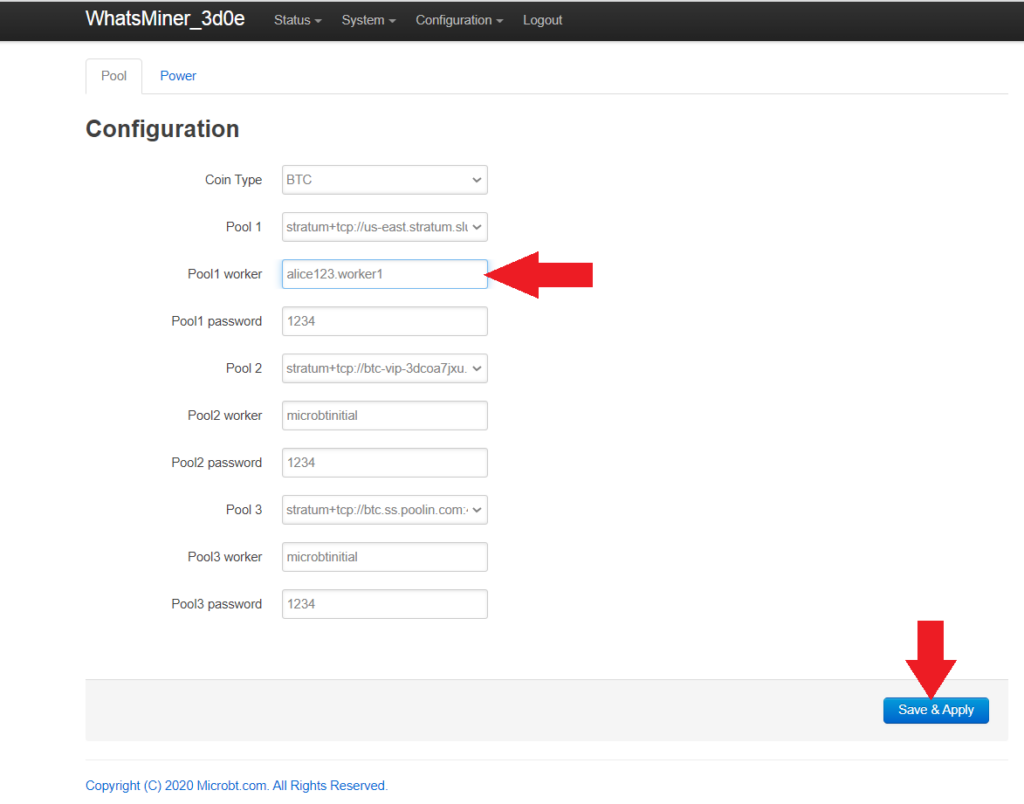
Whatsminer
Name your ASIC using your SlushPool username followed by .worker1 for example, alice123.worker1. Then click on Save & Apply before making any other changes.
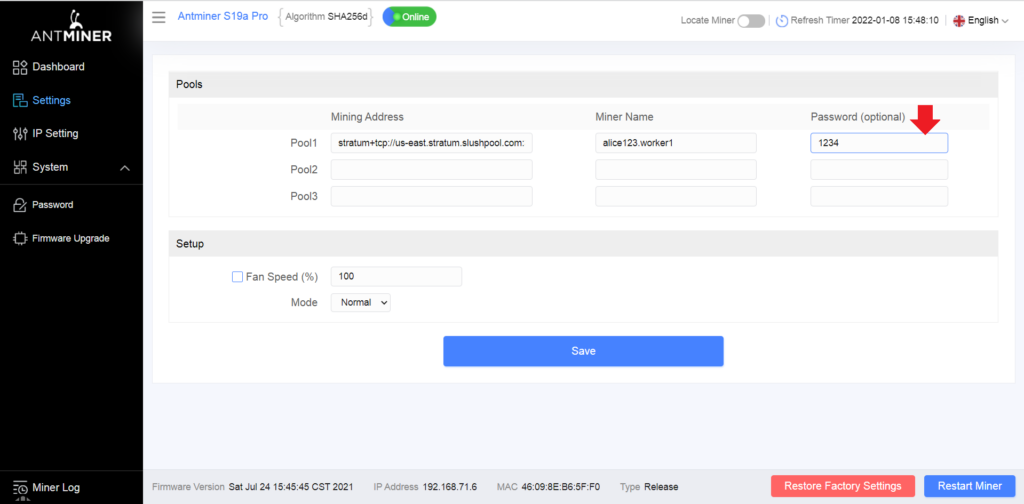
Antminer
You can use any password such as 1234. Then click on Save.
Whatsminer
You can leave the default password as 1234.
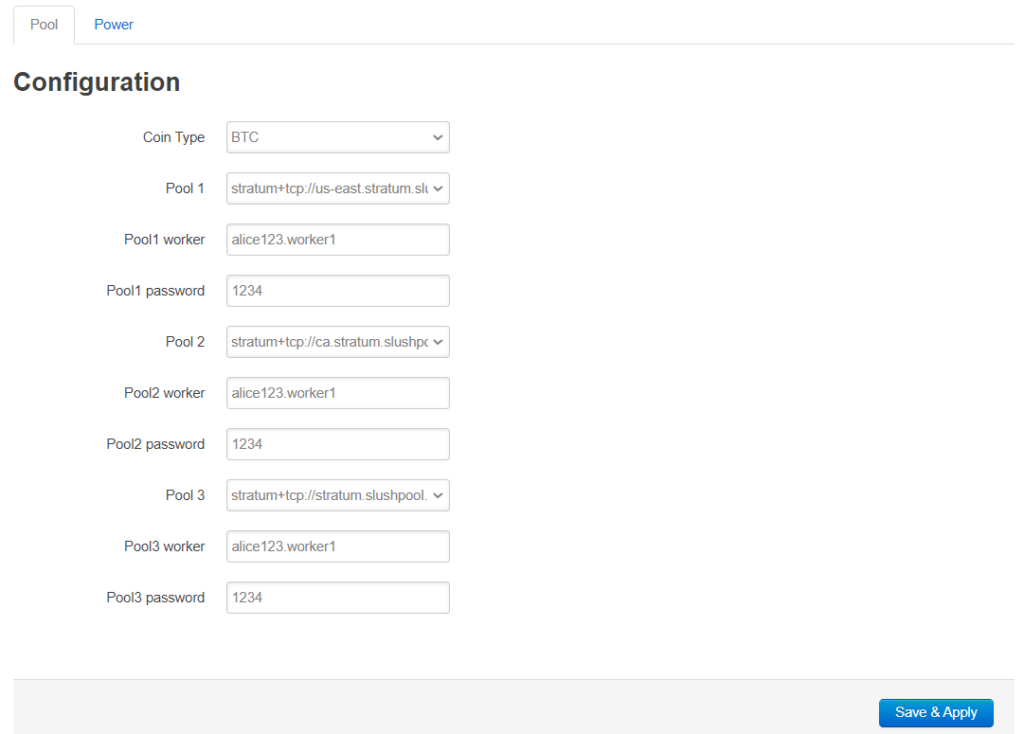
Antminer & Whatsminer
Repeat this process for the other two failover servers, picking a different server for each. Keep the worker name and password the same for each. Make sure you save your setting changes prior to reboot.
Antminer
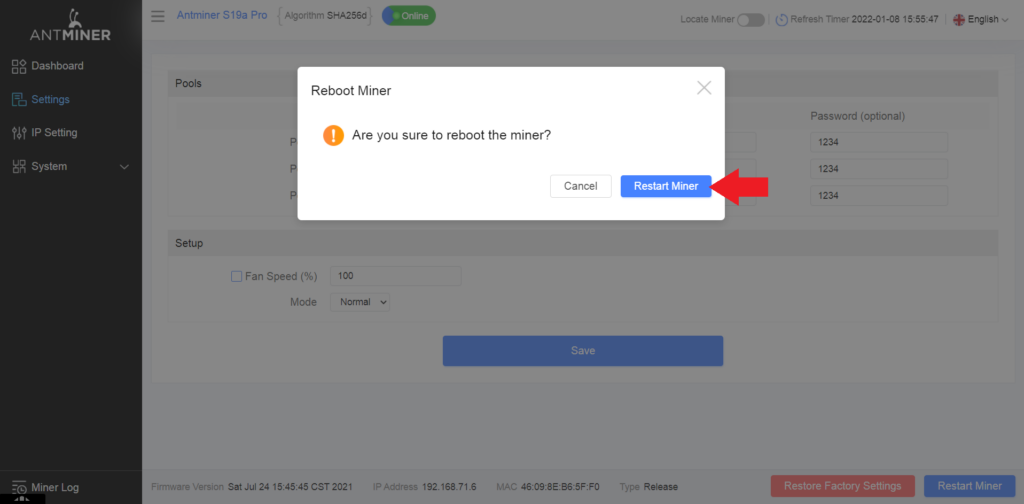
The ASIC needs to be rebooted in order for these changes to take effect. Click on Restart Miner in the lower right-hand corner, then again in the pop-up prompt. You should hear the fans spool down and back up again.
Whatsminer
The ASIC needs to be rebooted in order for these changes to take effect. Navigate to System > Reboot then click on the Perform reboot button. You will be logged out of the interface and the ASIC will reboot. You will hear the fans spool up and down a couple times. Then you can log back into the ASIC interface.
Antminer & Whatsminer
After a few minutes and as long as 90 minutes, you should start to see activity showing up in your SlushPool dashboard. Do not be alarmed if the hash rate is low or if the worker is showing as Offline or Disabled, it can take a long time for everything to connect and settle down.
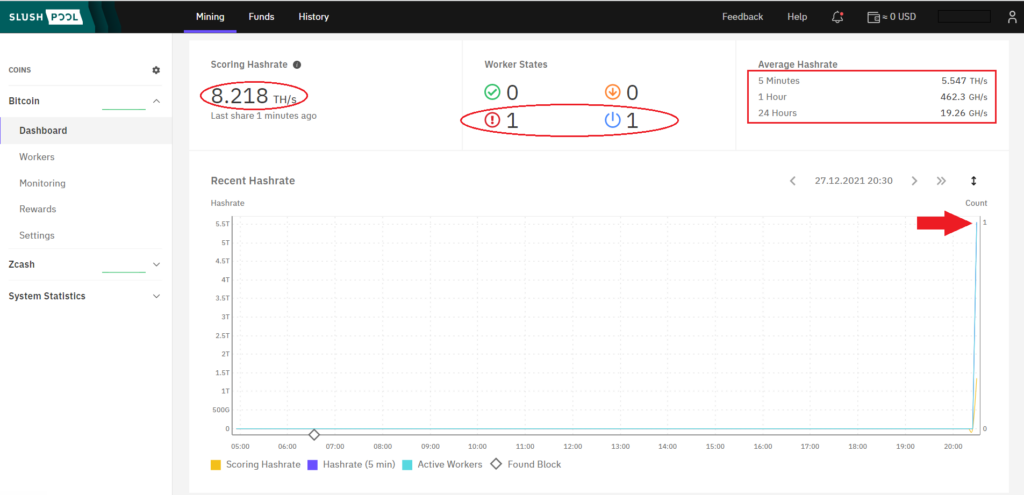
At this point, simply monitor both your SlushPool dashboard and the ASIC web interface to ensure that the amount of hash being generated at the interface is reaching the dashboard.
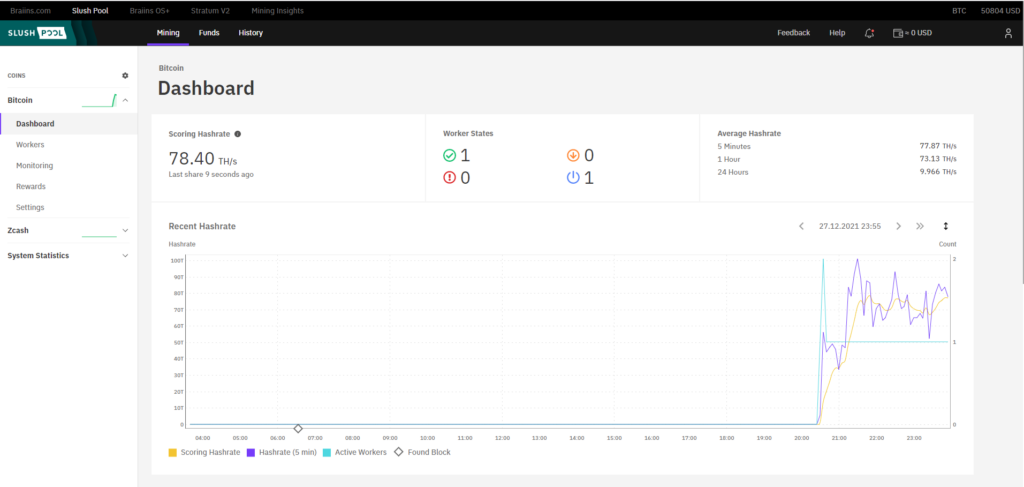
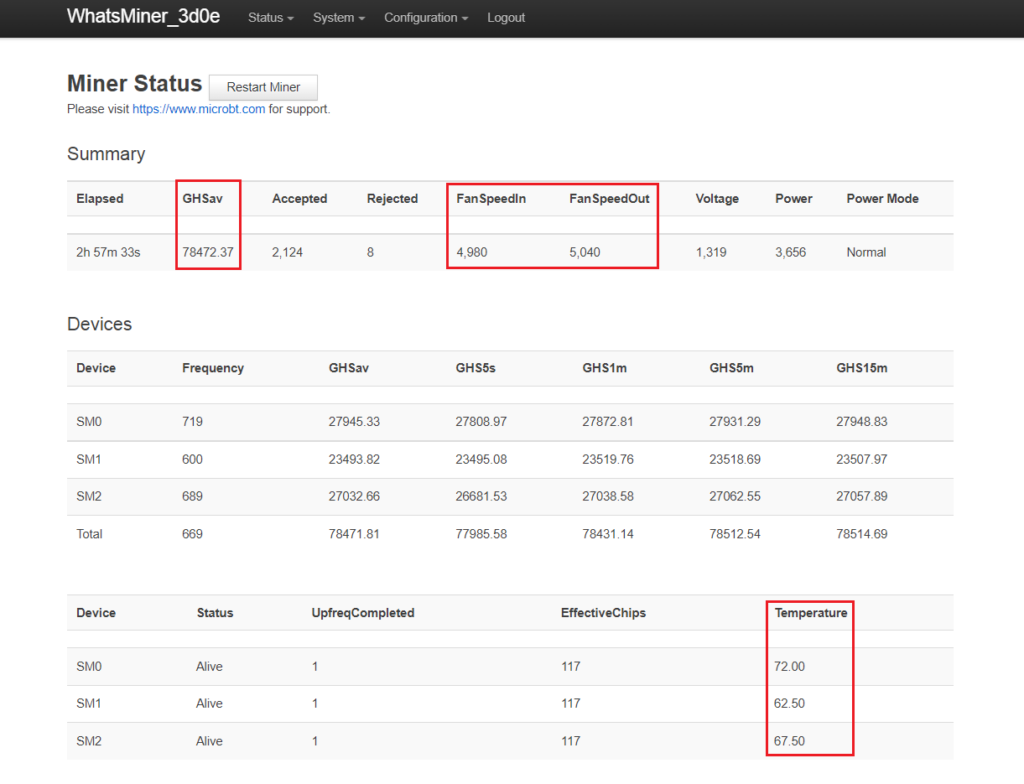
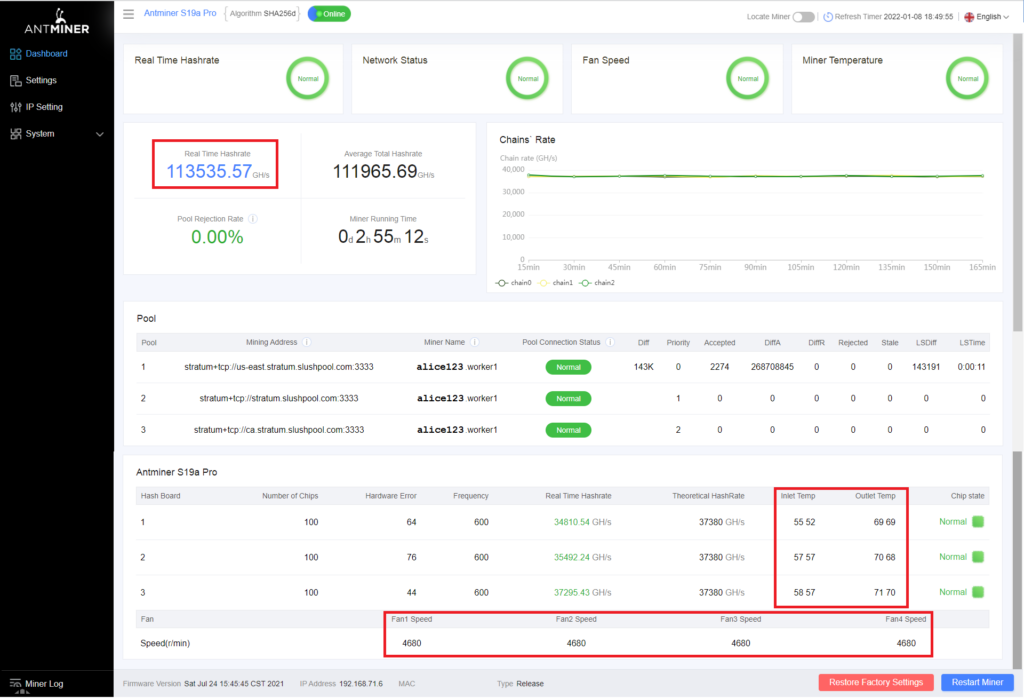
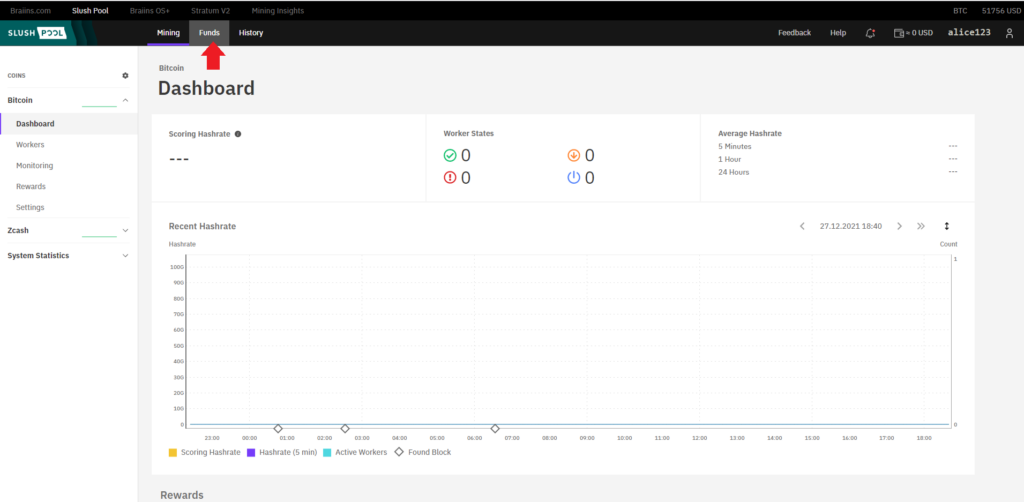
Keep in mind that the prominently displayed hash rate score on the SlushPool interface is your scoring rate which is made of averages. During initial startup do not be surprised if this number is significantly lower than the hash rate reading you get from the web interface on your ASIC. A more accurate metric to watch is in the upper right-hand corner of your SlushPool dashboard, the 5 minute, 1 hour, and 24 hour averages.
In the next section on Sparrow Wallet, you will see how to setup a wallet and generate a receiving address. Once you have that address, you can use it to setup your payout rules in your SlushPool dashboard. Navigate to the Funds tab in the upper menu bar.
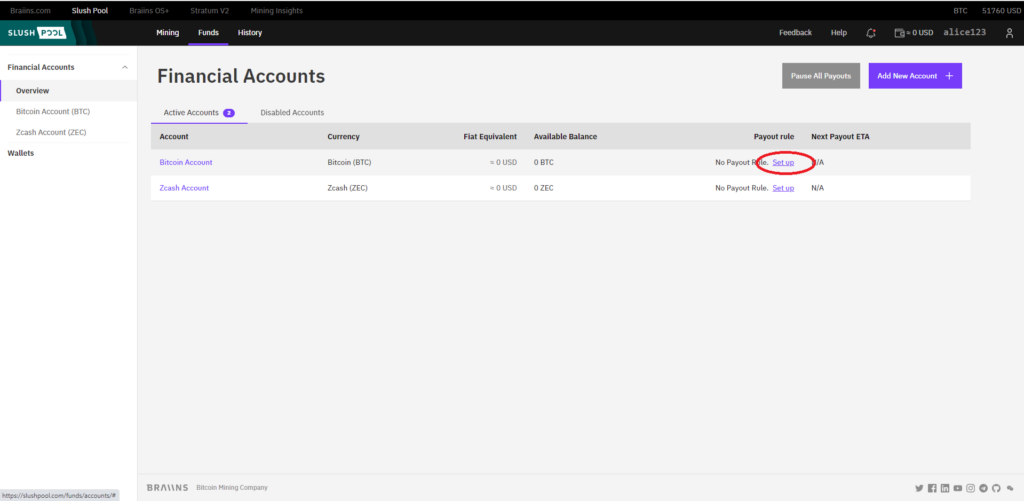
Next, navigate to the row labeled Bitcoin Account and on the right-hand side click on the Set up hyperlink. Then click on the Create New Wallet option. Then fill in a wallet name, your bitcoin deposit address from your preferred wallet, and select a Trigger Type of either threshold or time interval. With small scale mining operations it may make more sense to use the threshold option so that once the accumulated rewards exceed a specified threshold, the payout is made. Specifying a threshold value lower than 0.01 bitcoin will result in a small fee. Then click on Confirm Changes.
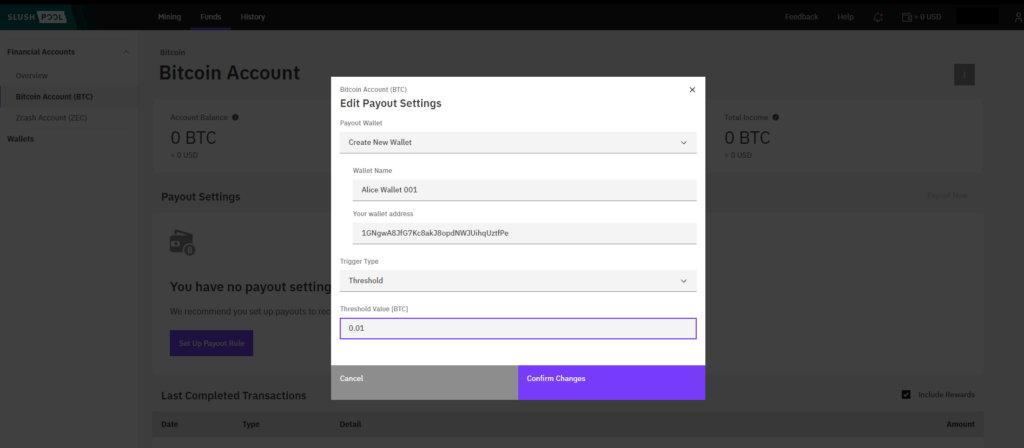
You will be asked to confirm your SlushPool password and you will be sent a confirmation email asking for you to confirm the deposit address change. After clicking on the confirmation link in your email, you will be directed to a new SlushPool window and you will see that your changes have taken effect.
That is the process for updating your payout address. There are privacy benefits to only using addresses one time, so consider updating this address between each payout. At this point your SlushPool account is all setup and ready to use. If you want additional details for creating a SlushPool account, check the Upstream Data Startup Guide.
Section 4: Sparrow Wallet
Sparrow Wallet is a Bitcoin wallet designed to be connected with your own node and ran from your desktop or laptop computer. This is a user-friendly wallet with an intuitive interface and many advanced features for a range of capabilities. To learn more about Sparrow Wallet and for installation instructions, visit the Sparrow Wallet website.
In this guide you will see how to:
- Get started, connect your Sparrow Wallet using your own Bitcoin Core node.
- Generate addresses, setup a hot wallet in Sparrow for receiving & Whirlpool mixing.
- How to use Whirlpool & connect to your COLDCARD to automatically deposit from Whirlpool.
- How to spend from air-gapped COLDCARD.
Bitcoin Core
If you don’t have your own Bitcoin Core node, you can use reputable public Electrum servers as demonstrated in the UltraQuick guide. However, there are privacy trade offs that come with using the convenience of a public Electrum server. Luckily there are a number of resources available to help you spin up your own Bitcoin node, to learn more check out:
You do not need to buy dedicated hardware like a RaspberryPi to run a Bitcoin node. You can just install Bitcoin Core on your PC, just be aware that you will need ~450GB of hard drive space for the blockchain data. Once you have your Bitcoin Core node ready, there are a couple steps needed to configure it to work with Sparrow Wallet.
If you have Bitcoin Core running on the same computer as Sparrow Wallet, then all you need to do is open the bitcoin.conf configuration file and add server=1 near the top and save it. Then relaunch Bitcoin Core. You may have a blank configuration file if this was a new Bitcoin Core install and that is fine.
Alternatively, if you are running Bitcoin Core on a remote computer, you need to add a username & password and the Remote Procedure Calls (RPC) binding local IP addresses in the configuration file. To do this, navigate to the bitcoin.conf configuration file and open it in your preferred text editor. Then add the local IP address for your node and the local IP address for your desktop. For example:
rpcuser=pi
rpcpassword=Nakamoto21
rpcbind=127.0.0.1
rpcbind=192.168.0.11 #(your node)
rpcallowip=127.0.0.1
rpcallowip=192.168.0.12 #(desktop)
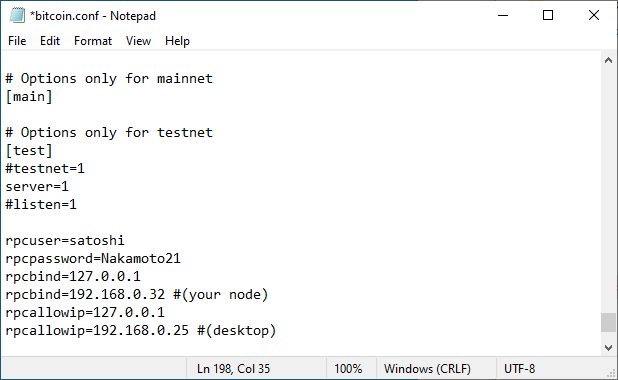
Save those changes and then you should be able to connect to your Bitcoin Core node from your computer on the same local network. Make sure you restart Bitcoin Core after saving those changes.
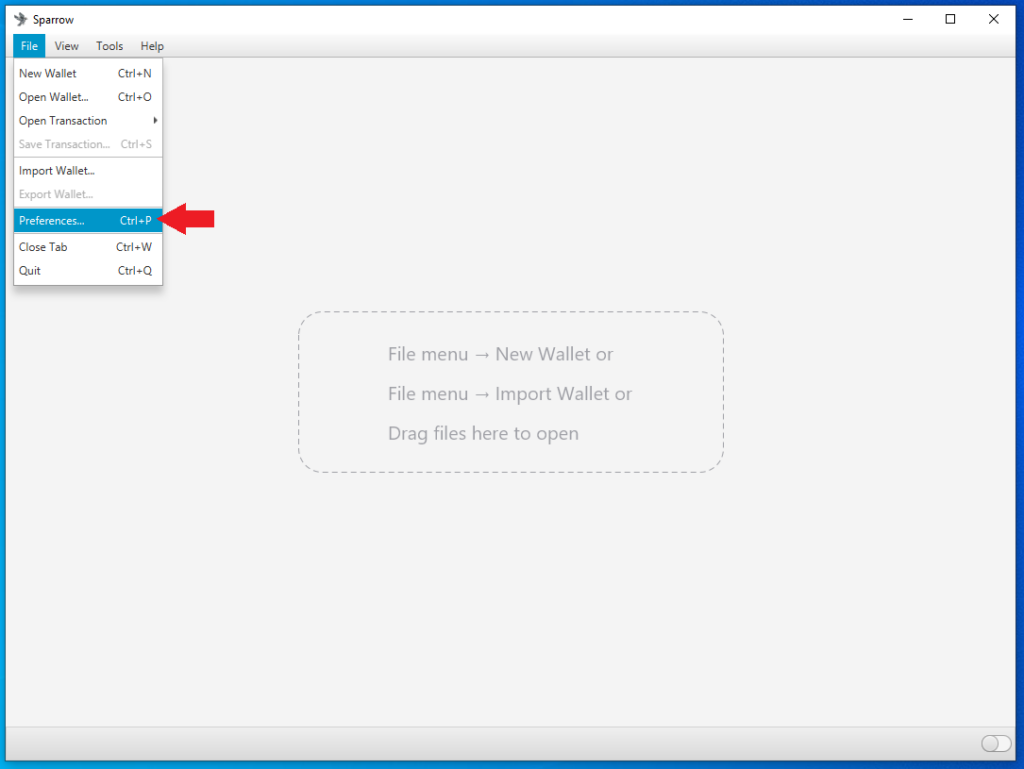
Now you are ready to configure Sparrow Wallet to talk to your Bitcoin Core node. Once you have Sparrow Wallet installed and launched, you will be presented with an empty user interface. Navigate to File > Preferences.
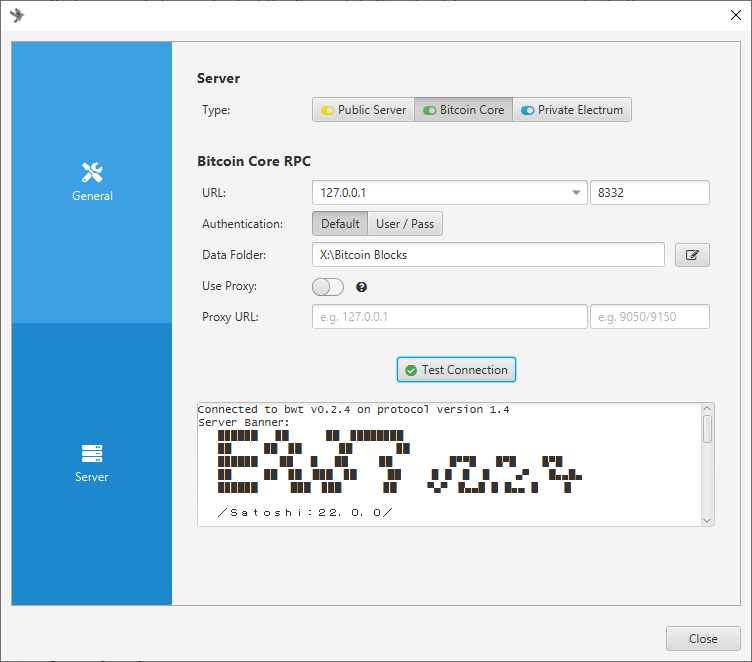
Then click on the Server tab on the left-hand side. Click on the Bitcoin Core tab for the Server Type. If running Bitcoin Core on the same computer, use the 127.0.0.1 rpcbind IP address with 8332 as the port and the default authentication option. Or if running Bitcoin Core on a different computer, use the same User/Pass that you entered in the bitcoin.conf file. Either way, set the Data Folder directory to the same folder the bitcoin.conf file is being written. This should be the same directory that Bitcoin Core writes the .cookie file that Sparrow Wallet needs to read. Test the network connection from Sparrow Wallet. If it’s good, you should see the green check mark next to Test Connection and some information populated in the dialog box below that. Then you can close that window.
Unfortunately, Bitcoin Core stores your public keys and balances un-encrypted on the computer it is running on. Although your bitcoin are not directly at risk of theft, if this computer is regularly connected to the internet, it is at risk to hackers – which has the potential to make you a target if your balance and geographic location are discovered. To learn more about Sparrow Wallet best practices, check out this Sparrow Wallet resource.
Now that Sparrow Wallet is connected with Bitcoin Core, this is a good time to get the hot wallet setup.
Configuring Sparrow as a Whirlpool Wallet
This section will show you how to set up the hot wallet that you can use for the Whirlpool CoinJoin implementation in Sparrow Wallet. Using Whirlpool will help prevent the mining pool from seeing what you do with your mining rewards (or anyone watching the movement of mining rewards on chain) and this will also help prevent anyone you spend your bitcoin with from knowing that you earned that bitcoin through mining.
The important idea to understand here is that you are making a hot wallet in Sparrow that is totally separate from your COLDCARD wallet. You want to keep your COLDCARD wallet totally air-gapped and never have that signing key on a device that is connected to the internet. When you use Whirlpool however, Sparrow Wallet needs to sign CoinJoin transactions as they are created. The benefit of leaving your UTXOs in Sparrow Wallet to mix is that your UTXOs will continually be registered as available inputs when new liquidity enters the mixing pool. Your UTXOs will be able to continue re-mixing again and again for free, so you get more and more anonymity with each mix, this is the incentive to leave your UTXOs mixing. The downside is that you have a Bitcoin wallet connected to the internet with private keys on it, thus the term “hot wallet”.
The hot wallet will be used to deposit the mining rewards to, then they will be mixed, and once the UTXOs are in the post-mix hot wallet, you can choose to set a minimum number of mixes you want to achieve and then have them automatically deposited to your COLDCARD. This is where things get interesting, when you have a post-mix UTXO deposited to the COLDCARD straight from a CoinJoin, on-chain it is impossible to tell that this has been moved to a different wallet. It looks like it is just an unspent CoinJoin output. And so long as it remains unspent, then while other UTXOs from that last CoinJoin transaction continue to mix, your anonymity set continues to grow. To learn more about the anonymity set in Whirlpool, read this article.
To get started, open the Sparrow Wallet application, you should be presented with a blank home page and you should see that the toggle switch in the lower right-hand corner is colored yellow if you are using a public Electrum server, green if you are using Bitcoin Core, or blue if you are using your own Electrum server.
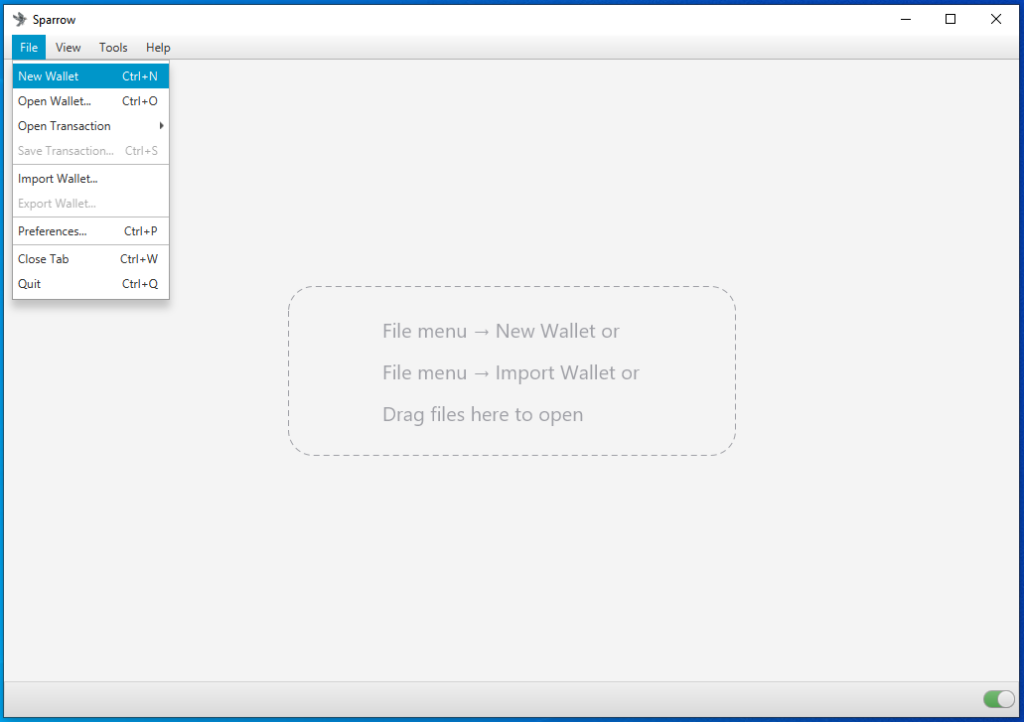
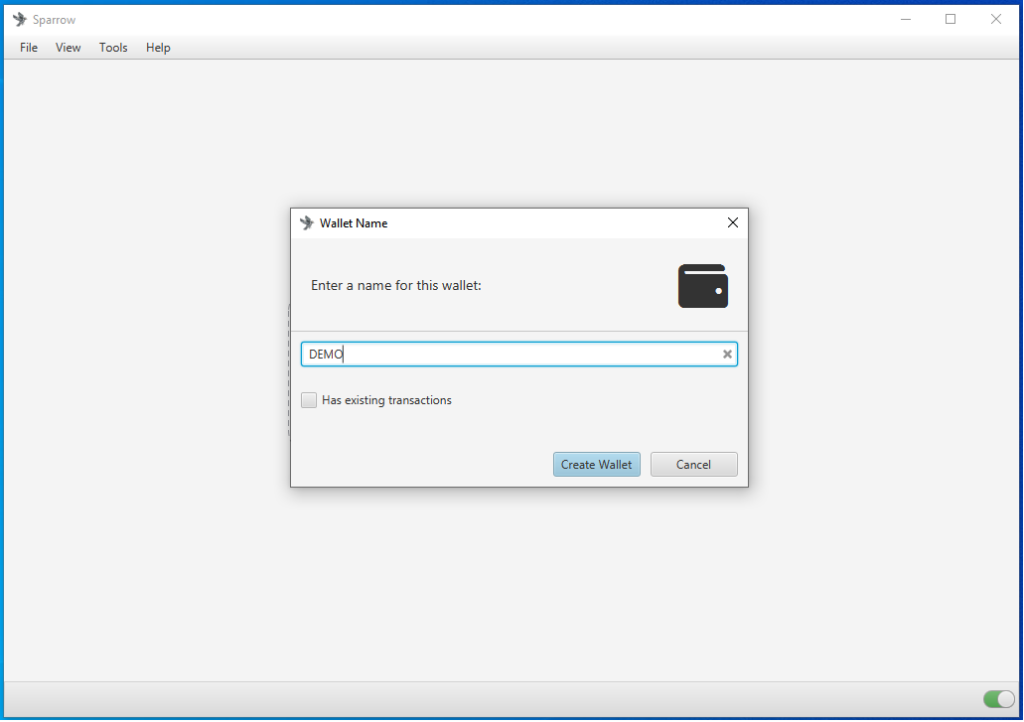
Navigate to file > New Wallet. Then name your new wallet whatever you want and select Create Wallet. Alternatively, there is a convenient method to derive entropy from your COLDCARD for external wallets using BIP85, you could generate a seed phrase to import here instead and then so long as you have your master seed phrase and the corresponding index number safe, you will always be able to restore the derived seed phrase as well. To learn more about BIP85 read this guide.
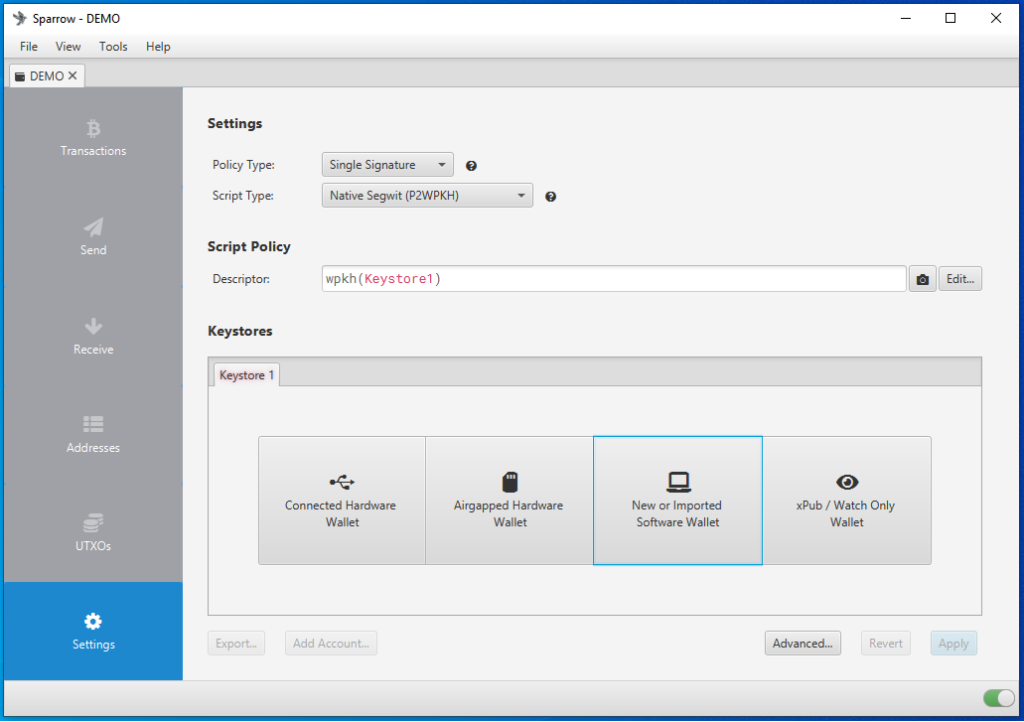
The next screen you will be presented with is going to ask you for some specific information about how you want to configure your new wallet. For the purposes of a Whirlpool hot wallet, the following default options are fine:
- Policy Type:
Single Signature - Script Type:
Native Segwit (P2WPKH) - Script Policy Descriptor:
wpkh(Keystore1) - Then under the
Keystore 1section choose:New or Imported Software Wallet
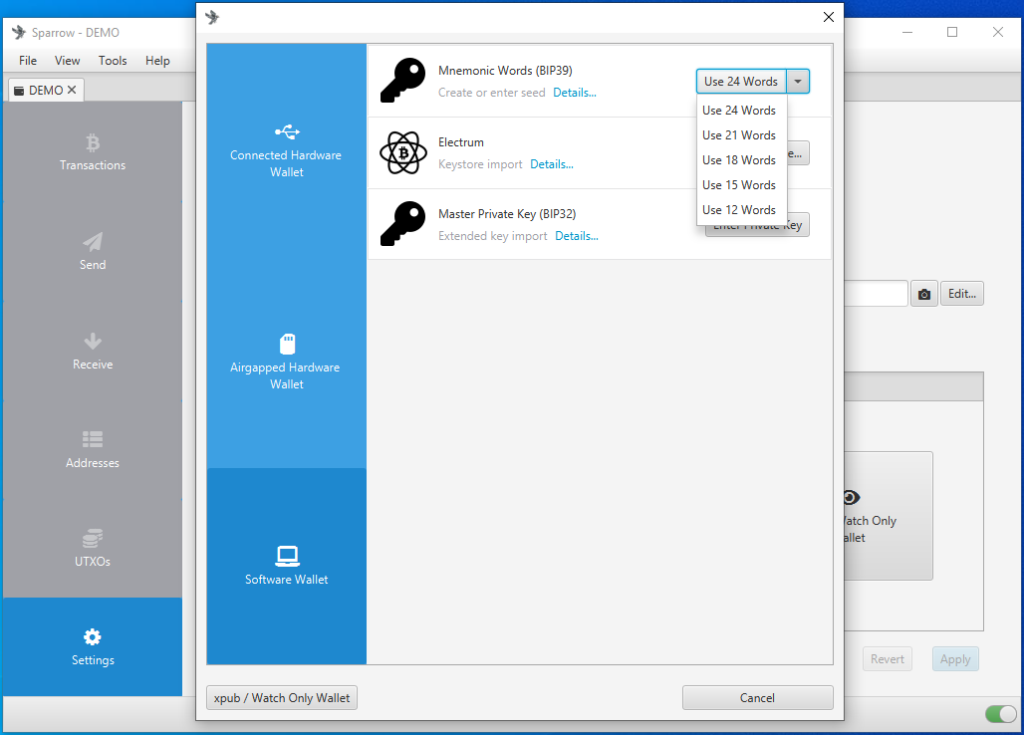
On the screen that pops up, click on the drop down menu that says Use 24 Words and select how many seed words you want in your seed phrase. 24-words are used for this demonstration. Then click on the button that reads Use 24 Words, or what ever number of words you selected.
Next, you will be presented with a screen full of blank cells for your seed words. Click on Generate New and these cells will be filled in from the results of the Sparrow Wallet Random Number Generator.
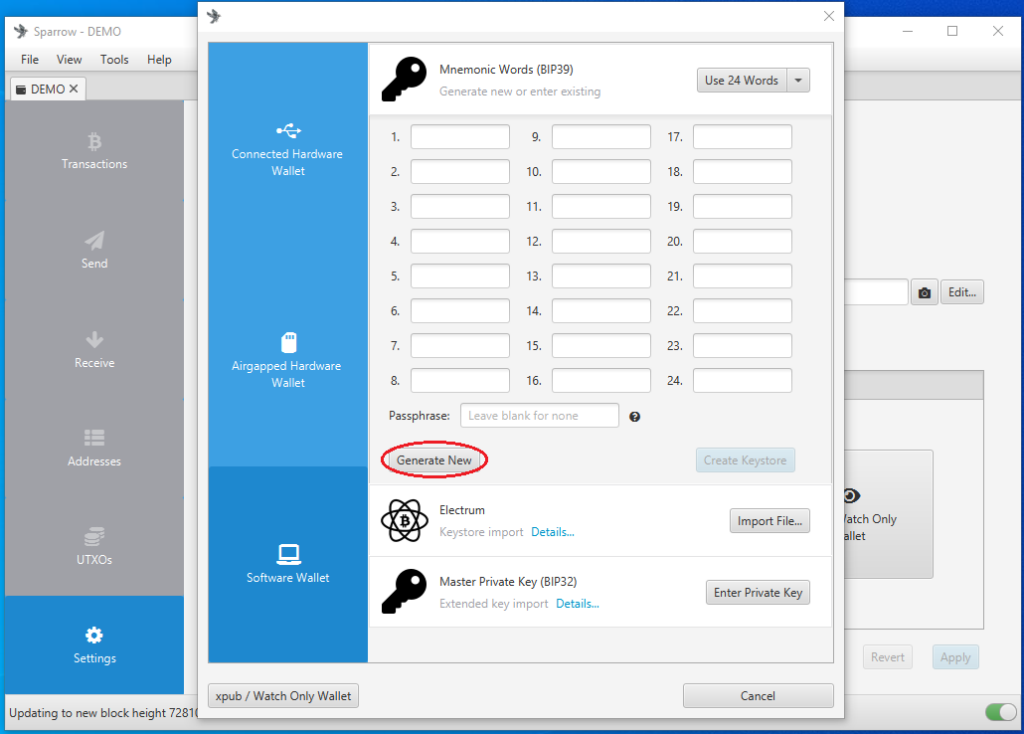
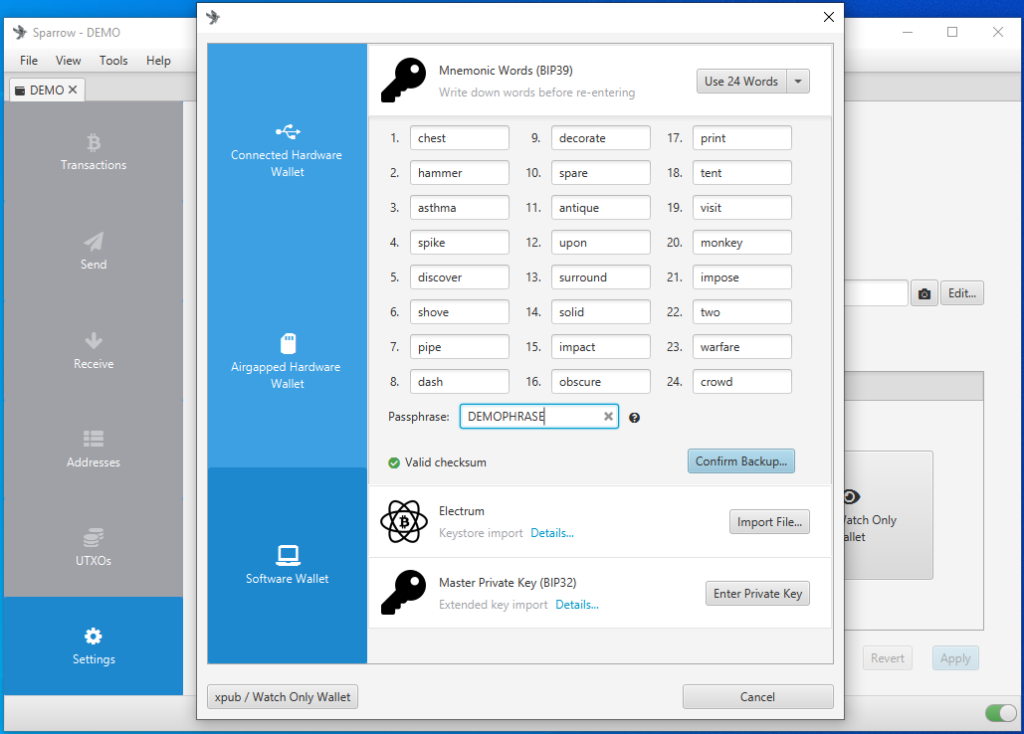
Ensure that you write these words down, in order, in a note book or other piece of paper that you can keep secure in the way you would with gold, cash, or jewelry. Never share these words with anyone, they will have access to your bitcoin. Do not take a screen shot of these words. Do not take a photograph of these words. Do not say them out loud. Do not put them in a text file.
The passphrase is optional but recommended. If anyone ever gains access to your seed words, then the passphrase will be the only thing protecting your bitcoin. Using a high entropy passphrase will make it difficult for anyone to guess your passphrase. Ensure that you also write this passphrase down, you will not be able to restore your wallet without it in the event that you need to attempt to recover your bitcoin. There is no way for the wallet to know what your passphrase is and any passphrase you enter will be accepted. If you enter the passphrase incorrectly in the future due to forgetting or losing it, you will lose access to your bitcoin. Also, consider storing your passphrase separately from the seed phrase because if anyone finds them together then for sure they will swipe your bitcoin.
Many people choose to stamp their seed words and passphrase into a metal medium because it can withstand extreme environments like fire and flooding better than paper. For this kind of wallet though, you may only be using it as a pass through to get mining rewards through Whirlpool before depositing them to your COLDCARD. Perhaps given the short time you will have bitcoin in this wallet is reason enough to not go through the trouble of stamping the information into metal. The choice is totally up to you and there are many options out there like the SEEDPLATE from Coinkite.
After clicking on Confirm Backup you will see a dialog box popup asking you if you have written the seed words down, click on Re-enter Words.
Then type all your seed words in order and enter your passphrase. If you make a spelling mistake, the wallet will warn you by highlighting the incorrect word in red. Once everything is correct and you have entered your passphrase, click on Create Keystore.
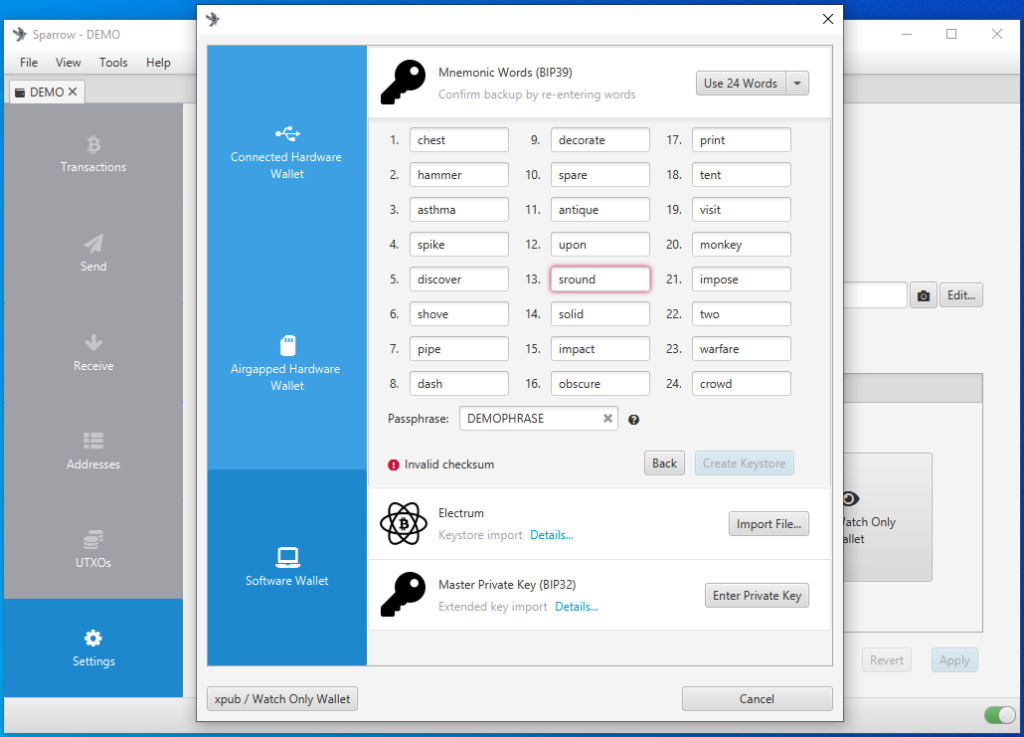
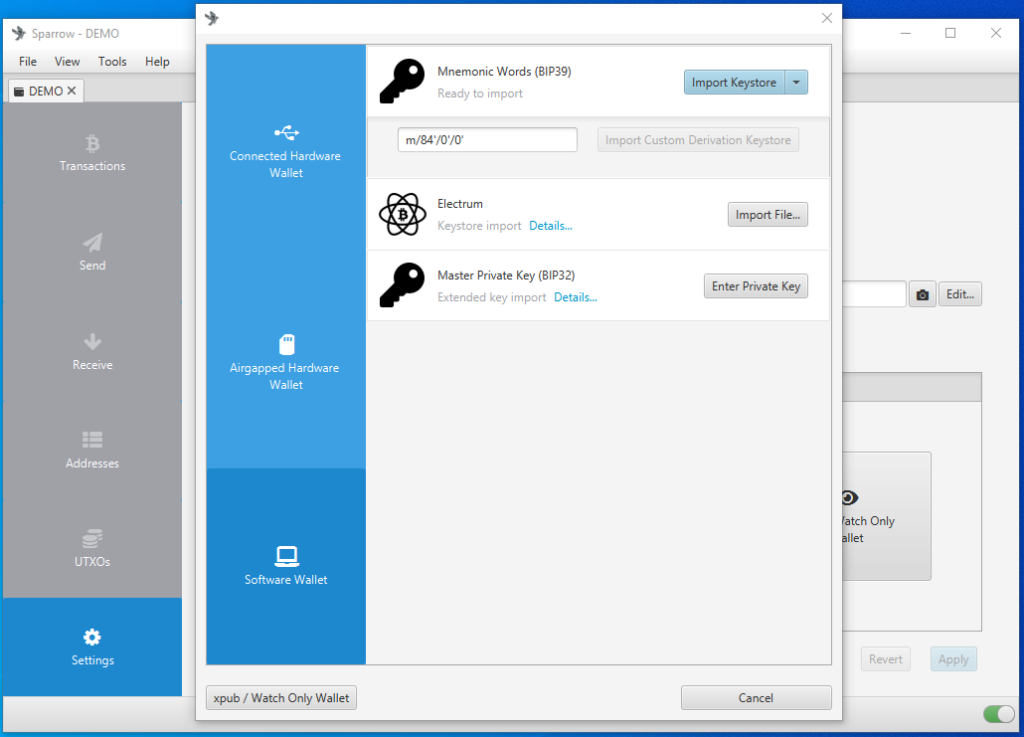
The next screen will show you the derivation path, leaving this as the default is fine and recommended unless you have a specific reason you want to change it and you understand the implications of doing so. Click on Import Keystore, leaving the account from the drop-down menu on the default setting, #0. You will be asked to enter your passphrase again in a pop-up dialog.
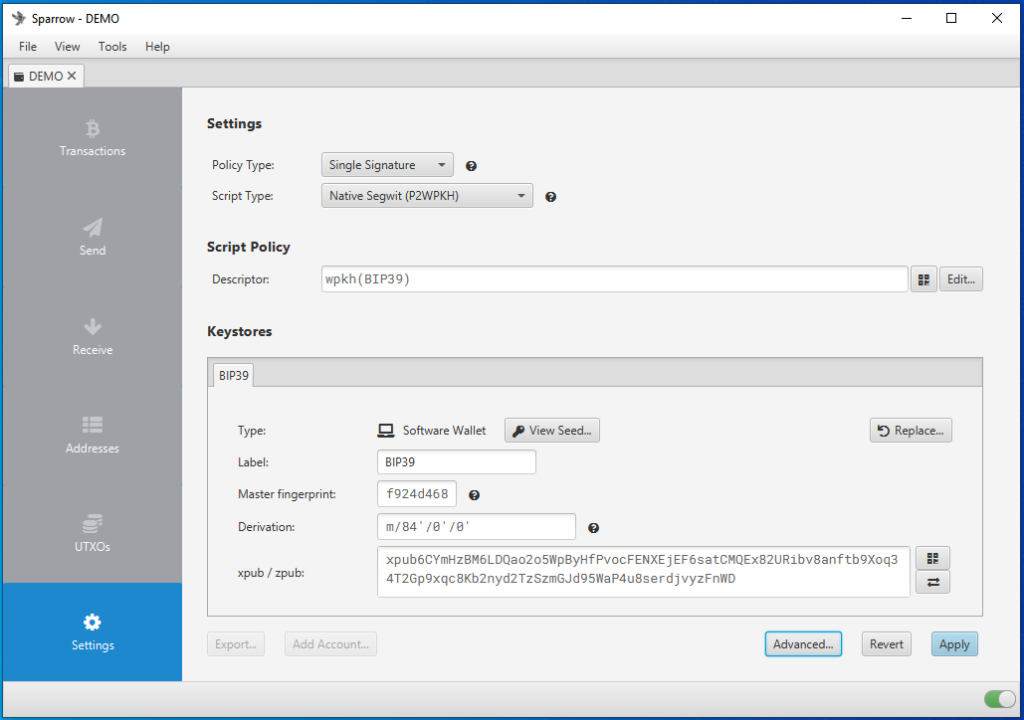
The next screen will display the summary details of the wallet you have just created. One important item to note here is the Master Fingerprint. This is a unique checksum that accompanies your passphrase. Any passphrase you enter will generate a different fingerprint. This is how you can verify that you have entered your passphrase correctly the next time you open this wallet. You can always come back to this page and find this information when you select the Settings tab from the left-hand side menu. You can store your fingerprint with your passphrase, this does not compromise your security. Once you have you the fingerprint written down, click on Apply.
You will be asked if you would like to add a password to this wallet. This password is different than your passphrase, the password is used to encrypt the wallet data file that Sparrow Wallet saves on your computer. Having this file password protected will add an additional layer of security in case anyone gains access to your computer.
Using Whirlpool
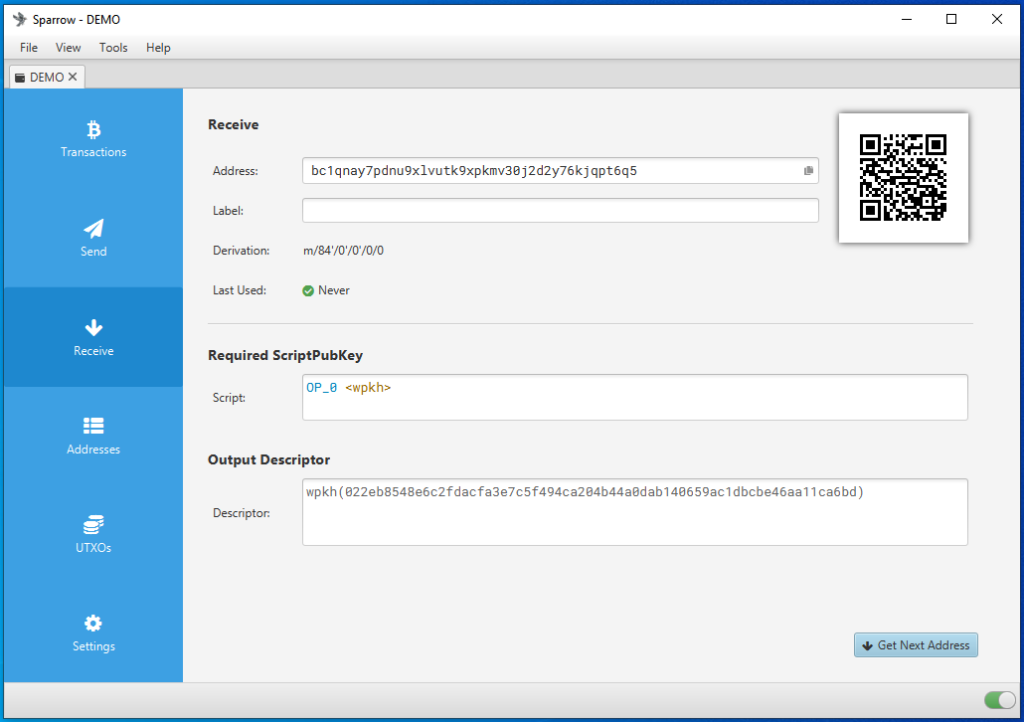
Now that you have your wallet all setup, you are ready to start using Whirlpool. You will need some bitcoin deposited into your wallet first. To get a receiving address, navigate to the Receive tab on the left-hand side menu and you will be presented with a QR code and the text of your first bitcoin address. You could copy/paste this address into your SlushPool account and have your mining rewards automatically deposited there. Changing your SlushPool reward address in between each payout can help you preserve your privacy.
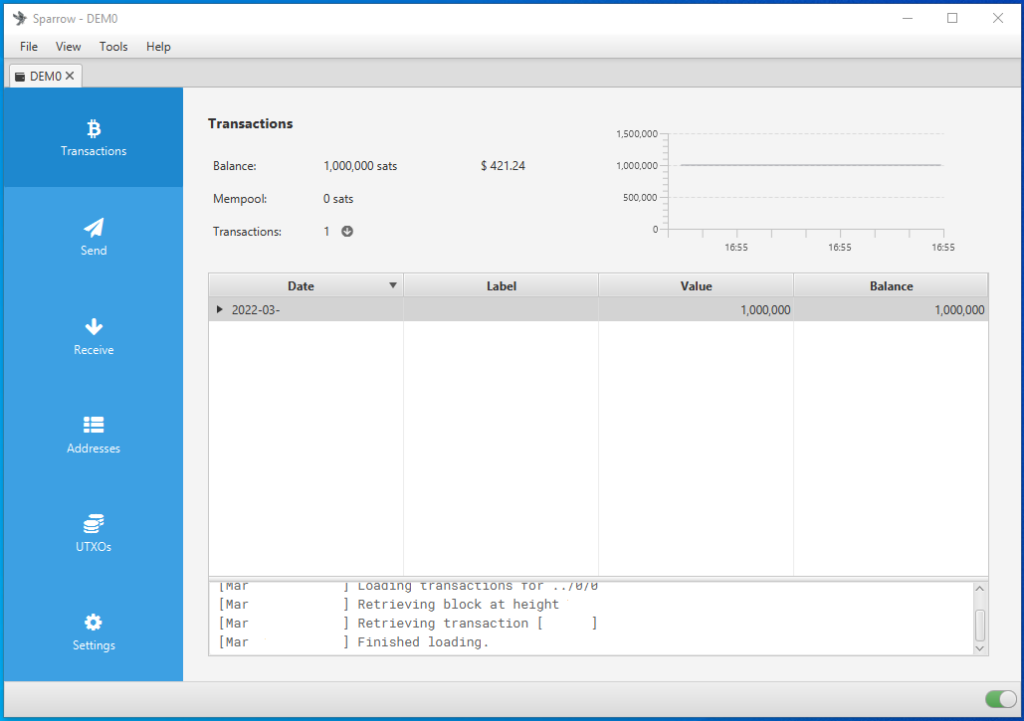
Once you receive your first payout, you will see the transaction appear in Sparrow Wallet, under the Transactions tab on the left-hand side menu. In this example, 0.01 BTC was received.
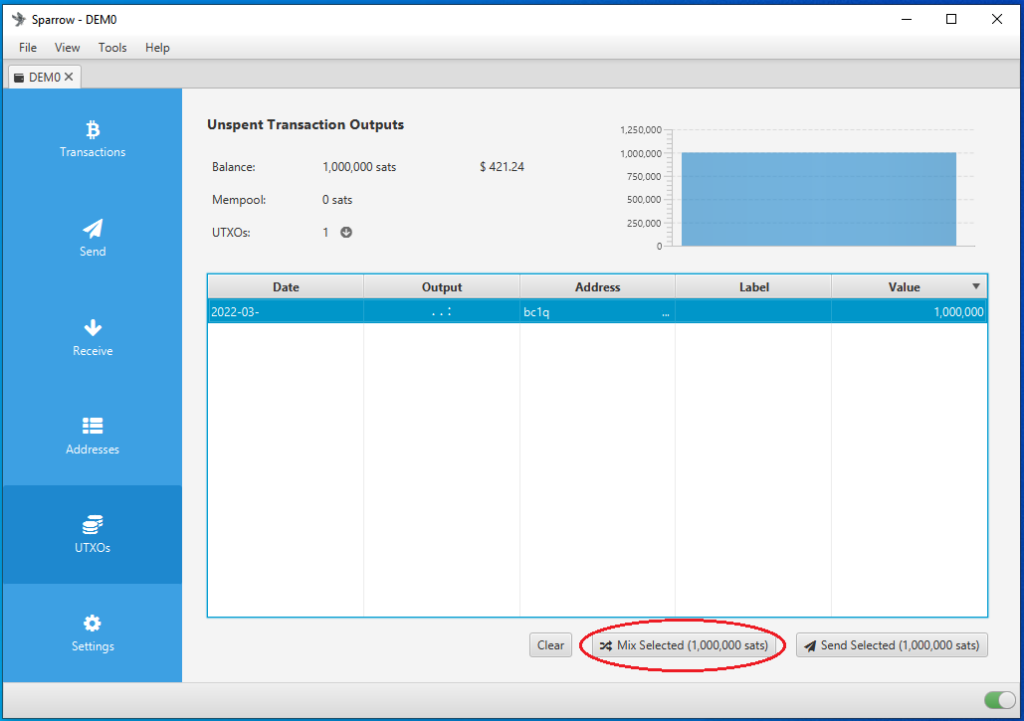
Now that you have some bitcoin, navigate to the UTXOs tab in the left-hand side menu and then select the UTXO you are interested in. You will see the Mix Selected button appear once you select the UTXO(s). Click on that button and then click Next in the two pop-up explainer windows that describe the Whirlpool process.
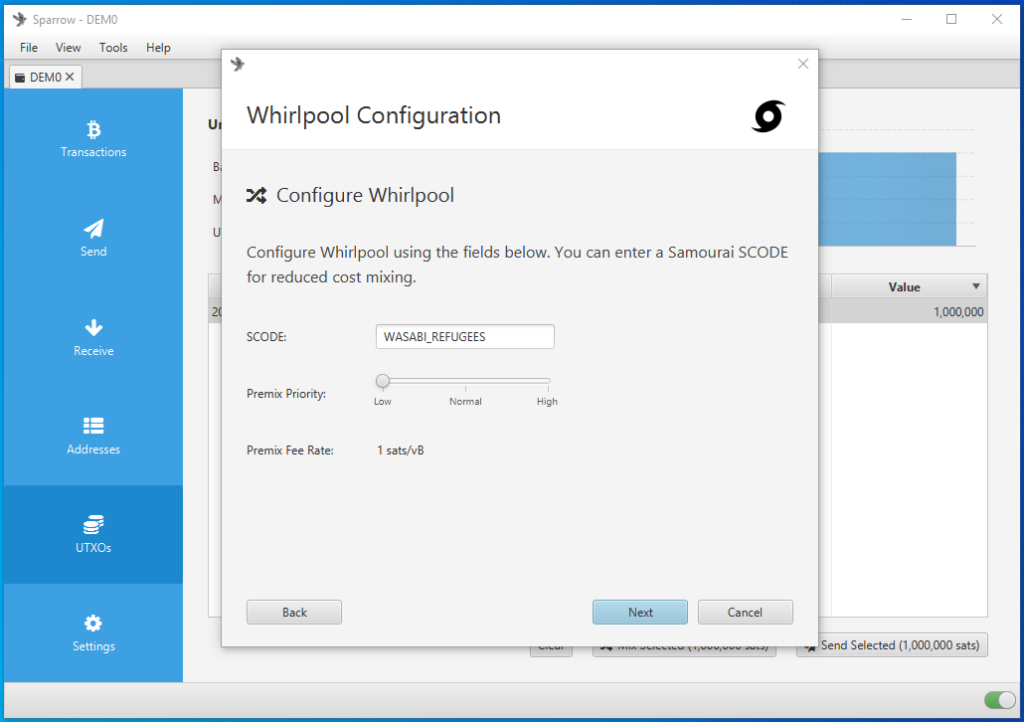
Then if you have an “SCODE” you can enter it in the third window. The “SCODE” can be used for discounted CoinJoin fees announced by @SamouraiWallet. Then click on Next.

Then you will be presented with a preview describing which pool is appropriate for your BTC amount, the anonset, the pool fee, and how many UTXOs you will have as eligible inputs for CoinJoins. Then click on Preview Premix
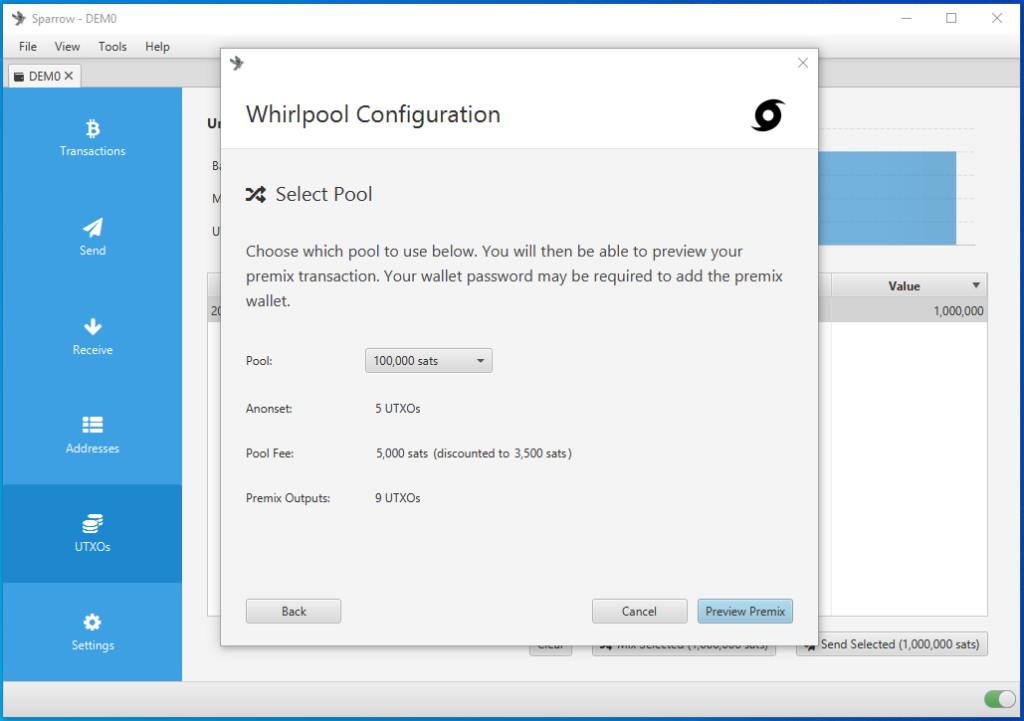
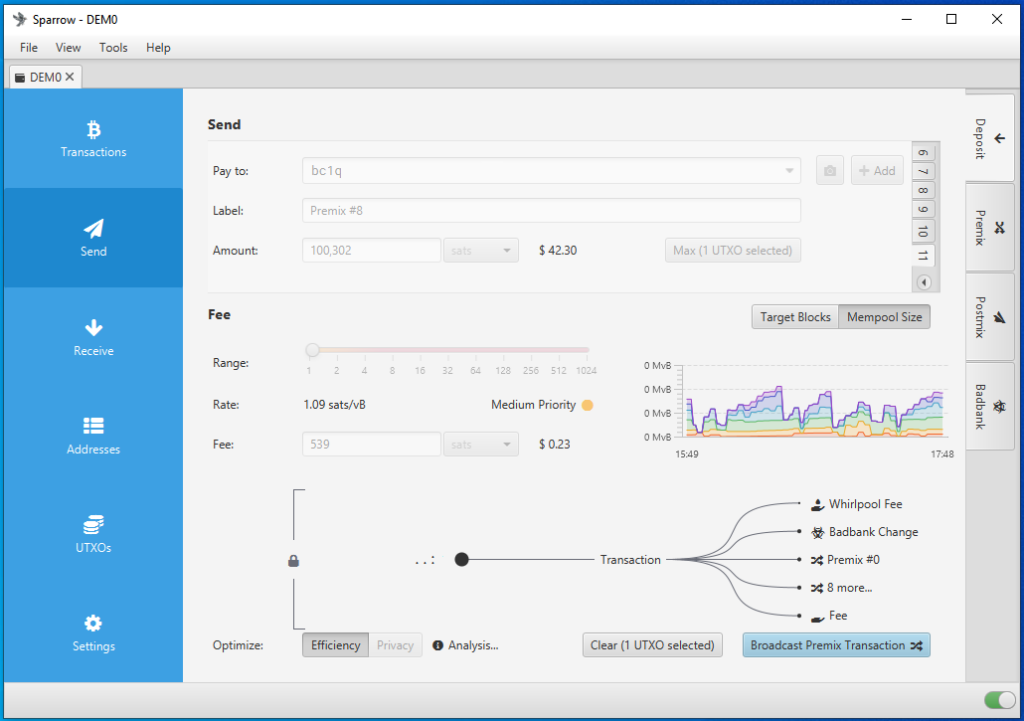
You will be presented with the overview of the transaction you are creating called “tx0”. This transaction it what splits your input into the several outputs you are creating that will be used as inputs to the CoinJoin transactions you are about to participate in when Whirlpooling.
You can check all the addresses you are sending to with the different tabs in the Send section. There is a graph which gives you a visual indication of how the transaction is being split up; noting the Whirlpool fee, Badbank Change, the Premix UTXOs, and the miners fee. If everything looks good, click on Broadcast Premix Transaction.
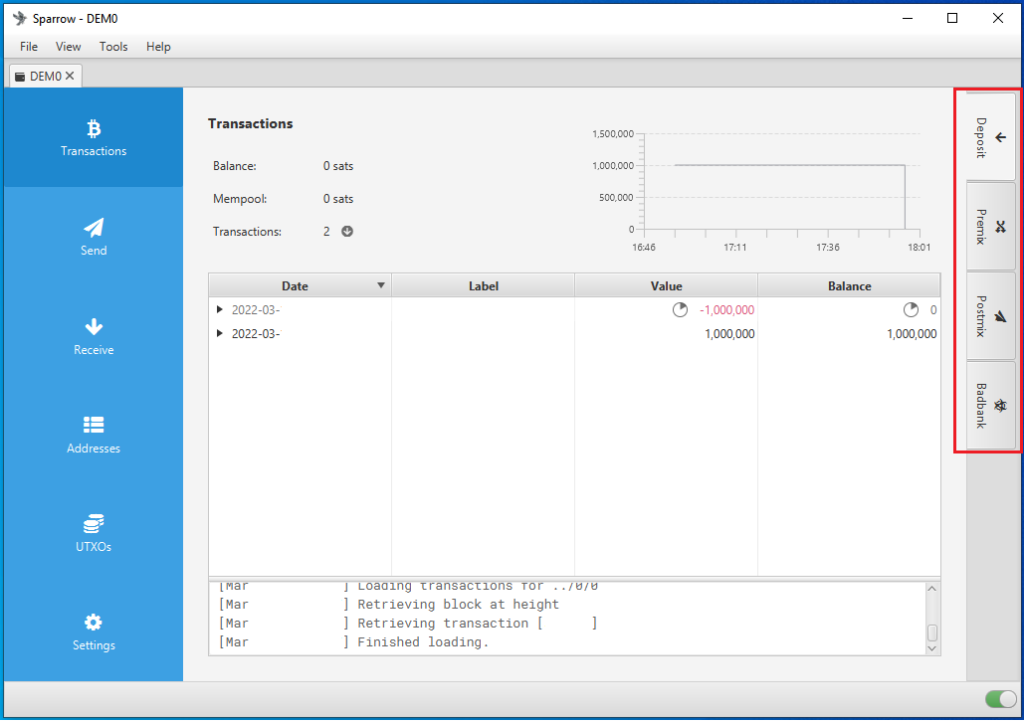
You’ll also notice that four additional tabs showed up on the right-hand side of Sparrow Wallet. These are basically four separate wallets you have so that you can manage your bitcoin safely.
- The
Deposittab will be where you generate receiving addresses, this works just like any other bitcoin wallet, you can send from here too if you wanted to just make a normal bitcoin transaction. - The
Premixtab is where you can view the history of your pre-mix UTXOs, you do not want to manually receive or send bitcoin from this wallet. - The
Postmixtab is where you will see your UTXOs after they have been mixed. All the UTXOs in this wallet have been through at least one CoinJoin transaction. So long as you leave these UTXOs in here, they will continually be registered as available UTXOs when new liquidity enters the Whirlpool and they will re-mix for free. So the longer you leave UTXOs in here, the more mixes they will get and the more anonymity you will achieve. - The
Badbanktab is where your toxic change from the “tx0” gets sequestered from the rest of your funds. You want to be careful what you do with this toxic change. If you combine it with your postmix UTXOs then you will be degrading the privacy gains you got in Whirlpool.
And that’s how to use Whirlpool in Sparrow Wallet. Another great benefit are the build in postmix spending tools that allow you to better preserve your anonymity. For an overview of how these transaction work check out this guide on collaborative spends, although the instructions are not specific to Sparrow Wallet, you will understand the mechanics of what these transactions are doing.
Next, you’ll see how to configure your COLDCARD as a Watch-Only wallet in Sparrow Wallet which allows you to keep an eye on your balance and generate receiving addresses while keeping the COLDCARD totally air-gapped. Once the Watch-Only wallet is imported then it can be set to deposit to directly from Whirlpool CoinJoins.
Sparrow as a Watch-Only wallet
In order to keep your COLDCARD air-gapped, the Partially Signed Bitcoin Transaction (PSBT) can be utilized to spend bitcoin from the COLDCARD without ever connecting it to the internet. Basically, the public information from the COLDCARD called an XPUB will be used to import the necessary information into Sparrow Wallet on our desktop. By doing this, Sparrow Wallet will be able to generate receive addresses and QR codes, monitor the COLDCARD’s balance, and initiate PSBT’s. All without exposing any of the private information from the COLDCARD, like the signing key.
You will use the microSD card to transfer information between the desktop and the COLDCARD. Ensure the microSD card is inserted to the COLDCARD.
First, the .json file needs to be exported from the COLDCARD, which will contain all the public information necessary so that Sparrow Wallet can import this watch-only wallet. From the COLDCARD main menu select Advanced > MicroSD Card > Export Wallet > Generic JSON.
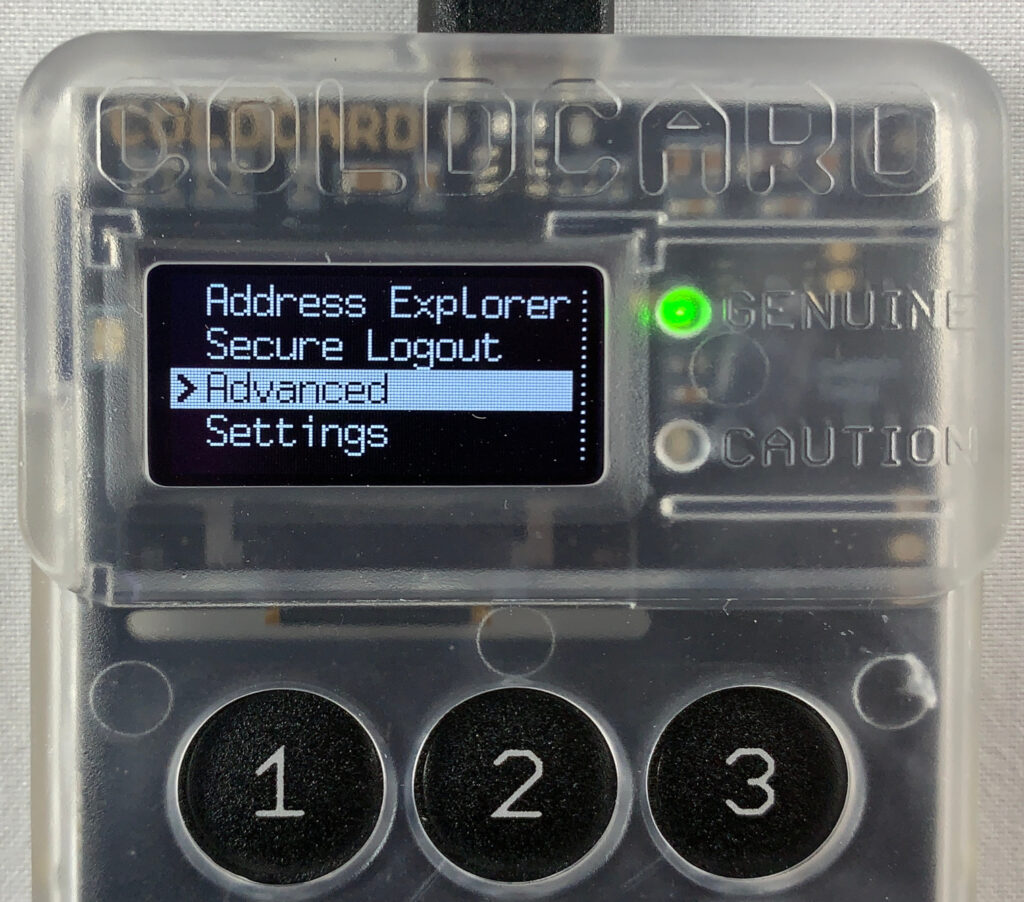
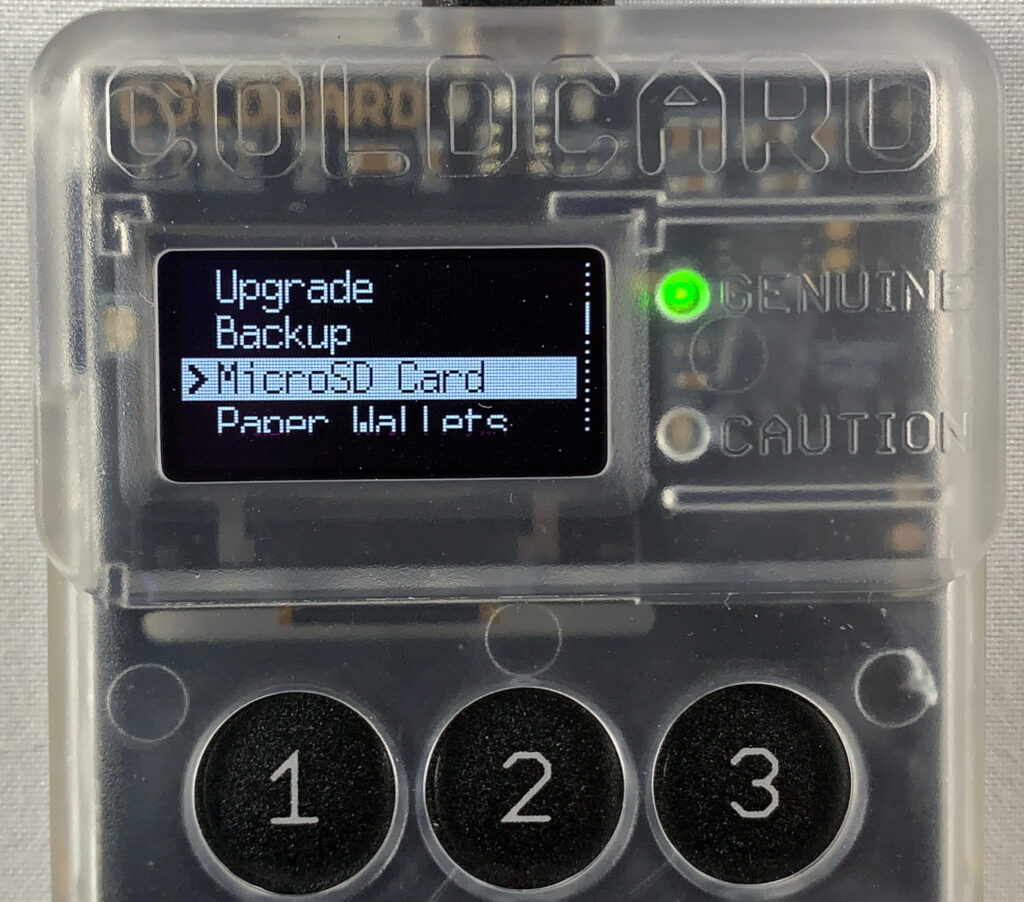
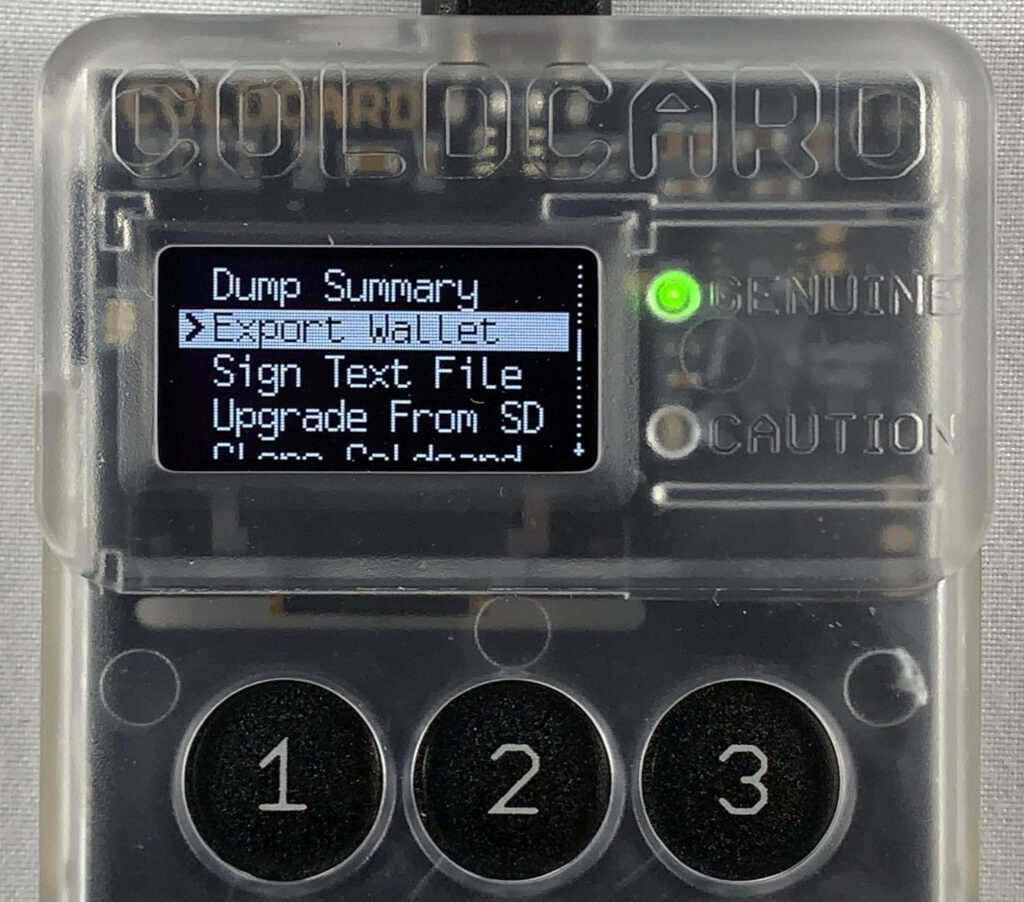
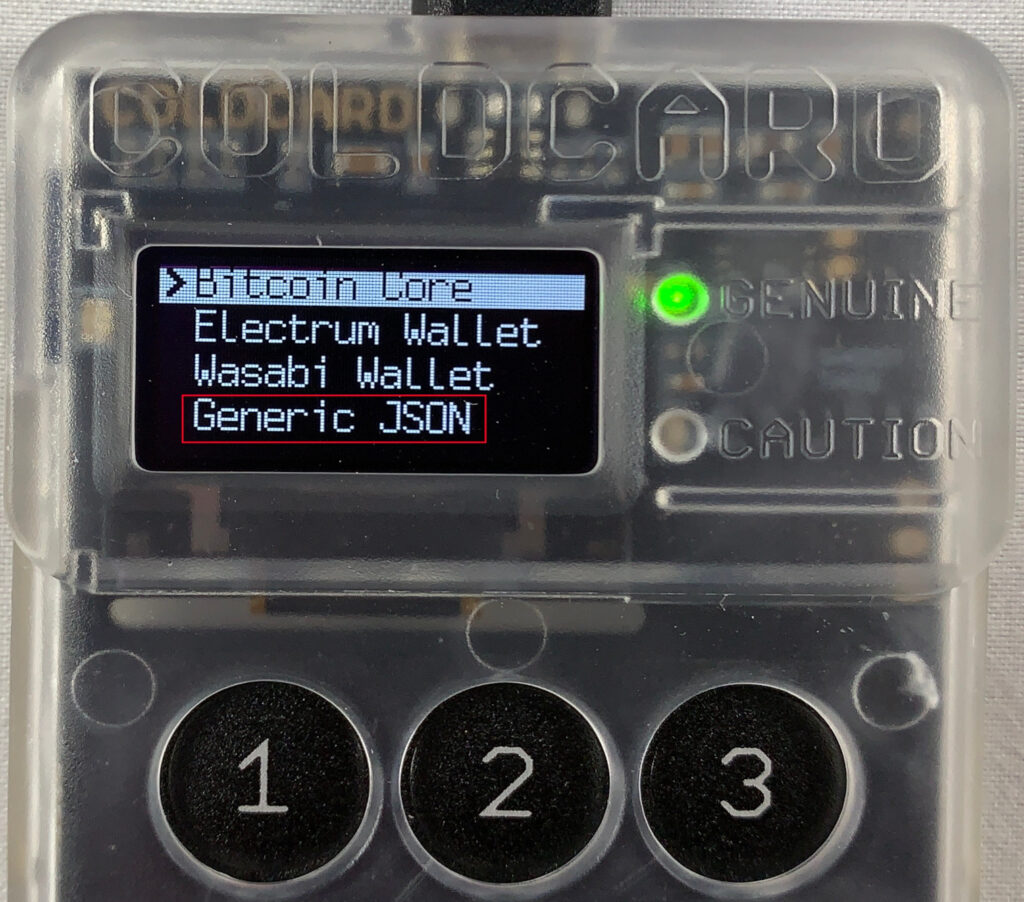
This is going to write the file to the microSD card, then you can connect that microSD card to your desktop computer with your USB adaptor. Copy/paste the exported .json file to your desktop from the microSD card. Note the file location and now you will switch back to Sparrow Wallet to get it ready to import the .json file.
In Sparrow Wallet, create a new wallet by selecting File > New Wallet, then you will be asked to name this wallet. Name the wallet whatever you want then click on Create Wallet.
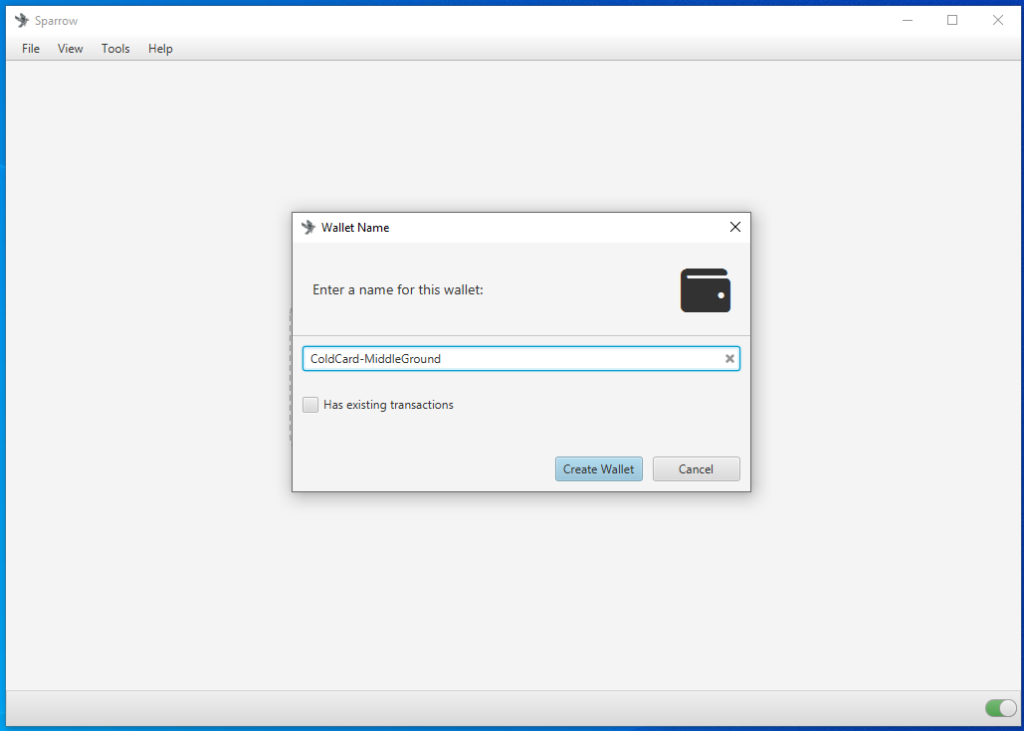
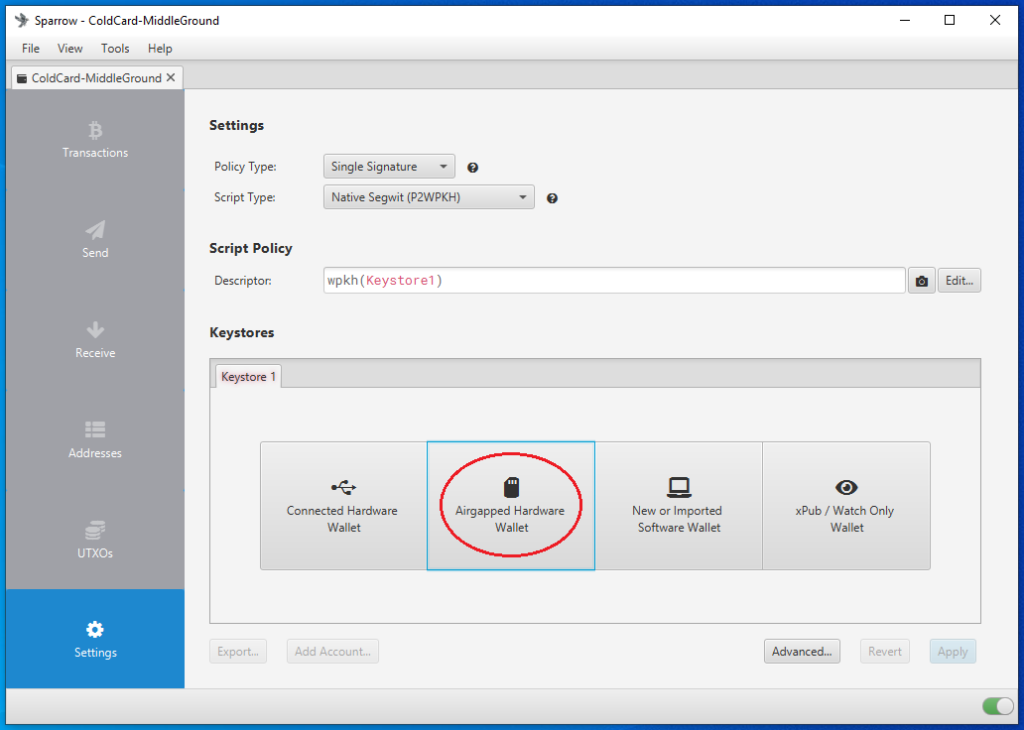
You will see the following screen, you can leave all the settings on the defaults. Then select Airgapped Hardware Wallet.
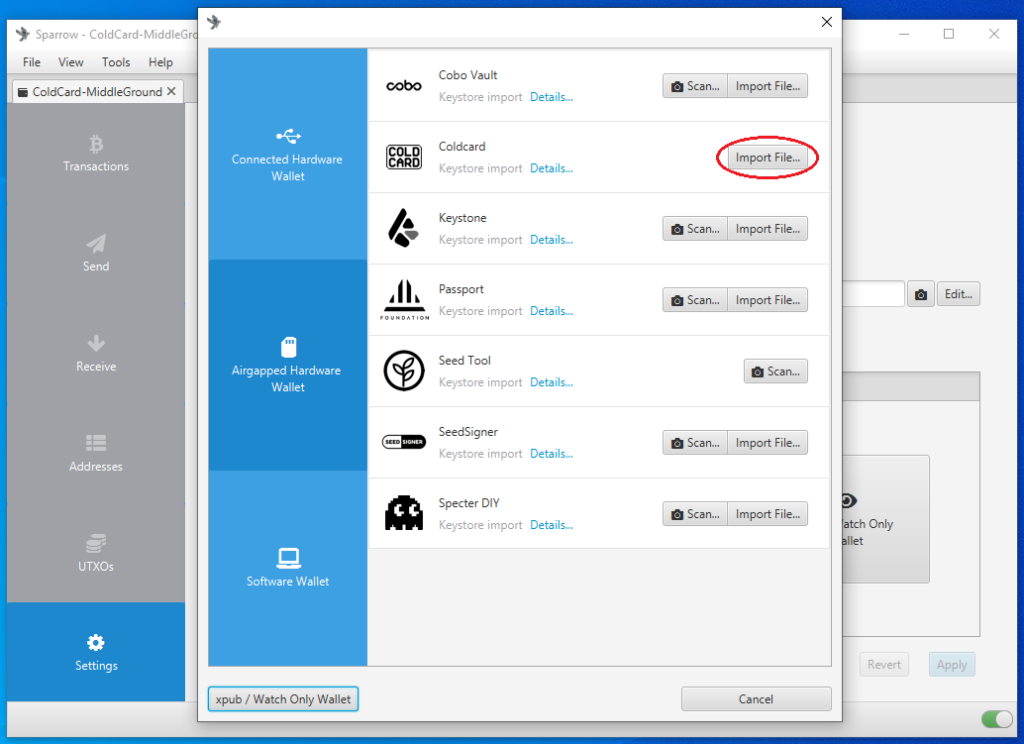
A screen will pop up and you can click on the Import File… button next to the COLDCARD icon. This will open your file explorer where you can point Sparrow Wallet to the file location containing the exported COLDCARD .json file. Select that file and click on open.
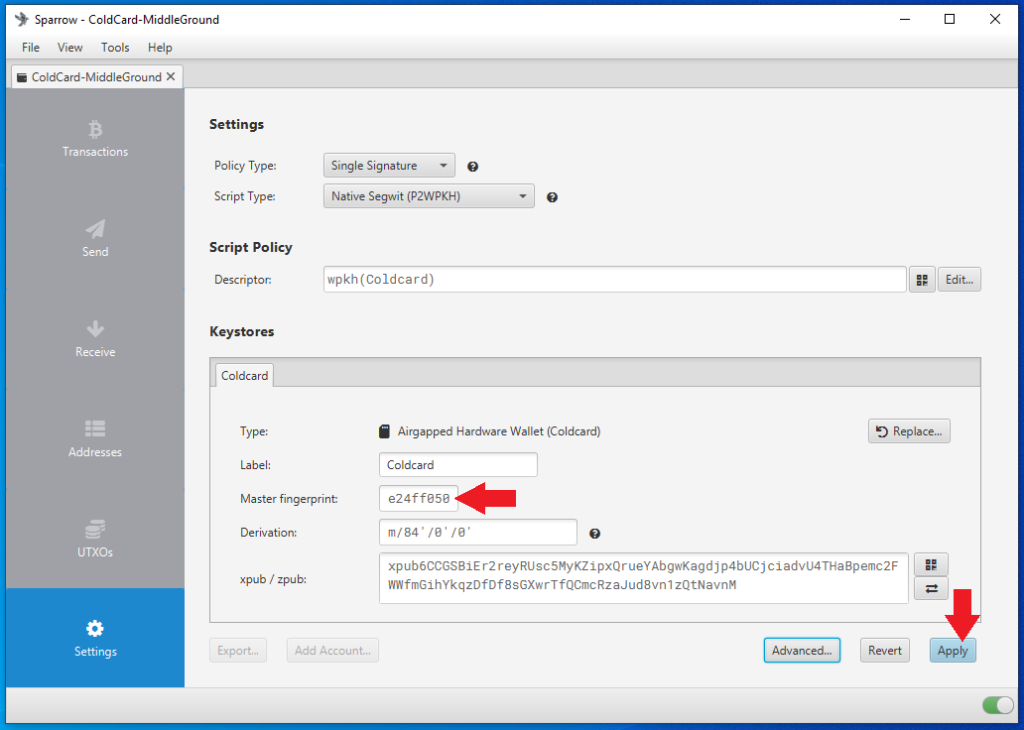
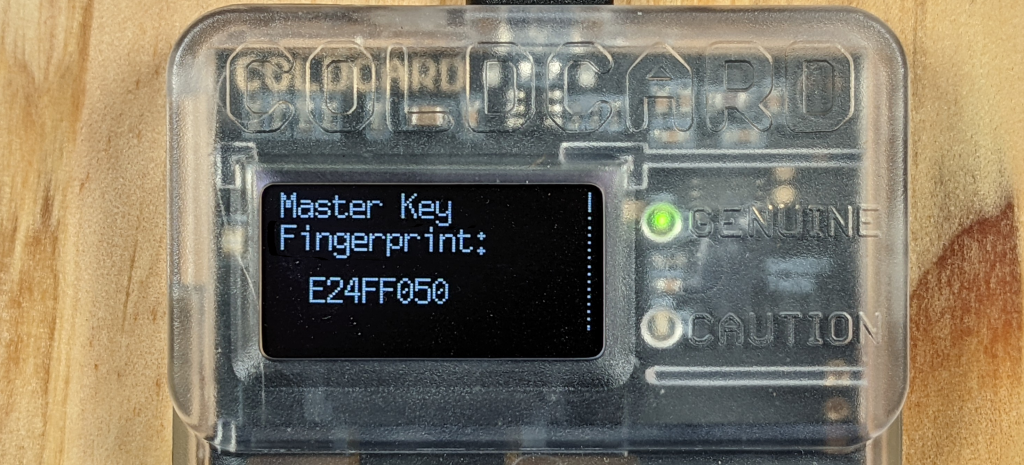
After a moment, you will see a summary of the wallet you are about to apply. You will notice a “Master fingerprint” dialog box with 8-characters in it. You can use this unique identifier to confirm that you are importing the correct wallet from your COLDCARD.
On your COLDCARD, from the main menu, navigate down to Advanced > View Identity and you can compare the displayed fingerprint to the one displayed in Sparrow Wallet. This is especially important to confirm if you have added a passphrase which will be covered in the Paranoid guide
If everything looks good, then click on Apply in Sparrow Wallet.
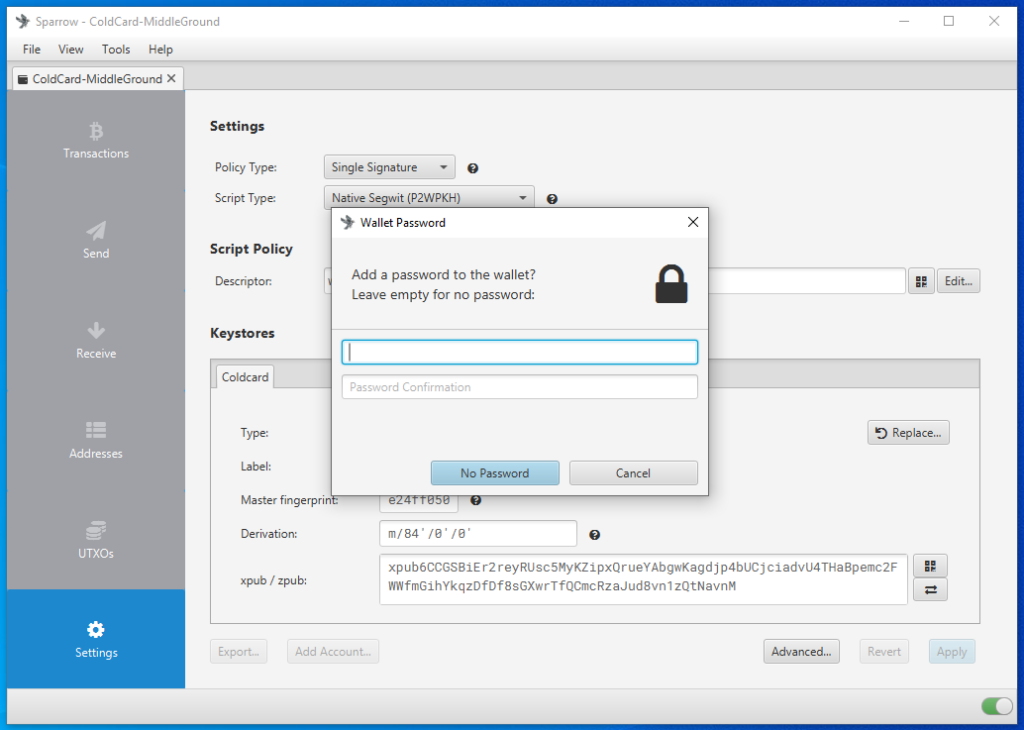
After clicking on Apply, you will have the opportunity to add a password to your wallet. This is a password which will encrypt the Sparrow Wallet data file that is saved on your computer. This password can protect your wallet if someone else gains access to your desktop and Sparrow Wallet file. If you forget your password, you will need to create a new wallet file by repeating this whole process.
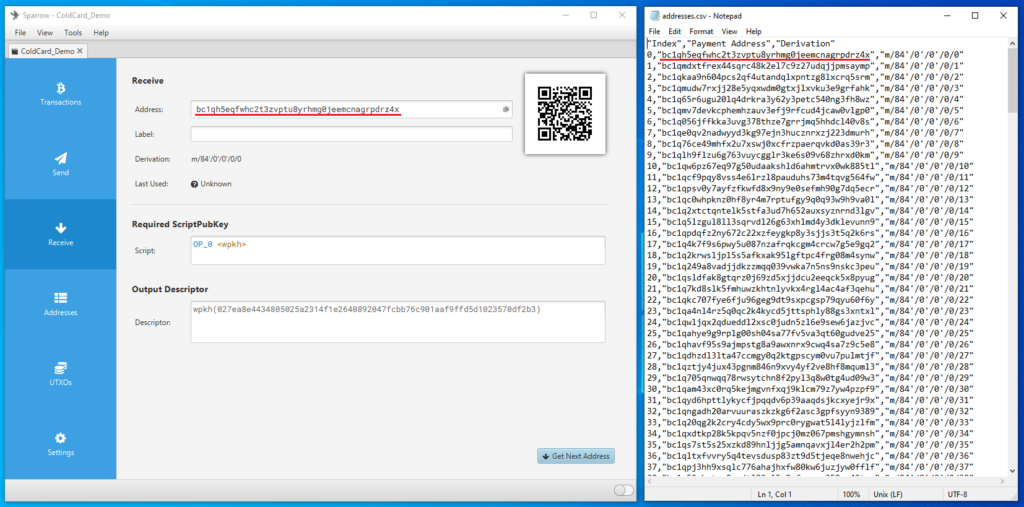
You can also save a list of deposit addresses from your COLDCARD and compare this saved list to Sparrow Wallet to ensure the correct wallet is loaded without having to retrieve your COLDCARD, login to it, and compare the deposit addresses there. To do this, select the Receive tab in Sparrow Wallet then you can view the first receiving address from your COLDCARD and its QR code. On your COLDCARD, make sure you insert the microSD card and enter your passphrase if applicable. Then from the main menu, select Address Explorer. This will bring up a few address types that you can choose to view. Your COLDCARD can use legacy P2PKH Bitcoin addresses that start with “1”, or nested SegWit P2SH Bitcoin addresses that start with “3”, or Native SegWit Bech32 Bitcoin addresses that start with “bc1”. Then you want to press 1 and this will save the first 250 addresses to a .csv file on your microSD card. You can also open the addresses.csv file with a text editor on your desktop to view the 250 addresses you exported from your COLDCARD and compare them to your Sparrow Wallet just for the added assurance.
After applying the changes, you can now navigate through your watch-only wallet in Sparrow Wallet. On the left-hand side of the Sparrow Wallet interface there are six tabs:
- The Transactions tab is where you can see information related to the transactions in this watch-only wallet.
- The Send tab is where you can create the PSBTs to then export for signing by the COLDCARD.
- The Receive tab is where you can generate receive address for your COLDCARD without having to plug in your COLDCARD and log into it.
- The Addresses tab shows several deposit and change addresses as well as any balances.
- The UTXOs tab shows any unspent transaction outputs and a small graph charting the history.
- The Settings tab is where you can see detailed information about the watch-only wallet such as the master fingerprint, derivation path, & xpub.
Now you can click on the Receive tab on the left-hand side of the Sparrow Wallet interface. Then you will be presented with a bitcoin receiving address, a QR code, and some additional details. You can scan this QR code with your mobile Bitcoin wallet, for example, and deposit some bitcoin to your COLDCARD. You should see the transaction show up in Sparrow Wallet after a moment along with a pop-up notification. Also, in BitcoinCore, the transactions should show up there as well. The transaction will remain in a pending status until it receives some blockchain confirmations. In the mean-time, you can click on the Transactions tab and review further details about your transaction. You can also copy/paste your transaction ID in mempool.space to watch for your first confirmation, or use whatever your preferred block explorer is. Tor Browser is a privacy-focused browser.
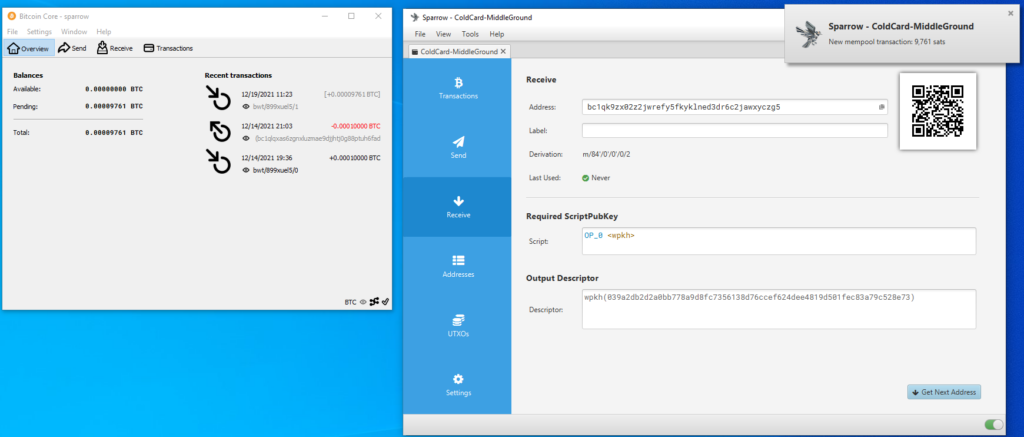
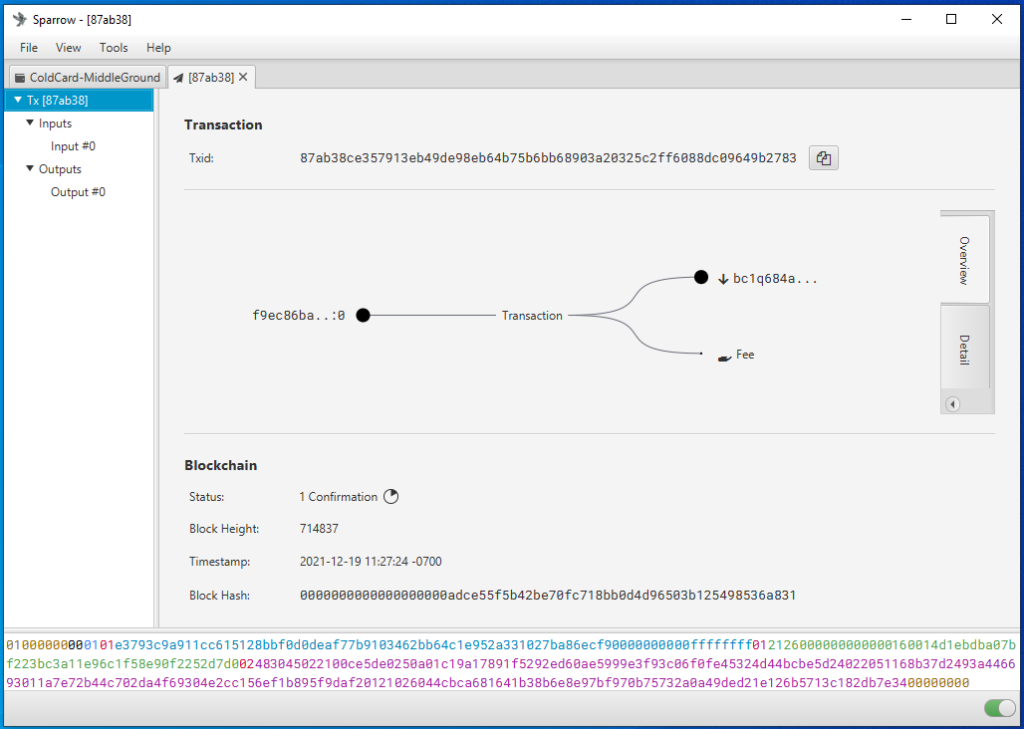
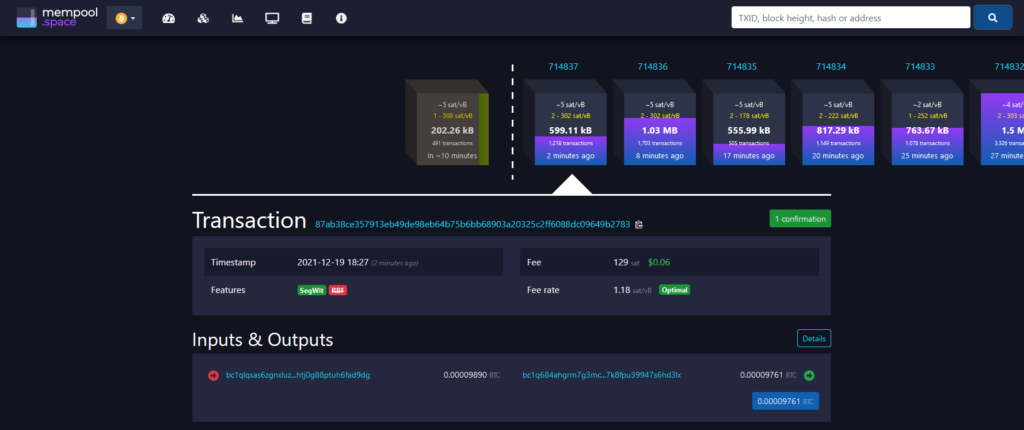
Now you can power off and secure your COLDCARD in a safe place until you want to sign a transaction and spend from it, several addresses will be cataloged in Sparrow Wallet so you can continue depositing to your COLDCARD via Sparrow Wallet without having to reconnect it every time. It is best practice to confirm each receiving address on the COLDCARD itself and or your saved .csv file and additionally to only use each address once. Sparrow Wallet now has all the information it needs to starting depositing Whirlpool outputs directly to your COLDCARD.
Mixing Straight to COLDCARD
One really cool feature of Whirlpool is that you can mix straight to your COLDCARD. You can set the number of mixes you want each UTXO to achieve and as your UTXOs re-mixes hit that number they will be deposited to your COLDCARD straight from a CoinJoin transaction. Additionally, Sparrow Wallet will add an additional source of randomness to help you avoid creating paterns that could be used as on-chain heuristics; each UTXO that hits your set number of re-mixes will have a 25% chance of being mixed again. When you receive deposits to your COLDCARD straight out of a CoinJoin transaction, it looks as though that UTXO is still in Whirlpool to any outside observer looking on-chain.
Navigate to the UTXOs tab on the left-hand side and the Postmix tab on the right-hand side, these are all of your mixing UTXOs. At the bottom, click on Mix to.
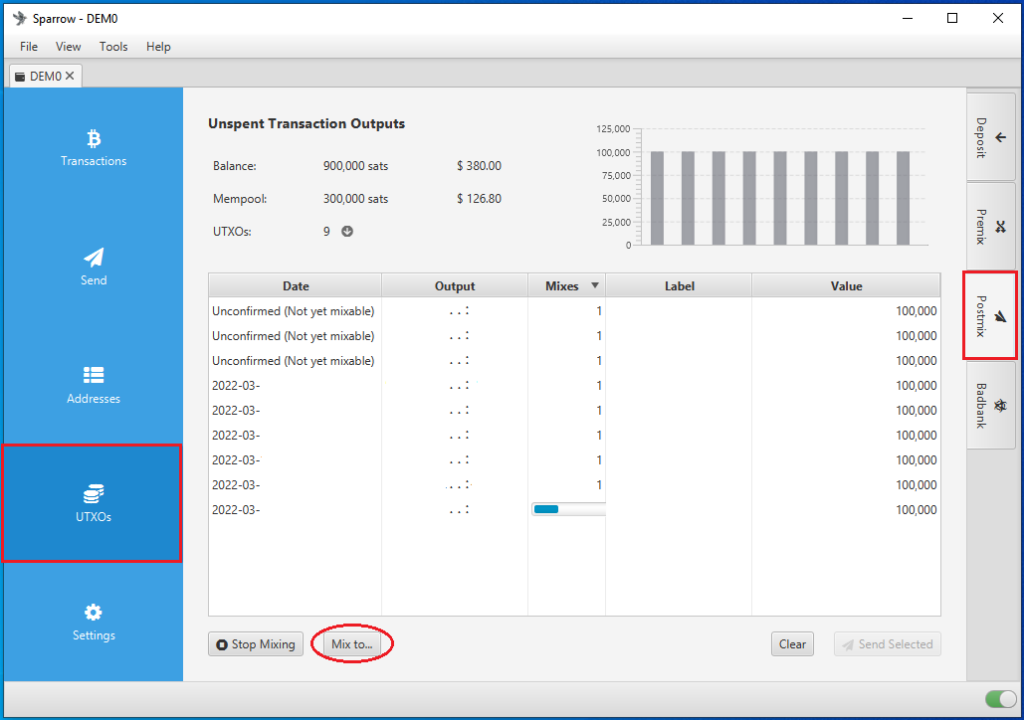
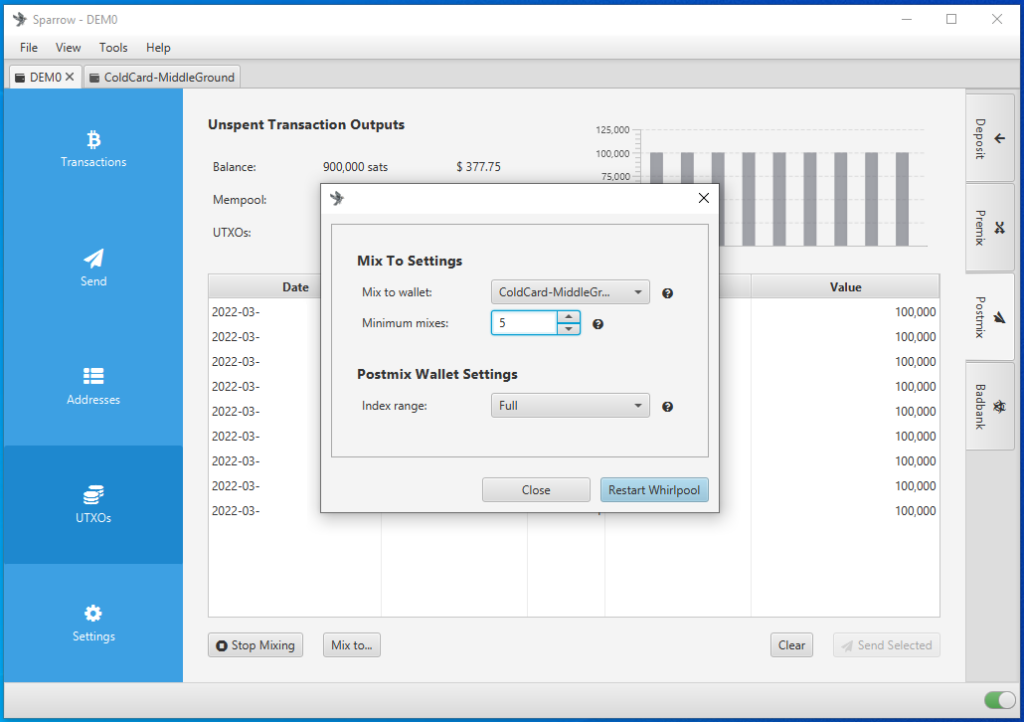
A window will pop up and from the Mix to wallet drop-down menu, select the COLDCARD Watch-Only wallet that you imported. Then you can set the minimum number of mixes you want each UTXO to achieve before being deposited to your COLDCARD. Keep in mind, each UTXO will have a 25% chance of being mixed again even after it hits this number. You can leave Index range on the default Full setting to use both even and odd indexed addresses. Then click on Restart Whirlpool.
Then you will notice that the button at the bottom has changed to display the wallet you have selected for the automatic deposits.
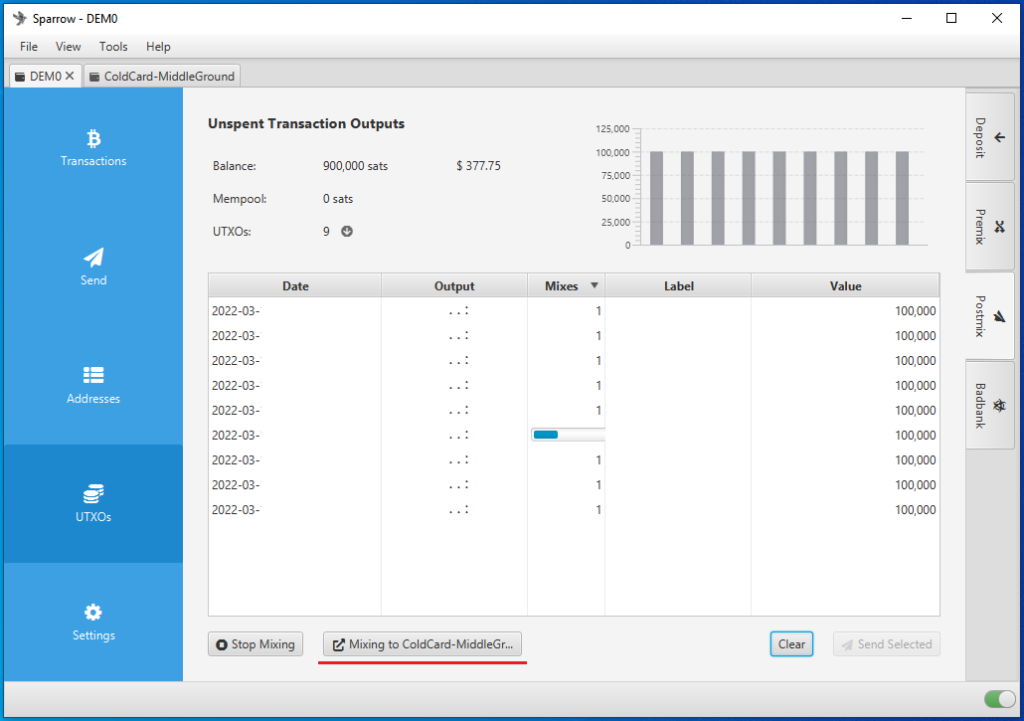
Now you can just leave your UTXOs to re-mix and as they achieve enough mixes they will be automatically deposited to your COLDCARD. Next, you’ll see how to spend from your COLDCARD using Sparrow Wallet and keeping your COLDCARD fully air-gapped.
Signing with the COLDCARD
When you are ready to sign a transaction to spend bitcoin, it is necessary to create a PSBT in order to maintain the air-gapped benefit. You can deposit bitcoin with your COLDCARD disconnected but to spend bitcoin, the COLDCARD needs to sign the transaction. Sparrow Wallet is used to build the transaction based on your available Unspent Transaction Outputs (UTXOs) and the information you enter when constructing the transaction. The PSBT details are passed between Sparrow Wallet and the COLDCARD using the microSD card.
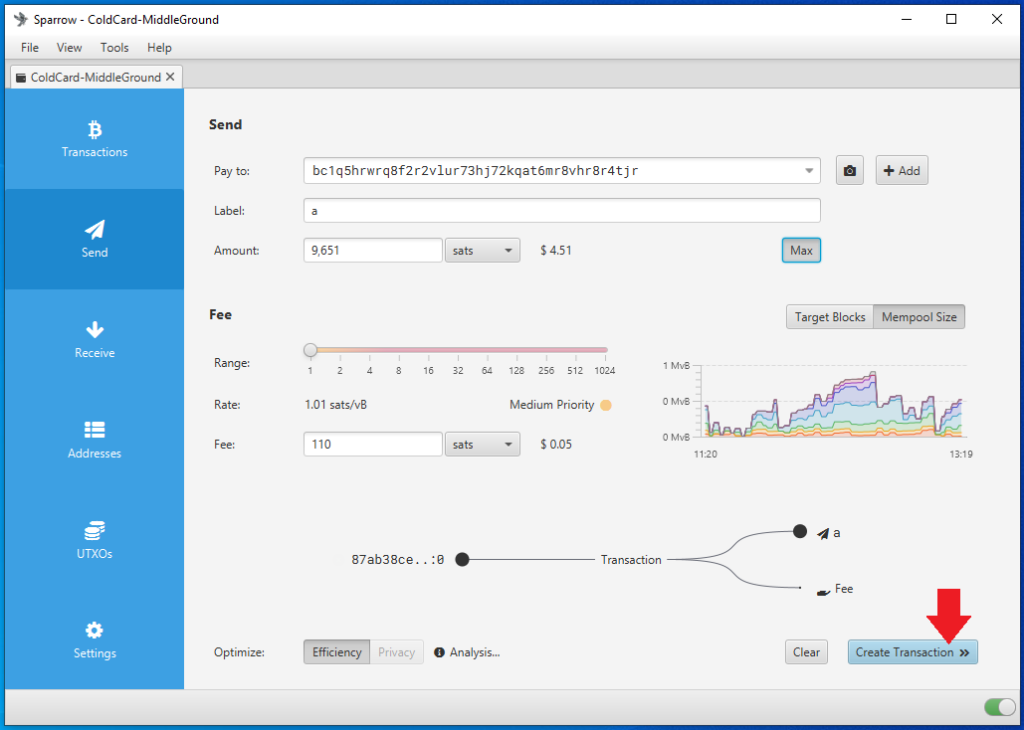
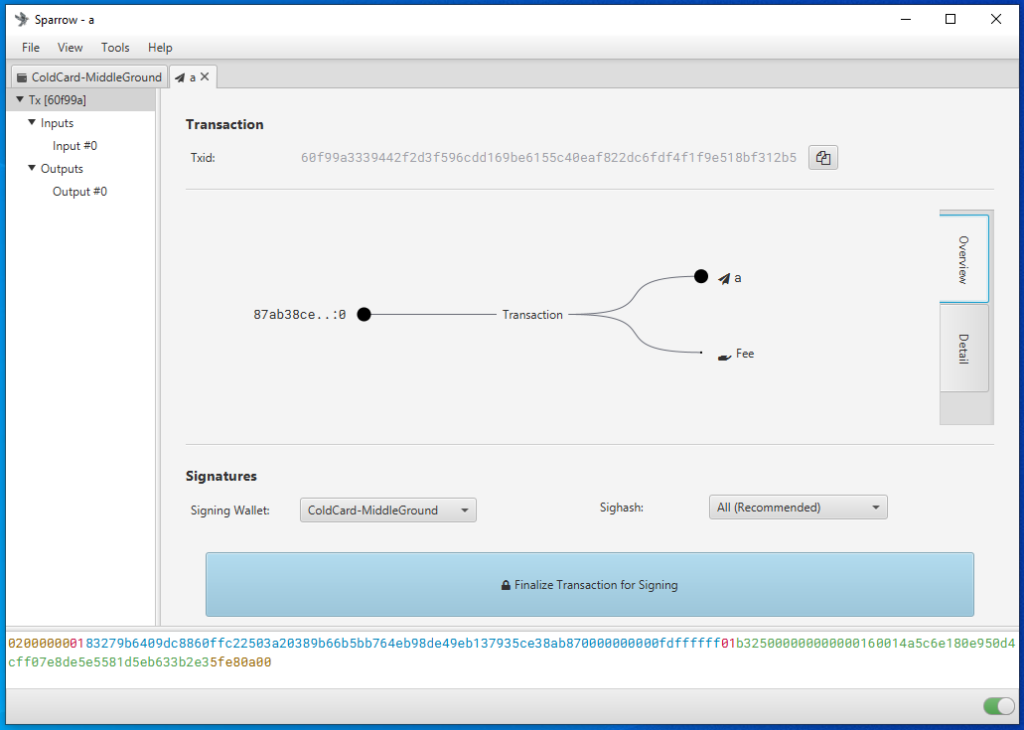
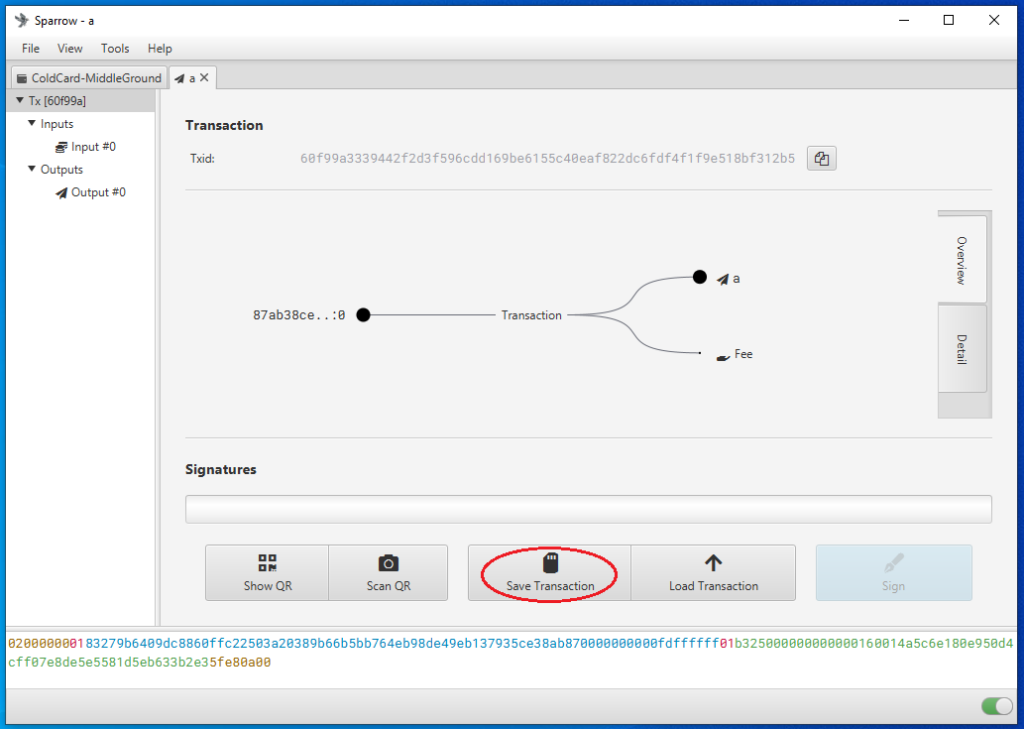
To create a PSBT, navigate to the Spend tab on the left-hand side in Sparrow Wallet. There, you can paste the address you are sending to, add a label, enter an amount to send, and choose a miners fee rate, etc. Once you have everything set, click on Create Transaction. On the next screen, double check the details then click on Finalize Transaction for signing. Then you will be asked what you want to do with the finalized PSBT. In this case, click on Save Transaction and Sparrow Wallet will launch the file explorer. Navigate to the microSD card and save the PSBT there. Then safely eject the microSD card.
Insert the microSD card into the COLDCARD. If necessary, power on your COLDCARD using the COLDPOWER 9v battery adaptor or USB adaptor. Then enter your COLDCARD PIN prefix, verify your anti-phishing words, and enter the PIN suffix. From the main menu choose Ready to Sign. Then the details of the PSBT will be displayed and you can confirm that the address and the amount and the miners fee are correct.
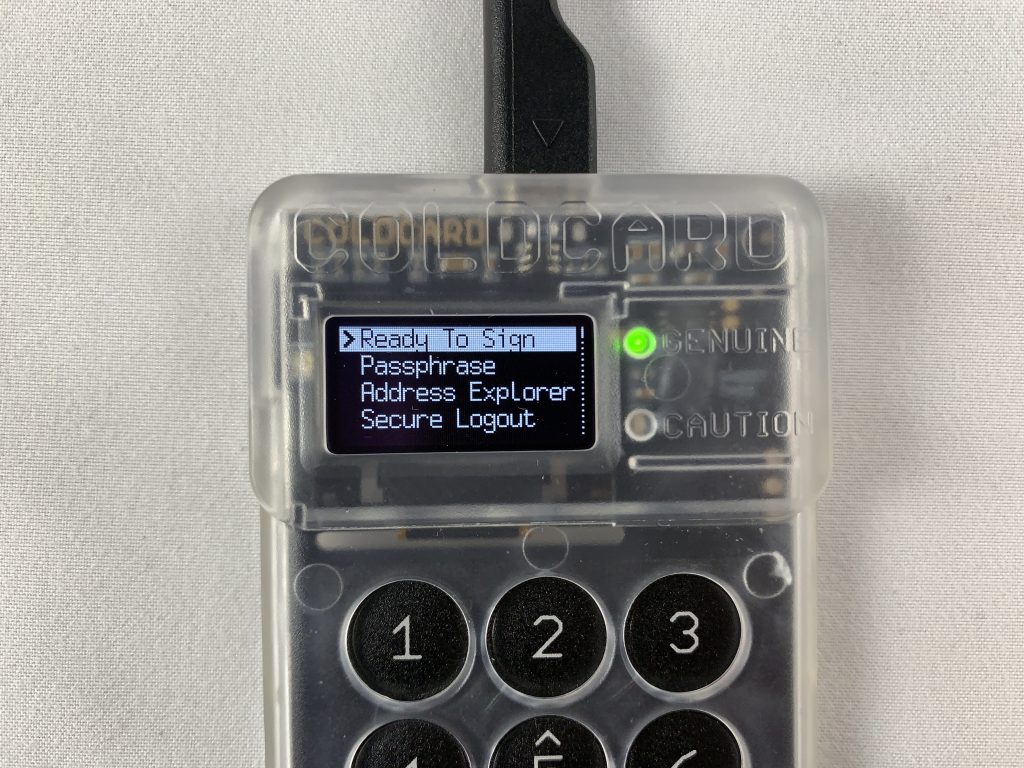
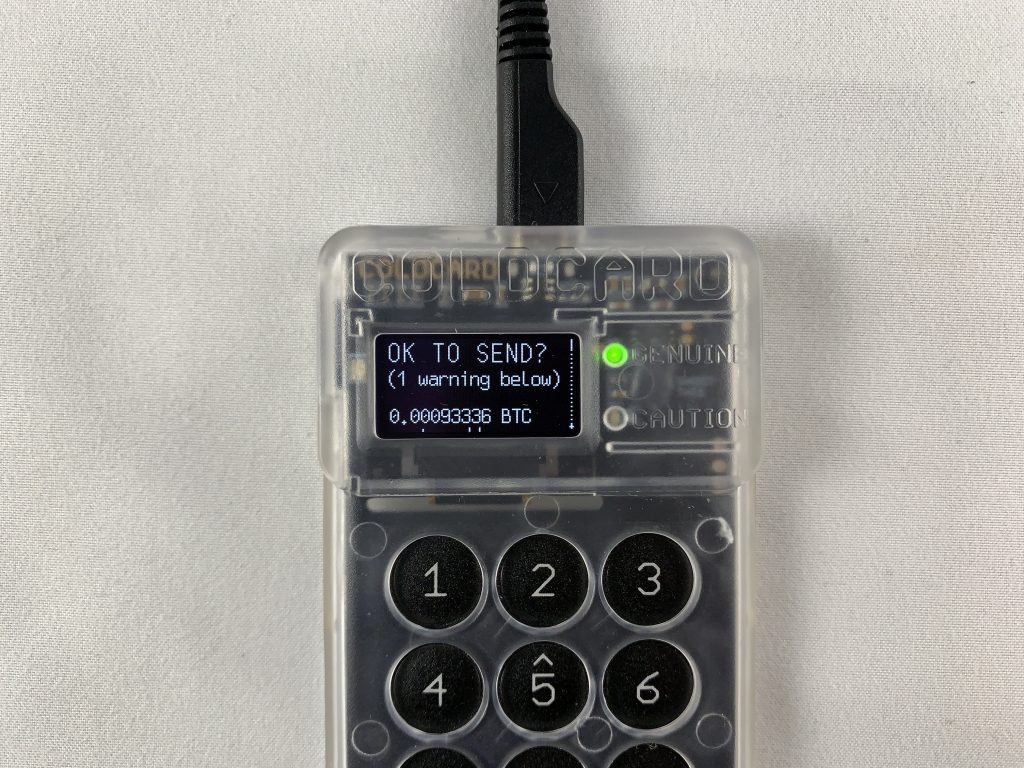
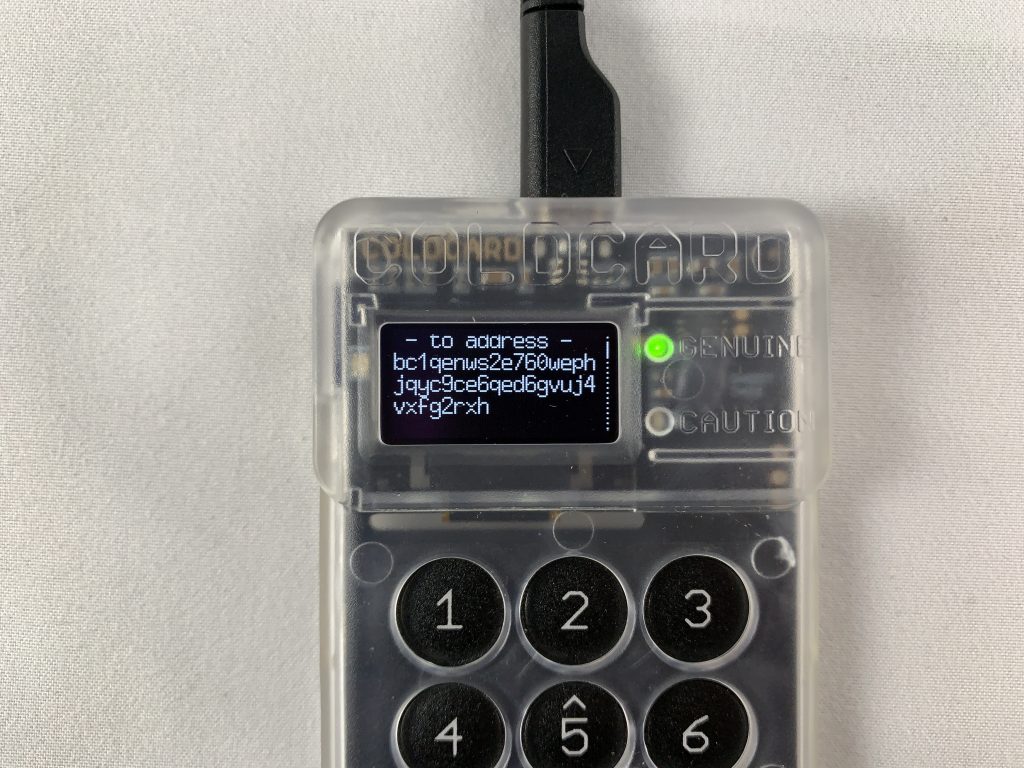
Then hit OK to sign. Once the file is signed it will be saved as a new file to the microSD card. You can then eject the microSD card and securely log out of your COLDCARD and power it down.
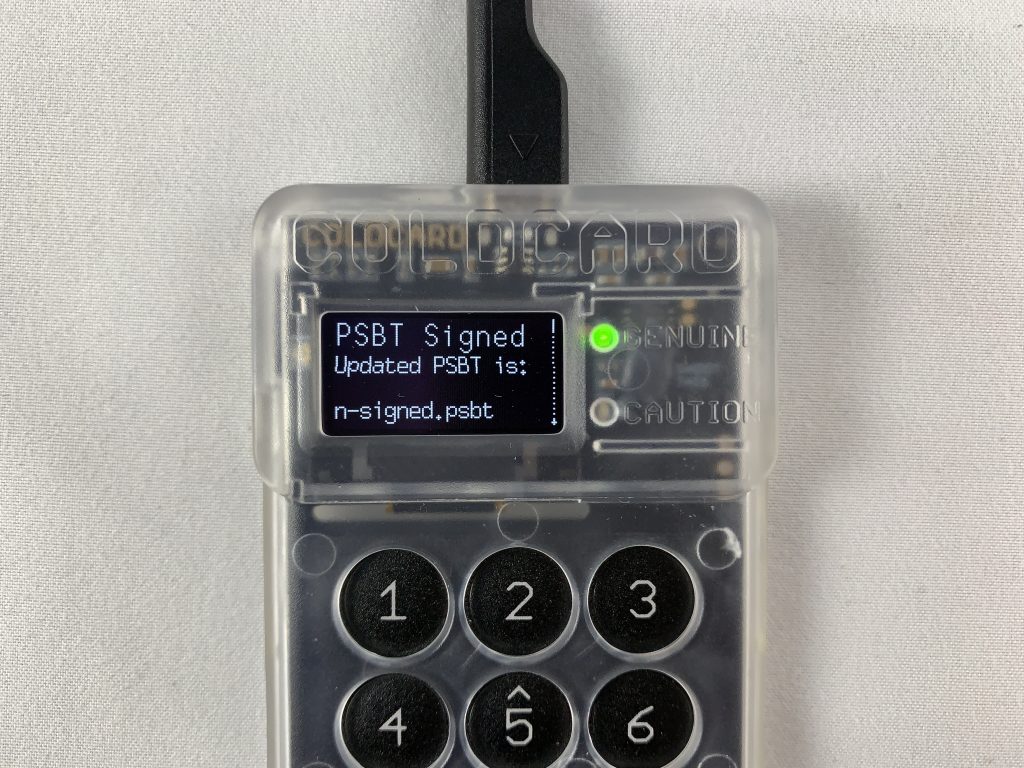
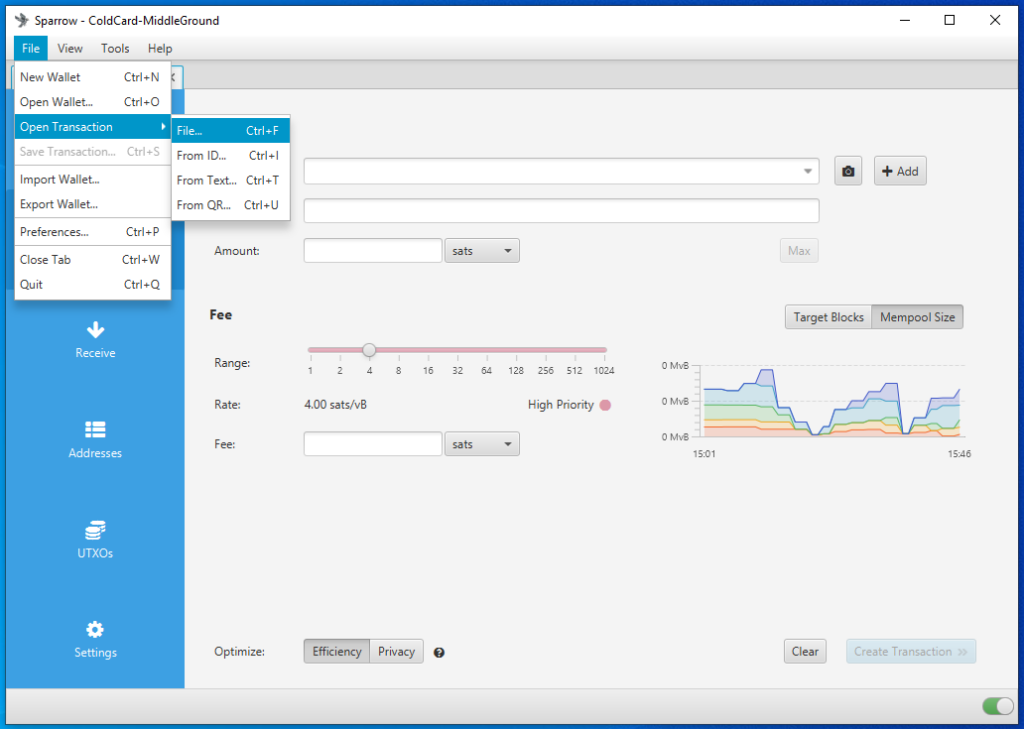
Eject the microSD card from the COLDCARD, insert to the USB adaptor, insert the adaptor into the desktop computer. Ensure BitcoinCore and Sparrow Wallet are open. Then from the file explorer, simply double-click on the signed PSBT file and it should open automatically in Sparrow Wallet. Alternatively, from Sparrow Wallet navigate to File > Open Transaction then choose File from the menu of options and navigate to the file location of the signed PSBT. Either way, then click on the Broadcast Transaction button to send the signed transaction to the Bitcoin Network.
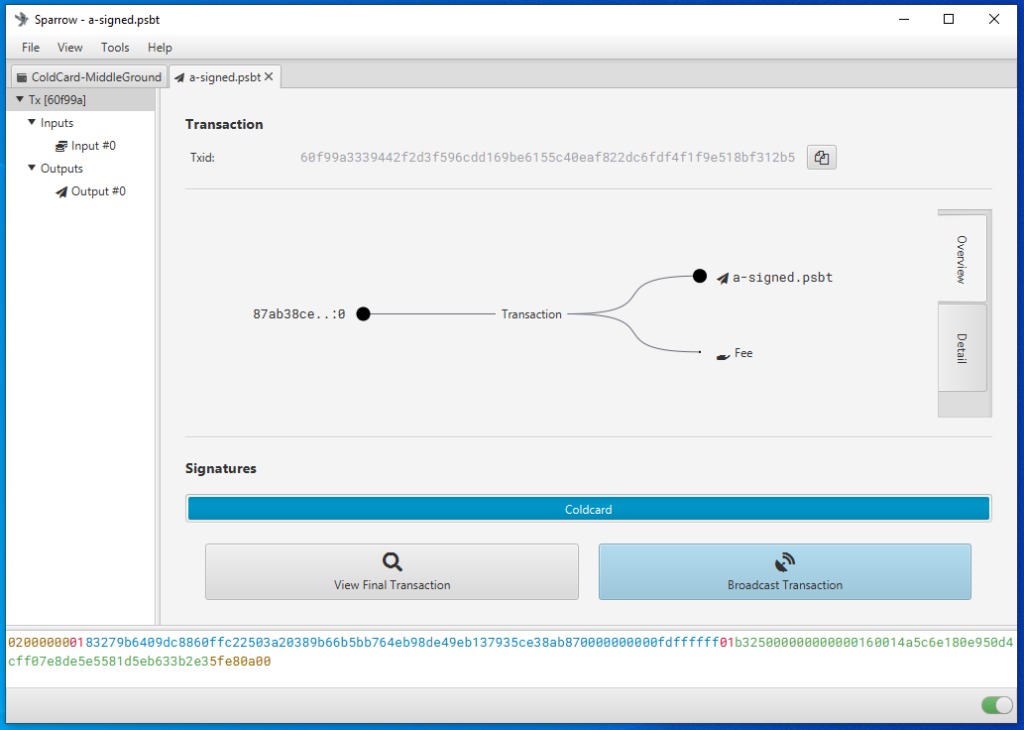
At the time of broadcast you should see the transaction in BitcoinCore as well as receive a notification in Sparrow Wallet. Again, you can copy the transaction ID and paste in your preferred block explorer to watch for confirmations.
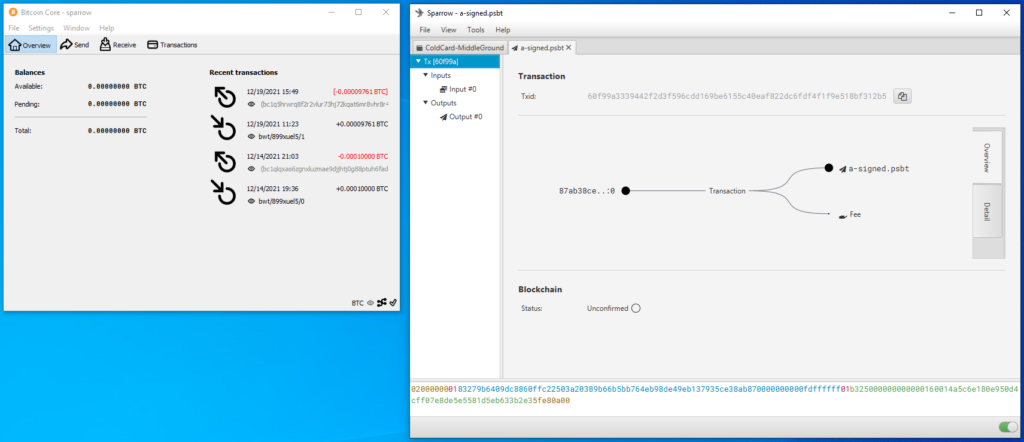
The main point here is that your COLDCARD is the required signing device while your Sparrow Wallet is your interface, transaction builder, & broadcaster. In this configuration, Sparrow Wallet can do many things like catalog addresses and build transactions but without the signature from your COLDCARD, Sparrow Wallet cannot authorize spending of any of your bitcoin.
You should have a good grasp on how to setup your COLDCARD and use Sparrow Wallet as your interface for your mining rewards in a private way through Whirlpool. This way, you are prepared to handle the mining rewards from your BlackBox bundle in a way that preserves your privacy.


